- Clip studio paint как настроить планшет
- Tablet [Windows]
- Clip studio paint как настроить планшет
- Clip studio paint как настроить планшет
- Pen Pressure Settings [Windows]
- Clip studio paint как настроить планшет
- Menu Shortcuts
- CLIP STUDIO PAINT Menu [macOS/Tablet]
- App Settings menu [Smartphone]
- Clip studio paint как настроить планшет
- Interface
Clip studio paint как настроить планшет


Tablet [Windows]
Configures settings related to tablet operation.
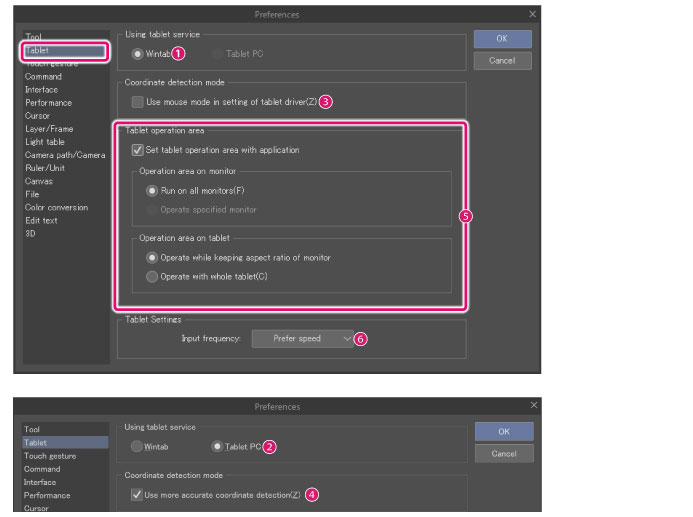
Using tablet service
Configures settings related to the type of tablet in use.
(1) Wintab
Select this option when using a normal tablet.
(2) Tablet PC
Select this option when using a tablet PC.
If you are using a Windows 8 or Windows 10 touch device without a pen, set [Using tablet service] to [Wintab] to switch between touch operation and tool operation when using this software. For details on how to switch, see » Switch between tool operations and touch operations when operating the canvas » .
Coordinate detection mode
(3) Use mouse mode in setting of tablet driver
To display this option, set [Using tablet service] to [Wintab]. This item will turn on when setting the tablet in mouse mode.
(4) Use more accurate coordinate detection
To display this option, set [Using tablet service] to [Tablet PC]. Turning on this item improves pen coordinate detection accuracy, resulting in smoother lines.
Tablet operation area
Configure the display area and tablet operation area of the tablet for Clip Studio Paint.
(5) Set tablet operation area with application
When turned on, the [Display area] and [Tablet operation area] of the tablet are set from Clip Studio Paint.
Set this function when using a tablet without «Operation area on monitor» and «Operation area on tablet» settings. If the driver of your tablet has these settings, configure them on the driver.
Operation area on monitor
Sets the monitor area in which the cursor can move.
Run on all monitors
The cursor can move around the entire area of the connected monitor. This also applies to multi-monitors, independently of how they are arranged.
Operate specified monitor
This setting is available only in a multi-monitor environment. Turning on this item displays the monitor number on the right side. You can change the value with a pop up slider which will display as many values as the number of connected monitors. The area in which the cursor can move is the area around the upper left corner of the specified monitor.
Operation area on tablet
Sets the tablet area in which operation is possible.
Operate while keeping aspect ratio of monitor
The operation area is set so that the monitor is included in the tablet area.
Operate with whole tablet
The aspect ratio is ignored and the whole tablet is set as operation area.
Tablet Settings
(6) Input frequency
Set the amount of information to be sent from your tablet when using it. You can select from [Prefer speed] or [Prefer quality].
Источник
Clip studio paint как настроить планшет


Здравствуйте, помогите пожалуйста.
Windows, модель графического планшета: Gaomon PD1561
Решила воспользоваться пробной версией. После скачивания и регистрации без проблем создала новый холст. Затем сделала несколько пробных линий мышкой, а после воспользовалась комбинацией ctrl+Z.
Пришло время подключать графический планшет. После подключения решила повторить ранее сделанные действия, но уже стилусом. При наводе им на холст курсор просто пропадает, либо застывает на месте, пока я его не отвиду куда-нибудь в сторону (если снова попробовать нарисовать что-нибудь мышкой, то всё исправно). Кисть включена, цвет выбран, слой создан.
Решила ещё кое-что проверить. На вспомогательных кнопках на ГП у меня стоит комбинация клавиш ctrl+Z. Нарисовав линию мышкой, на графическом планшете нажала на кнопку с выставленной данной комбинацией, но результата никакого. (Если нажать на клавиатуре, то всё работает)
Я пришла к выводу, что Clip Studio Paint кажется просто на видит мой ГП.
Впервые сталкиваюсь с такой проблемой.
В чём проблема? Можно её как-то исправить?
Для того, что бы проверит исправность своего графического планшета я воспользовалась Sai2 и Photoshop. Всё работает исправно.
Источник
Clip studio paint как настроить планшет
Pen Pressure Settings [Windows]
Adjusts the pen pressure sensitivity when using a tablet.
Before configuring the pen pressure settings, please connect the tablet and stylus you will use for drawing.
1 Select the [File] menu > [Pen Pressure Settings] to open the [Adjust pen pressure] dialog box.
2 Adjust the pen pressure sensitivity from the [Adjust pen pressure] dialog box.
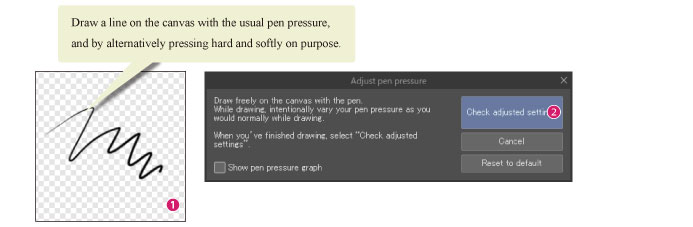
(1) Draw on the canvas with your usual pen pressure, while deliberately increasing and decreasing pen pressure.
(2) Click [Check adjusted settings].
· If the [Show pen pressure graph] is turned on, the [Adjust pen pressure] dialog box will display the pen pressure graph. You can change the pen hardness by adjusting the pen pressure graph curve.
· On Windows, if pen pressure isn’t registering on the canvas or if you cannot click [Check adjusted settings], click [If the “Check adjusted settings” button isn’t clickable even after drawing a line] and follow the instructions.
· When using a Wacom stylus with an iPad or an iPhone, click [If using Wacom Stylus Pen] and follow the instructions on the screen.
3 When the [Check adjusted settings] dialog box appears, you can further adjust the pen pressure sensitivity.

(1) Draw with your usual pen pressure on the canvas. If you are satisfied with the result, proceed to step 3. To further adjust the pen pressure settings, proceed to step 2.
(2) Click [Stronger] or [Lighter] to adjust pen pressure sensitivity. Draw on the canvas again, and adjust the pen pressure to your liking.
(3) Click [Complete].
Dialog box for adjusting pen pressure
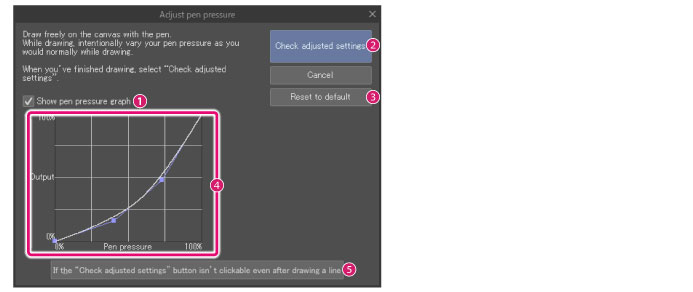
(1) Show pen pressure graph
Turn this on to display the pen pressure graph.
(2) Check adjusted settings
Opens the [Check adjusted settings] dialog box. When this dialog box opens, you can draw with the adjusted pressure on the canvas.
(3) Reset to default
Resets the pen pressure settings to default.
(4) Pen pressure graph
Pen pressure sensitivity will be shown as a curve graph. You can adjust [Pen pressure] and [Output] by dragging the control points of the curve.
You can adjust the pen pressure sensitivity by dragging the control points of the curve.
· Drag a control point to change its position.
· Click on the curve to add a control point.
· To delete a control point, drag it outside the graph.
(5) If the “Check adjusted settings” button isn’t clickable even after drawing a line [Windows]
If the line isn’t reflecting pen pressure, you can change the supported tablet type to improve it. Click this to select the tablet type. This option will not appear if a supported tablet is not connected.
(6) If using a Wacom Stylus Pen [iPad/iPhone]
You can also adjust the settings of supported Wacom stylus pens. When using a Wacom stylus, your dominant hand and hand position can be simultaneously set.
[Check adjusted settings] dialog box
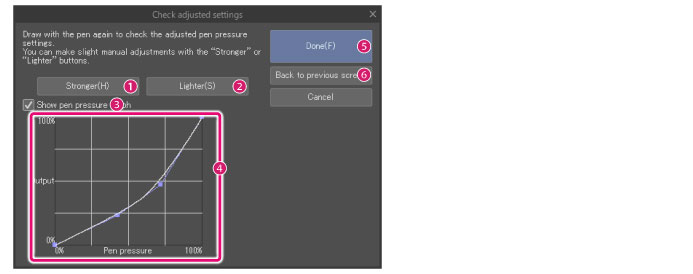
(1) Stronger
The stronger the pressure, the bigger the change. This option is more sensitive to changes in heavy pen pressure.
(2) Lighter
The weaker the pressure, the bigger the change. This option is more sensitive to changes in light pen pressure.
(3) Show pen pressure graph
Turn this on to display the pen pressure graph.
(4) Pen pressure graph
Pen pressure sensitivity will be shown as a curve graph. You can adjust [Pen pressure] and [Output] by dragging the control points of the curve.
You can adjust the pen pressure sensitivity by dragging the control points of the curve.
· Drag a control point to change its position.
· Click on the curve to add a control point.
· To delete a control point, drag it outside the graph.
(5) Complete
Applies the settings in the [Adjust pen pressure] and the [Check adjusted settings] dialog boxes and closes the dialog box.
(6) Back to previous screen
Returns you to the [Adjust pen pressure] dialog box.
Источник
Clip studio paint как настроить планшет
Menu Shortcuts
Menu shortcuts are as follows.
· Blank spaces are items where no shortcut is set.
· For shortcuts, operations in this guide are described based on the Windows version unless otherwise noted. If you are using the macOS or the iPad version, replace the Alt key with the Option key and the Ctrl key with the Command key.
CLIP STUDIO PAINT Menu [macOS/Tablet]
Clip Studio Paint menu shortcuts are as follows.
About CLIP STUDIO PAINT [macOS/Tablet]
Version information [macOS/Tablet]
Shortcut settings [macOS/Tablet]
Ctrl + Shift + Alt + K
Modifier key settings [macOS/Tablet] [PRO/EX]
Ctrl + Shift + Alt + Y
Command bar settings [macOS/Tablet] [PRO/EX]
Tab-Mate Controller [macOS]
Tab-Mate Controller Settings [macOS]
Quick Menu Settings [macOS]
CLIP STUDIO TABMATE [macOS]
CLIP STUDIO TABMATE Settings [macOS]
Tool Rotation Settings [macOS]
Pen Pressure Settings [macOS/Tablet]
Wacom stylus [iPad]
Use QUMARION [macOS]
Import calibration information [macOS]
Export Calibration information [macOS]
Open CLIP STUDIO [macOS/Tablet]
Quit CLIP STUDIO PAINT [macOS]
App Settings menu [Smartphone]
App Settings menu shortcuts are as follows.
Источник
Clip studio paint как настроить планшет
Interface
Adjust settings related to IME controls, interface color scheme, and screen/operations optimized for touch operations.

IME control [Windows/macOS]
Sets the Input Method Editor (IME) settings, if an IME is set up on your device.
(1) Automatically activate IME when editing text layer
When this is turned on, the input method will automatically change to the IME when you type on a Text layer. With this option, you can automatically switch to IME input without manually toggling the input settings, depending on your IME settings.
(2) Automatically switch IME when typing text into panel
When this is turned on, the input mode of the IME will change automatically when you type in a palette. For example in Japanese, the IME mode will toggle to hiragana input when the mouse cursor is moved to the field to input the layer name on the [Layer] palette, or to alphanumeric input when the mouse cursor is moved to type in a numeric field in the [Tool Property] palette.
Color
You can change the color scheme of the Clip Studio Paint main window.
(3) Interface color
Choose the color scheme for the user interface. You can select from [Light color] or [Dark color].

(4) Adjust density
Use the slider to adjust the density of the color.
Touch Operation Settings [Windows]
You can switch Clip Studio Paint screens and operations to be optimized for Windows touch operations.
Changes to settings in [Touch Operation Settings] will be applied when Clip Studio Paint is restarted. For operations when using a slate device, see » Explanation: Operations Using Unique Windows Features » .
(5) Adjust interface for touch operations
Turn this on to optimize the sizes of the buttons, text, and operations for Windows touch operations.
(6) Interface Scaling
When [Adjust interface for touch operations] is turned on, you can adjust the sizes of buttons and text.
You can select from [Small], [Default], or [Large].
Depending on the Windows settings, some items may not be displayed in [Large], [Default], or [Small] modes.
Layout [Windows/Tablet]
Switches the basic layout of Clip Studio Paint palettes according to the device.
(7) Switch to tablet interface
Turn this on to switch the basic palette layout to a layout optimized for tablets.
Turn this off to switch the basic palette layout to a layout optimized for computers.
The basic layout will change if you turn on [Switch to tablet interface].
To save the current placement of the palettes, you should register a workspace. For details, please refer to » Register Workspace [PRO/EX] » .
Status bar [iPad/iPhone]
You can show or hide the status bar.
(8) Display the status bar
Turn this on while Clip Studio Paint is running to display the iPad/iPhone status bar.
Edge keyboard [Tablet/Smartphone]
You can set how the edge keyboard is displayed.
(9) View
You can change how the edge keyboard is displayed by selecting by hiding, using the switch button, or swiping.
Hides the edge keyboard.
Switches how the edge keyboard is displayed. For details on the edge keyboard switch button, see » Show/hide edge keyboard » .
Changes how the edge keyboard is displayed by swiping towards the canvas from the left or right edges of the device. For details, see » Display edge keyboard » .
(10) Modifier Key [Android/Chromebook]
The Edge keyboard can be set to use modifier keys.
A modifier key is only active while you hold it down. This is recommended for drawing with your finger.
Once you press a button, it will remain pressed. Press it again to return it to its original state. This is recommended for drawing with a pen.
Источник


