- Tutorial: Configure CLion on Windows
- MinGW
- MinGW-w64 (64- and 32-bit)
- MinGW (32-bit only)
- Cygwin
- Windows Subsystem for Linux
- Microsoft Visual C++
- MSVC compiler
- Clang-cl compiler
- MSVC debugger
- Clang compiler on Windows
- Set up the Clang compiler for MinGW
- Qt/C++ — Урок 068. Hello World с использованием системы сборки CMAKE в CLion
- Настройка IDE CLion
- CMakeLists.txt
- main.cpp
- Open and create projects
- Open a project
- Create a new project
- New project example
- Create a CMake project from sources
- Work with a monorepo
Tutorial: Configure CLion on Windows
On Windows, configuring CLion requires setting up the environment: Cygwin, MinGW, WSL, or Microsoft Visual C++. You can have several environments installed on your system and create separate CLion toolchains for each of them. As a determining part of a toolchain, the environment provides C and C++ compilers, the make utility, and the debugger (in case of using default tools).
For details on Remote Host toolchains, see Full Remote Mode.
MinGW
MinGW-w64 (64- and 32-bit)
Download and run the MinGW-w64 installer. It provides both 64- and 32-bit options.
In the MinGW-w64 installation wizard, make sure to select the required architecture. Note that the default suggested option is 32-bit.

Once the installation is finished, open CLion and go to File | Settings | Build, Execution, Deployment | Toolchains .
Choose the MinGW toolchain that you want to configure or create a new one using the icon.
CLion will attempt to detect the MinGW installation automatically. Check the detection result in the Environment field, and specify the path manually if required.
Wait until the tools detection finishes. 
Select the Debugger : you can use either MinGW-w64 GDB or a custom GDB binary.
Click Apply when all the tools are set correctly.
MinGW (32-bit only)
Although MinGW-w64 provides both 64- and 32-bit options, you can also install MinGW, the 32-bit-only version.
In the MinGW installation wizard, select the following packages from the Basic Setup list: mingw-developer-tool , mingw32-base , mingw32-gcc-g++ , mingw32-msys-base . 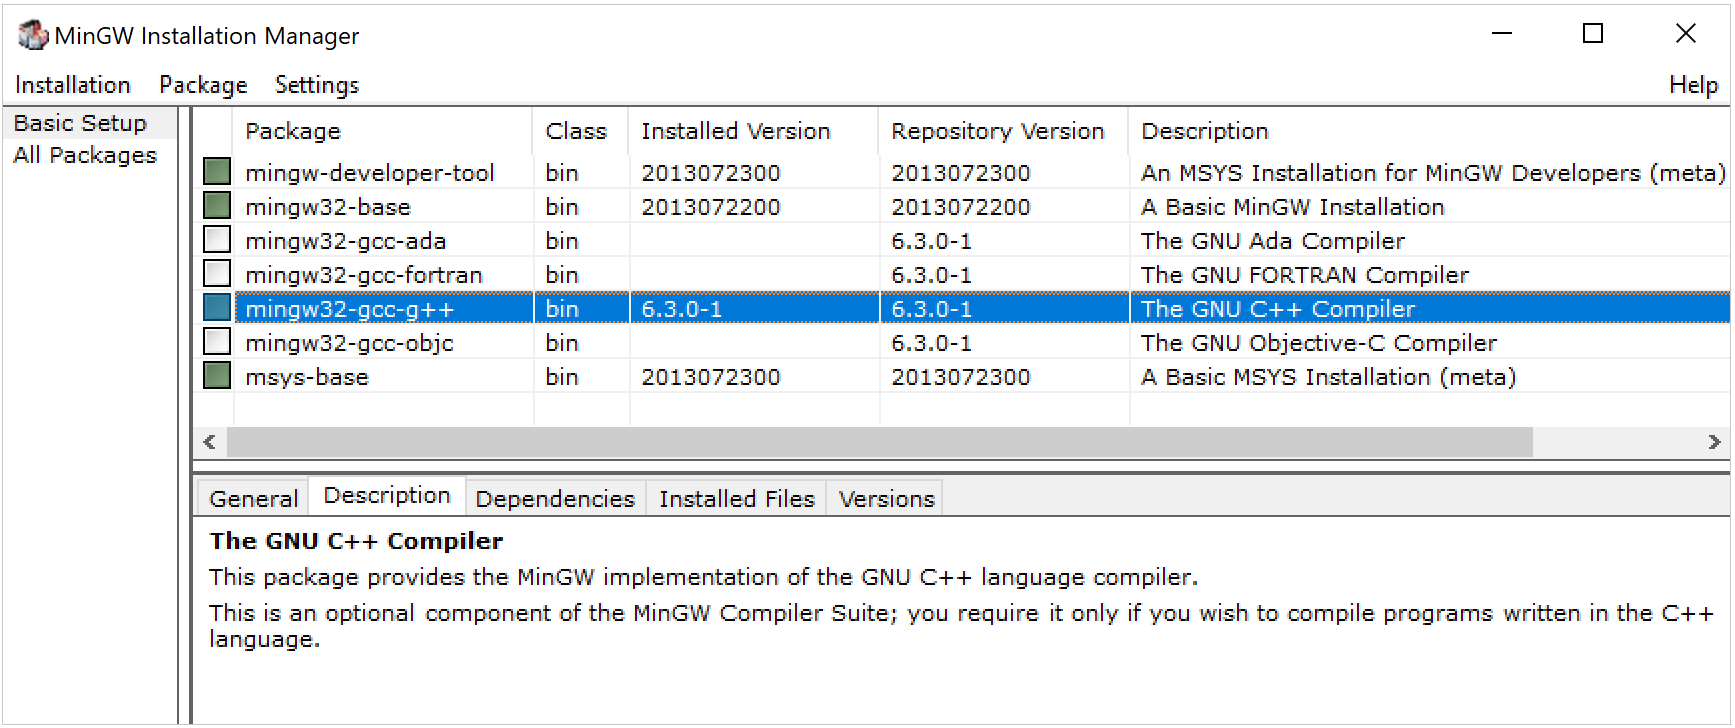
When configuring the toolchain, if CLion cannot detect compilers or make , double-check the installed packages in MinGW Installation Manager .
In the Debugger field, you can choose between the bundled GDB, MinGW GDB, or your custom GDB executable.
The recommended option is bundled GDB, since it is guaranteed to include Python support required for CLion data renderers.
Cygwin
Download the Cygwin installer, version 2.8 or later.
Run the installer and select the following packages:
- gcc-g++
- make
- gdb
To select a package, type its name in the Search field and set the version in the New column: 
Once the installation is finished, open CLion and go to File | Settings | Build, Execution, Deployment | Toolchains . Choose the toolchain that you want to configure.
Select Cygwin from the Environment list. CLion will attempt to detect the Cygwin installation automatically. Check the detection result, and specify the path manually if required.
Wait until the tools detection finishes, and click Apply . 
Windows Subsystem for Linux
You can use WSL, Windows Subsystem for Linux, as your working environment in CLion on Windows 10 (starting the Fall Creators Update version 1709, build 16299.15).
WSL toolchain enables you to build projects using CMake and compilers from Linux and run/debug on WSL without leaving CLion running on your Windows machine.
Refer to our WSL guide for details on setting up WSL on your system and configuring WSL toolchains in CLion.

Microsoft Visual C++
Install Visual Studio 2013, 2015, 2017, or 2019 on your system.
In CLion, go to File | Settings | Build, Execution, Deployment | Toolchains .
Click and select Visual Studio from the list of toolchain templates.
Check the Environment field. CLion will attempt to automatically detect the installed Visual Studio distribution. If the detection fails, set the path to Visual Studio manually.
If required, specify the Architecture ( x86 , amd64 , x86_arm , or another), Platform ( store , uwp , onecore , or leave it blank), and Version . To build your project for the selected architecture, CLion will call the script to configure the environment with the specified parameters.
If the version of your compiler toolset is earlier than the version of your Visual Studio installation, pass it in the Version field via the vcvars_ver flag, for example, -vcvars_ver=14.16 .
Wait until the tools detection is finished: 
MSVC compiler
CLion supports the Microsoft Visual C++ compiler that ships with Visual Studio 2013, 2015, 2017, and 2019.
Note that msbuild is not supported: CLion runs CMake with the NMAKE generator instead.
For the case when your code includes MSVC extensions, CLion provides the support for:
__uuidof , __forceinline , __unaligned , and __alignof keywords;
pointer type attributes: __ptr32 , __ptr64 , __uptr , __sptr ;
MSVC built-in data types: (unsigned) __int8 , (unsigned) __int16 , (unsigned) __int32 , (unsigned) __int64 , __wchar_t ;
additional format specifiers, such as %I32 and %I64 ;
the clang ‘s -fms-extensions flag.
Clang-cl compiler
As an alternative compiler, you can use clang-cl- the MSVC-compatible compiler driver for Clang. CLion supports clang-cl version 8.0 and later.
Install clang-cl from the LLVM site or along with the Visual Studio tools.
When installed from the LLVM site, the clang-cl binary can be found at the standard location C:\Program Files\LLVM\bin\clang-cl.exe for the 64-bit version or C:\Program Files (x86)\LLVM\bin\clang-cl.exe for the 32-bit version.
In CLion, go to File | Settings | Build, Execution, Deployment | Toolchains and select the Visual Studio toolchain that you want to configure, or create a new one.
Point the C Compiler and C++ Compiler fields to clang-cl.exe . CLion will suggest the paths detected automatically. 
Note that currently the -T clangcl options can’t be picked up if the bundled CMake is in use along with the Visual Studio toolchain setup (CPP-18848).
MSVC debugger
The MSVC toolchain debugger is implemented on top of LLDB, and it can work with native visualizers from the Visual Studio installation or from your project.
To enable native visualizers support and set the desired diagnostics level, select the Enable NatVis renderers for LLDB checkbox in Settings | Build, Execution, Deployment | Debugger | Data Views | C/C++ : 
CLion automatically generates one-line summaries for all structures not covered by Natvis and highlights them to increase readability. Also, the built-in formatters provide visualization for wide/Unicode strings ( wchar_t , char16_t , char32_t ).
If you have custom native visualizers in your project, CLion will use them as well. 
Clang compiler on Windows
With CMake 3.15, it has become possible to use the Clang compiler on Windows with the MinGW-w64/MinGW toolchain.
However, the LLVM Clang for Windows is built using Microsoft Visual Studio, and all the built-in macros and include search paths are set up for use with Visual Studio. So if you take Clang from the LLVM repository, it will not work correctly when configured with the MinGW toolchain. One of the possible workarounds is described below.
Set up the Clang compiler for MinGW
Download the following packages with the pacman tool (use the pacman -S package_name command):
Источник
Qt/C++ — Урок 068. Hello World с использованием системы сборки CMAKE в CLion
Напишем «Hello, World. « на Qt в IDE CLion с использованием системы сборки CMAKE . Акцент на то, что проект разрабатывается в IDE CLion был сделан потому, что для работы с проектом необходимо сделать небольшую настройку для работы с CMAKE .
В результате получим следующее приложение:

Настройка IDE CLion
После того, как Вы создатите проект, необходимо его настроить для работы с библиотекой Qt необходимо настроить путь к этой библиотеке через аргумент CMAKE_PREFIX_PATH.
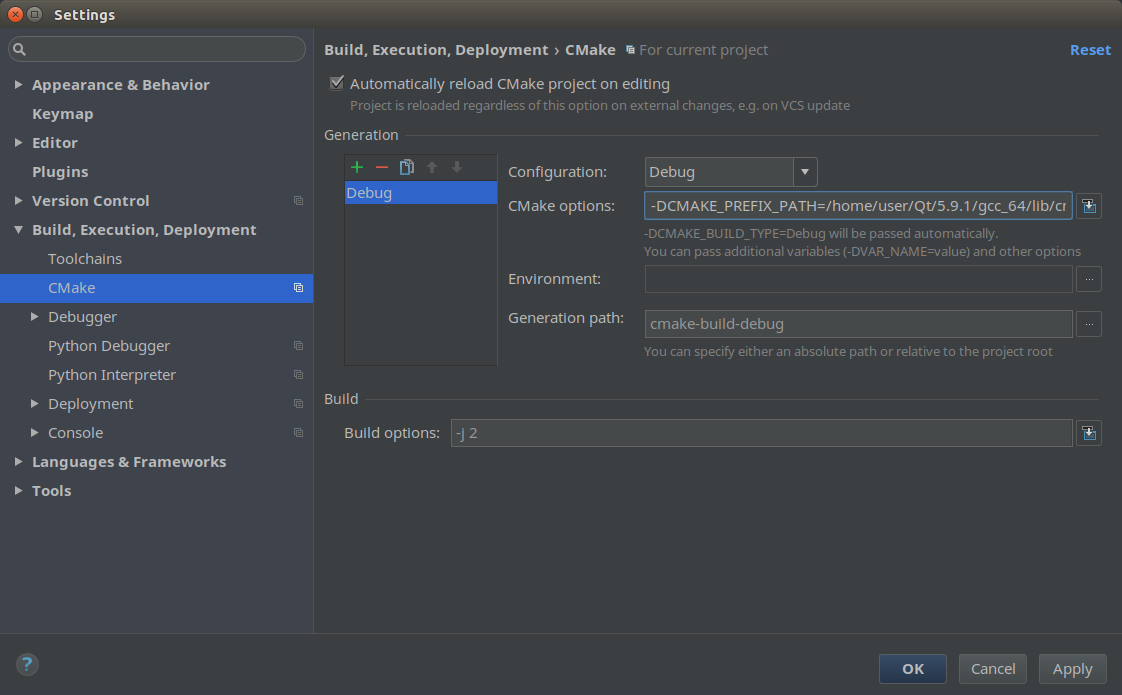
Для этого перейдите в настройки IDE. File -> Settings -> Build, Execution, Deployment -> CMake
Далее в CMake Options через CMAKE_PREFIX_PATH указываем путь к библиотекам Qt для CMAKE. Полный путь к библиотекам может быть следующим:
Вся запись префикса будет следующей:
В настройках же это окно будет выглядеть следующим образом.
CMakeLists.txt
В CMakeLists.txt кроме информации добавленной по умолчанию необходимо будет добавить поиск и подключение библиотек Qt через использование функций find_package и target_link_libraries.
main.cpp
В остальном же написание первого HelloWorld будет сходным разработкой под Qt Creator.
При разработке под Qt Creator с использованием системы сборки CMake не понравилось то, что при добавлении файлов в проект Qt Creator не прописывает их в CMakeLists.txt, то есть файлы создаются, но не включаются в проект. Также имеет ещё ряд небольших неудобств, хотя IDE CLion ещё далеко по удобству в работе с очень специфическим функционалом Qt, хотя бы взять автодополнение макросов Qt, автоматическое создание недостающих участников класса (переменные и методы) по этим макросам, работу с дизайнером и т.д.

Рекомендуем хостинг TIMEWEB
Рекомендуемые статьи по этой тематике
Источник
Open and create projects
Open a project
To open an existing CMake project in CLion, do one of the following:
Select File | Open and locate the project directory. This directory should contain a CMakeLists.txt file.
Select File | Open and point CLion to the top-level CMakeLists.txt file, then choose Open as Project .
Select File | Open and locate the CMakeCache.txt file, then choose Open as Project .
When you open a project for the time, CLion displays the CMake Profiles dialog with the initial configuration. You can edit the profile or close the dialog without editing. To disable this initial profile configuration, go to Settings / Preferences | Advanced Settings and clear the corresponding checkbox: 
Create a new project
If no project is currently opened in CLion, click New Project on the Welcome screen. Otherwise, select File | New Project on the main menu.
In the New Project dialog that opens, select the target type of your project (executable or library), and the language to be used (pure C or C++).
CLion will generate the top-level CMakeLists.txt file based on the provided settings. See CMakeLists.txt file templates for details.
New project example
As an example, let’s create a simple shared library assuming the C++14 standard.
Click New Project from the Welcome screen or the File menu.
In the left pane, choose C++ Library .
In the right pane, set the location and the name of your project. You can type the path in the text field or click to browse for the desired folder.
Click the Language standard control and select the standard from the drop down list ( C++14 in our example).
Use the Library type control to select the library type ( shared in our example). 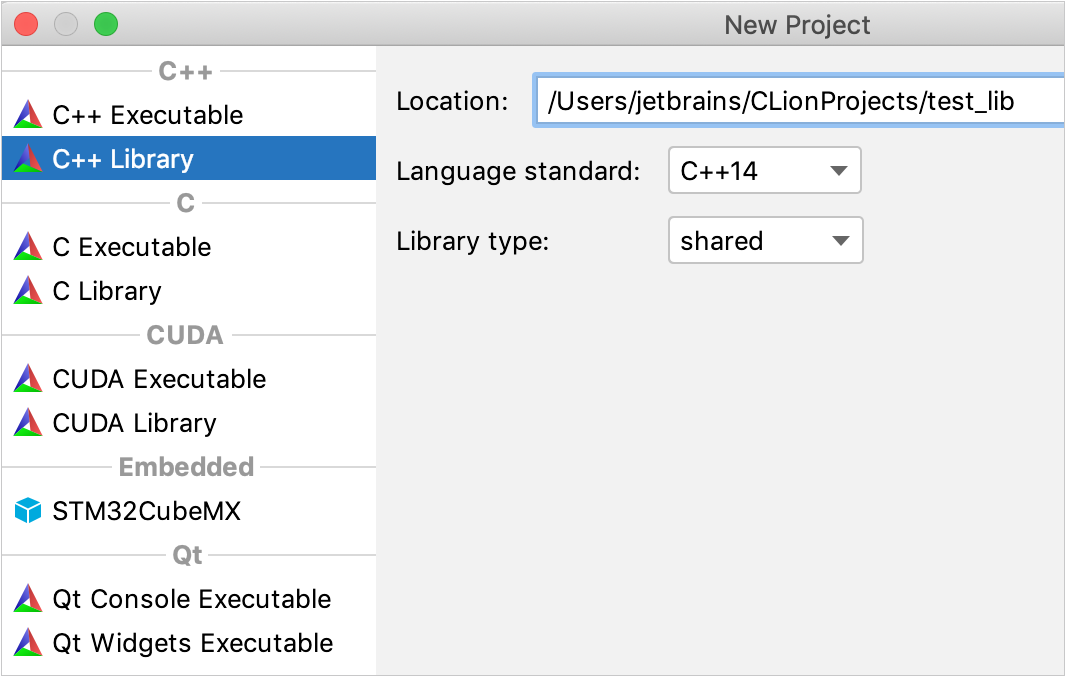
Click Create to create a project and generate the corresponding CMakeLists.txt file: 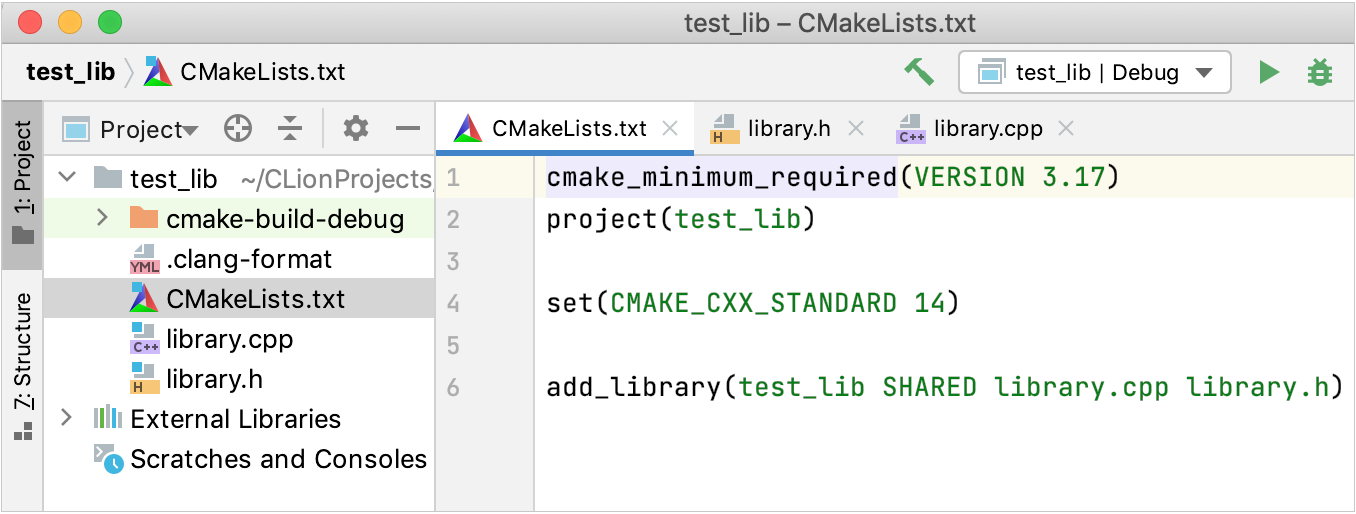
You can set up a CMake profile to be used for all new projects by default ( File | New Projects Setup | Settings for New Projects | Build, Execution, Deployment | CMake ).
Create a CMake project from sources
To work with non-CMake sources in CLion, you can convert them into a CMake project structure.
On the main menu, choose File | Open and select the project root folder.
Open a source file in the editor.
If there is no top-level CMakeLists.txt file, CLion will suggest creating it:

The Create CMakeLists.txt action appears only when there is no CMakeLists.txt under the project root, disregarding the subfolders’ CMakeLists.txt files.
If there is a CMakeLists.txt file under the root, the only available action will be Select CMakeLists.txt .
In the Create CMakeLists.txt dialog, specify the following:
Select project files — select the files to be imported as project files. Use the subdirectories checkboxes to import their entire contents or clear the checkboxes to import the contents selectively.
User Include Directories — select the directories to be included in the project and specified in the CMake include_directories command. CLion includes a directory automatically when it contains at least one header file, if it is named include , or when it has subdirectories that contain header files only.
Note that directories not selected in the Select Project Files pane are not presented in the User Include Directories list — select them first, and then the available include directories will appear in the list.

Work with a monorepo
Monorepos are repositories that combine multiple projects, usually without a top-level CMake script. Instructions below describe how to work with a monorepo in CLion using LLVM Project as an example.
Call File | Open and point CLion to CMakeLists.txt in the required subdirectory. For the case of LLVM, select llvm-project/llvm/CMakeLists.txt .
In the dialog that opens, click Open as Project .
Go to Settings/Preferences | Build, Execution, Deployment | CMake and use the CMake options field to add the sub-projects that you want to build additionally.
For example, to add clang and clang-tools-extra , specify -DLLVM_ENABLE_PROJECTS=“clang;clang-tools-extra” : 
Project reload should perform successfully at this point.
To be able to view the entire repository in the Project tree, change the project root: call Tools | CMake | Change Project Root from the main menu and select the top-level repository folder, llvm-project .
We also recommend that you build the project. This way, resolve will work on the entire codebase, including the parts generated at build time.
Источник


