- Как отлаживать файлы Arduino с помощью Code :: Blocks?
- Решение
- Codeblocks arduino ide как настроить
- Guide to setting up Arduino development environment with CodeBlocks on a Linux box
- 1. Install necessary packages
- 2. Get and extract the Arduino addon files for CodeBlocks
- 3. Modify the CodeBlocks project wizard configuration script
- 4. Done
- 11 Responses to Guide to setting up Arduino development environment with CodeBlocks on a Linux box
- CodeBlocks Arduino IDE
- Download | Screenshots | Changelog | Forum
- Features:
- Screenshots:
- Download CodeBlocks Arduino IDE (Windows build)
- Installation Guide (for Linux)
- Changelog:
- 9 Responses to CodeBlocks Arduino IDE
Как отлаживать файлы Arduino с помощью Code :: Blocks?
Я разрабатываю проект Arduino, и мне нужно протестировать его в тестовой среде, где я симулирую показания датчиков. Я делаю это в C ++, и я написал (очень грубый) порт проекта в C ++. Работа в Code :: Blocks и компиляция с помощью mingw
Все работает нормально, но я не могу отладить его, так как Code :: Blocks / gdb не распознает файлы .ino как правильные исходные файлы и поэтому не прерывается на точках останова. Для отладки кода мне нужно скопировать и вставить свой код в main.cpp
что-то вроде неудобно
- Как мне сообщить Code :: Blocks / gdb, что finestra.ino — это исходный файл, который нужно преобразовать в файл cpp?
- Есть ли лучшие решения для тестирования и отладки моего кода Arduino?
Решение
Я отвечаю за всех, кому это может понадобиться в будущем.
То, что я пробовал, так это две вещи:
- Существует форк Code :: Blocks, который, как считается, имеет дело с Arduino. Домашняя страница http://arduinodev.com/codeblocks/ . Все необходимые инструменты должны быть там (я все еще должен попробовать это полностью). Вам нужна вторая IDE Code :: Blocks, установленная на том же компьютере, но это разумный компромисс
- Я обновил свой gdb.exe до версии 7.7. С этими точками останова в файлах .ino работают, даже если и не идеально (программа останавливается на точке останова, но не показывает вам, где она находится, вы должны найти ее в журналах, что довольно неудобно, но, по крайней мере, работает !)
В любом случае возможна отладка, хотя и с недостатками
Источник
Codeblocks arduino ide как настроить


Arduino — «красивое» устройство, история которого началась с 2005 года, на сегодня выпускается серийно от 100 до 3000 в день на различных фабриках и стоит не малых кровных денег. Arduino имеет свою среду разработки Arduino IDE, которая, к сожалению, не лишёна недостатков.
Если Ваши проекты, на этом устройстве, заканчиваются лишь миганием лампочек, включение выключение релюшек, тогда нет смысла читать эту тему.
Лишь после личного опыта возни с этой средой разработки и траты своего времени, я решил убрать эти грабли с привязным топором и уберечь свои и чужие нервы.
Причин этому много: низкая скорость компиляции, крайне убогий интерфейс, малая функциональность, вернее, её отсутствие, библиотеки — это громко сказано и, самое раздражающее, создание новых окон для каждого скетча.
Заменить опасные грабли вариантов много, я взял CodeBlocks.
CodeBlocks 
Как только я задумал идею, сразу притормозил . Это надо скачать чистую среду настраевать её под Arduino. Не тут то было и Google меня спасет не в первый раз.
CodeBlocks Arduino Edition – out-of-box Arduino IDE for more demanding developers
1. Качаем CodeBlocks Arduino Edition for Windows или CodeBlocks Arduino Addons for Linux (Setup Guide)
2. Распаковать. Например в «C:\CodeBlocks»
3. Запускаем C:\CodeBlocks\codeblocks.exe
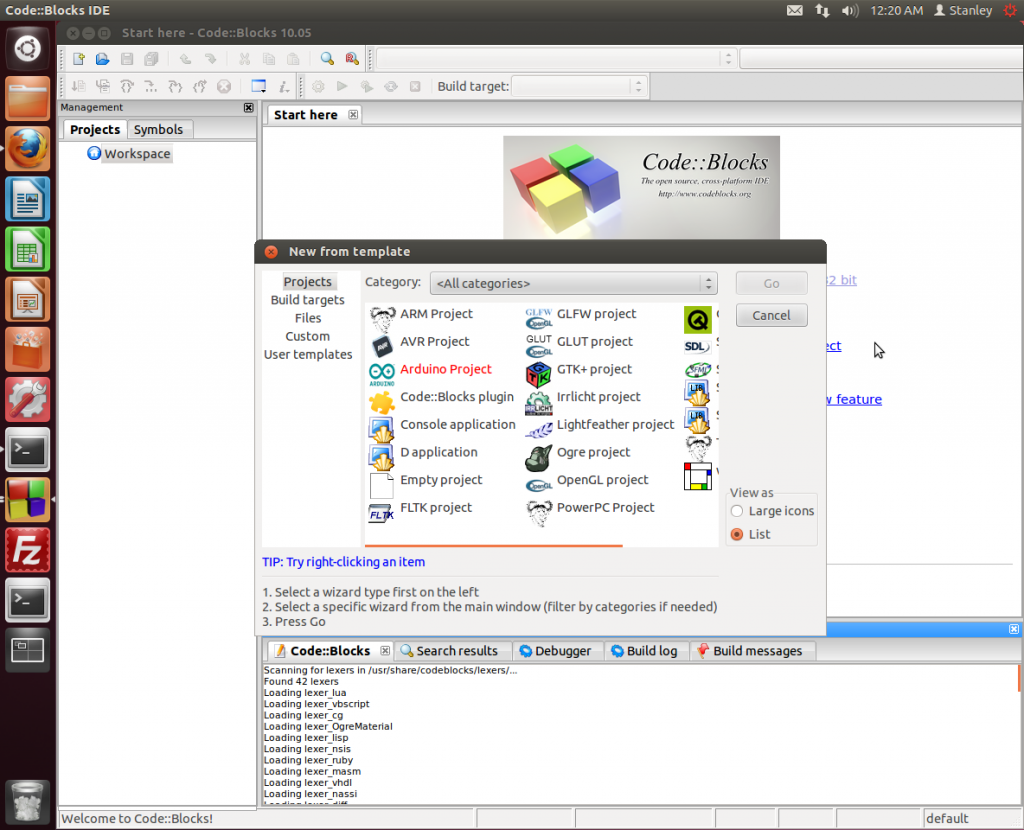
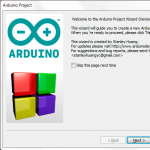
4. Меню: File -> New -> Project.
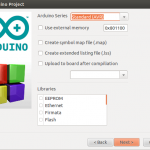
5. Выбираем «Arduino Project» -> Go -> (галочку не ставим) Next
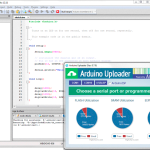
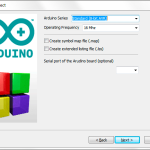
6. Для тестового проекта оставляем все как есть только в пустом селектор выбираем COM-порт нашей Arduino. У меня COM-2
7. Вводим название проекта, его путь к папке -> Next
8. В создном проекте На панели ищем Build Target -> выбираем тип своей Arduino (У меня Arduino Nano 328)
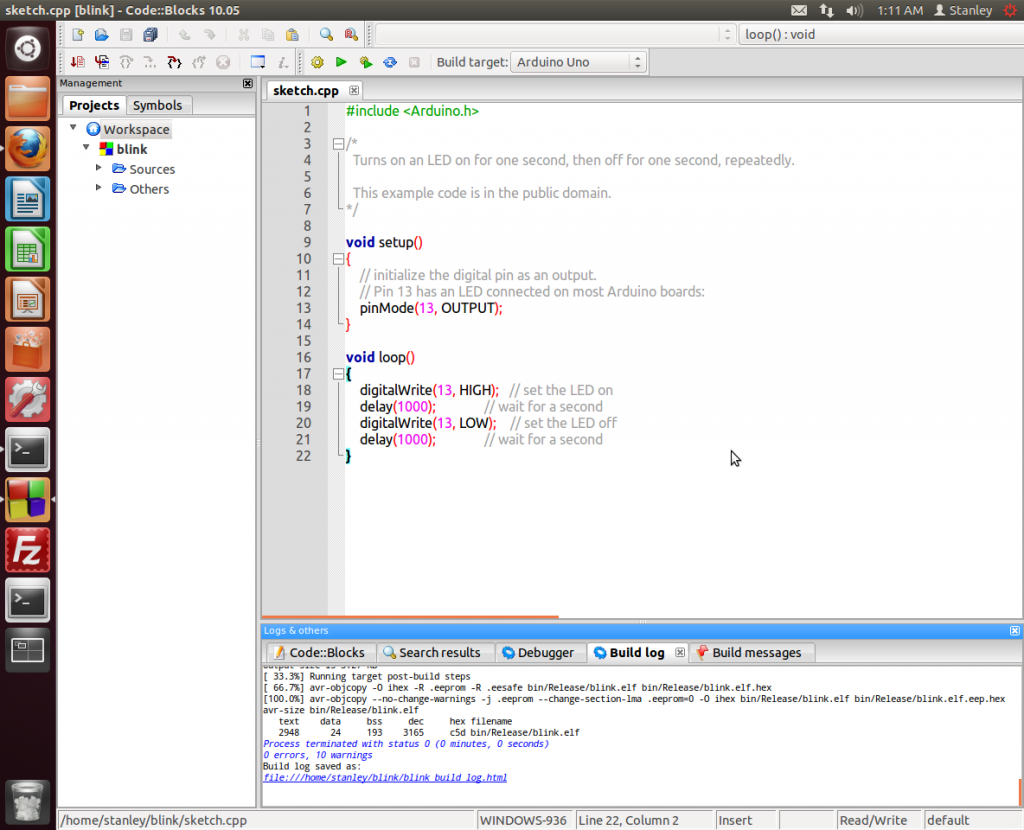
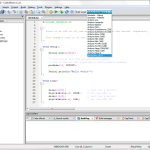
9. Посмотреть Код -> Worckspace -> Имя проекта -> Sources -> Scketch.cpp (Узнаем до боли знакомый глазу код миганием светодиода)
10. Меню: Build -> Build (Смотрим нет ли ошибок компиляции)
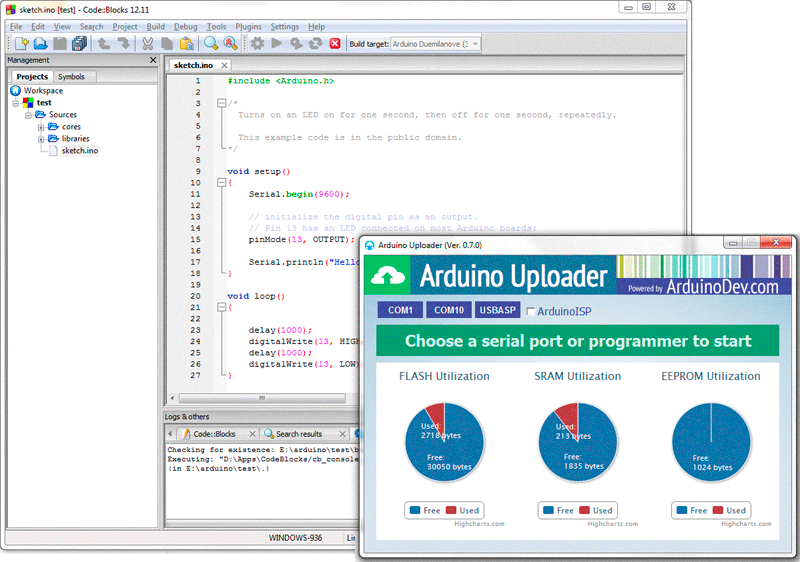
11. Меню: Tools -> USB Upload ( Flash )
12. Готово!!
Может сразу не заработает понадобятся MinGW — Minimalist GNU for Windows. При установке выберем компилятор только для С.
Теперь переносим свои проекты на это чудо и радуемся. )))
Библиотеки:
Очень хороший документ по созданию своей библиотеки в среде CodeBlocks Lib_codeblocks.pdf
Пожже расскажу как сделать рус, работать в отладке.
Источник
Guide to setting up Arduino development environment with CodeBlocks on a Linux box
 After maintaining CodeBlocks Arduino Edition, which is an out-of-box distribution for Windows only, for several months, I finally got everything to work on Linux. Thanks to Ubuntu that makes life a lot easier on Linux, I have the chance to get this done in one day. I put all my addons and tweaks on CodeBlocks IDE into a single downloadable package, so it’s easy for everyone to get this done from scratch. Here is a guide showing all the steps for setting up a productive Arduino development environment with CodeBlocks on a Linux box.
1. Install necessary packages
The packages we need to install are:
- Code::Blocks (the open-source IDE, why on earth do they like two commas in between)
- G++ (C++ compiler for host machine, used for building simulation target)
- GCC AVR (C/C++ compiler for AVR)
- GCC C library for AVR
- AVRDUDE (the AVR download/upload utility)
- CuteCom (a serial terminal program)
Yes, you don’t need to install Arduino IDE package. Hoping this won’t piss off the Arduino IDE developers. You can use Ubuntu’s Software Center to search and install all these packages, or you can simply pull in all these packages with one command line:
After a confirmation prompt, these packages will be fetched and installed like a charm.
2. Get and extract the Arduino addon files for CodeBlocks
There are two ways to get the package which I put all my addon and tweaks in, either by downloading the release file or checking out latest files from subversion. You need to put all the files in
/.codeblocks which is the user data directory of CodeBlocks.
As an alternative to the aboves, you can check out the latest code directly into .codeblocks directory if you have subversion installed.
3. Modify the CodeBlocks project wizard configuration script
This has to be done by an text editor. The file to be modified is located at:
You need to sudo to modify this file. Insert following line in the range of function RegisterWizards().
4. Done
Yes it’s done. Now launch CodeBlocks, click Create Project and you will see Arduino Project marked in red. You can then create a ready-to-build Arduino project by proceeding with the project wizard.
If you have any problems, please post them in this forum and let me know.

11 Responses to Guide to setting up Arduino development environment with CodeBlocks on a Linux box
I’d use a shield, comes with a library. I extracted to / home / me / .codeblocks / arduino / libraries but I can not import the class, how do you do?
The simplest way is to add the library cpp file to your project and place the library files in the same directory of your sketch.
Thank you. Another question, if i’ve not selected “Send when build” at the begining of the project, how can i upload my sketch ? (is there a button ?)
i’m not able to build anything, i’ve followed your instructions on Ubuntu 12.04.
In Simulator Debug mode :
||=== Demo, Simulator – Debug ===|
/home/vincent/.codeblocks/ardusim/include/util/delay.h|90|attention : #warning “Compiler optimizations disabled; functions from won’t work as designed” [-Wcpp]|
/usr/include/x86_64-linux-gnu/sys/types.h|198|erreur: conflicting declaration ‘typedef long int int64_t’|
/home/vincent/.codeblocks/ardusim/arduino/cores/stdint.h|33|erreur: ‘int64_t’ has a previous declaration as ‘typedef long long int int64_t’|
/usr/include/unistd.h|268|erreur: conflicting declaration ‘typedef __intptr_t intptr_t’|
/home/vincent/.codeblocks/ardusim/arduino/cores/stdint.h|66|erreur: ‘intptr_t’ has a previous declaration as ‘typedef int intptr_t’|
||=== Build finished: 5 errors, 0 warnings ===|
/home/vincent/.codeblocks/ardusim/include/util/delay.h|90|attention : #warning “Compiler optimizations disabled; functions from won’t work as designed” [-Wcpp]|
/usr/include/x86_64-linux-gnu/sys/types.h|198|erreur: conflicting declaration ‘typedef long int int64_t’|
/home/vincent/.codeblocks/ardusim/arduino/cores/stdint.h|33|erreur: ‘int64_t’ has a previous declaration as ‘typedef long long int int64_t’|
/usr/include/unistd.h|268|erreur: conflicting declaration ‘typedef __intptr_t intptr_t’|
/home/vincent/.codeblocks/ardusim/arduino/cores/stdint.h|66|erreur: ‘intptr_t’ has a previous declaration as ‘typedef int intptr_t’|
||=== Build finished: 10 errors, 0 warnings ===|
When i do “Build and run” on the “Arduino Uno” target, i have no error (only warnings) but the console say :
RegisRegisterWizard(wizProject, _T(“arduino”), _T(“Arduino Project”), _T(“Embedded Systems”));terWizard(wizProject, _T(“arduino”), _T(“Arduino Project”), _T(“Embedded Systems”));/media/Donnees/Divers/Projets/Arduino/Code/Demo/bin/Release/Demo.elf: 1: /media/Donnees/Divers/Projets/Arduino/Code/Demo/bin/Release/Demo.elf: Syntax error: “(” unexpected
Process returned 2 (0x2) execution time : 0.006 s
Press ENTER to continue.
And no program could be upload on my board =(
To upload the compiled HEX, click on tools menu and choose USB Upload. You may need to set upload port in build options’ “Custom Variables” page.
For “Arduino Uno”, the key “UPLOAD_PORT” is set to “/dev/ttyUSB0”. How can i check if it is the right ?
With this parameters, i get:
[some things]
Script/function ‘edit_startup_script.script’ registered under menu ‘&Settings/-Edit startup script’
Opening /media/Donnees/Divers/Projets/Arduino/Code/Demo/Demo.cbp
done
Launching tool ‘USB Upload (Flash)’: /usr/bin/avrdude -C /etc/avrdude.conf -V -p -carduino -P -b -D -Uflash:w:/media/Donnees/Divers/Projets/Arduino/Code/Demo//Demo.elf.hex:i (in /media/Donnees/Divers/Projets/Arduino/Code/Demo)
stderr>
stderr> avrdude: no programmer has been specified on the command line or the config file
stderr> Specify a programmer using the -c option and try again
stderr>
stderr>
stdout>
Tool execution terminated with status 1
From the command line, I see upload port is not specified. Normally it should be followed after -P.
Nice work. But i just follow all your recommandations on ‘how to seting up IDECode::blocks for aduino’, make all internal settings for my 2560, and try to build and run … and got strange errors with the blinking led sample :
…/bin/Release/Arduino tests.elf: Syntax Error: “(” unexpected
Process returned 2 (0x2) execution time : 0.011 s
Press ENTER to continue.
and console say :
Launching tool ‘USB Upload (Flash)’: /usr/bin/avrdude -C /etc/avrdude.conf -V -patmega2560 -carduino -P/dev/ttyACM0 -b57600 -D -Uflash:w:/home/trasher/Bureau/Arduino Docs/Code/Projet Tests divers/Arduino Tests//bin/Release/Arduino Tests.elf.hex:i (in /home/regis/Bureau/Arduino Docs/Code/Projet Tests divers/Arduino Tests)
stderr> avrdude: stk500_recv(): programmer is not responding
stderr>
stderr> avrdude done. Thank you.
stderr>
stderr>
stdout>
Tool execution terminated with status 1
I do some modifications … put a translation file, restart, configure. And now it work … The code upload and run well, still with the error message about the ‘unexpected “(“‘.
Источник
CodeBlocks Arduino IDE
Download | Screenshots | Changelog | Forum
CodeBlocks Arduino IDE is a customized distribution of the open-source Code::Blocks IDE enhanced for Arduino development. It provides more demanding software developers with everything a modern IDE should have including code foldering, code completion, code navgiation, compiling as well as uploading for Arduino. With a dedicated project wizard, it’s easy create a ready-to-go Arduino project. The distribution integrates latest Arduino core files, standard Arduino libraries, AVR toolchain, Arduino Builder, a serial terminal and most interesting, an API-level Arduino simulator (under development).
Features:
- dedicated project wizard for Arduino development
- integrated Arduino core files and libraries
- compiled core files cached for faster compiling speed (comparing to original Arduino IDE)
- integrated pre-configured AVR compiler toolchain
- popular Arduino boards supported as build targets
- uploading HEX to Arduino boards (Leonardo supported) by running the built target
- Arduino API-level simulator (very early stage) integrated (as a build target)
Screenshots:
Download CodeBlocks Arduino IDE (Windows build)
Installation Guide (for Linux)
Changelog:
Release 20140626
- Updated to CodeBlocks 13.12
- Minor bugfix
Release 20130704
- Updated with Arduino 1.0.5 core and library files
- Minor bugfix
Release 20130428
- Improved Arduino Builder integration with CodeBlocks (no need to close the window after uploading)
- Updated several Arduino libraries (OBD, MPU6050, MultiLCD)
- Compile with -O2 instead of -Os when target MCU has 64KB or larger program memory
Release 20130402
- Fixed a minor Microduino compiliation issue
- Fixed stop running button not terminating simulation process bug
- All compiled files now stored in build directory in project path
- Improving user experience of project wizard in several aspects
- Re-added “Simulator – Debug” target for debugging in simulation
Release 20130329
- Automatically building referenced Arduino libraries
- Built Arduino core files now cached for improving project building speed
- Fixed issues with Microduino
- Fixed a bug causing wrong board type choice on uploading
- Arduino Builder 0.8.3
Release 20130324
- Updated Arduino core and library files to 1.0.4
- Arduino Builder 0.8.1
Release 20130322
- Including project folder in include file search path by default
- Arduino Builder 0.8.0
Release 20130319
- Added opening serial terminal right after uploading
- Updated Arduino Uploader to 0.7.1
Release 20130311
- Added MCU operating frequency option (16/12/8 Mhz)
- Added support for Microduino Core+ (ATMega644PA)
- Updated Arduino Uploader to 0.7.1
Release 20130308
- Windows XP compatibility issue fixed
- Arduino Uploader updated
- Added “-lm” option in linking command line
Release 20130302
- Using Arduino Uploader GUI version for uploading
- Changed default sketch file extension from .cpp to .ino
Release 20130224
- Fixed processing execution path bug (when the path has whitespace)
- Simulation target changed to ATMega2560 from ATMega328
- Serial UART simulation (4 serial UARTs) with hardware serial port on PC
Release 20130219
- Arduino Uploader updated to 0.5.4
- Run button (also Compile and Run menu) on IDE now uploads the compiled sketch to Arduino
Release 20130214
- Based on latest CodeBlocks 12.11
- Added build targets of Arduino Leonardo, Esplora and Micro
- Integrated Arduino Uploader for uploading (supporting Leonardo)
- Fixed Arduino MEGA 2560 uploading issue
- Added “Upload to Arduino” menu item in Tools menu and allowing choosing among available serial ports for uploading
Release 20120613
- Added USBASP upload with chip encryption
- Minor fixups
- Updated GCC 4.7
Release 20120604
- Fixed SD card library issue with Arduino MEGA
- Defining USE_XXXX=1 in project settings to enable reference to a library
- Updated OBD-II library
Release 20120525
- Updated Arduino core files to version 1.0.1
Release 20120516
- Fixed simulator target build error with sample project
- Fixed wrong baudrate setting for ATmega168 based boards
- Updated OBD library
Release 20120416
- Initial simulation implementation (very limited)
- Integrating Mingw GCC for building simulation target
Release 20120326
- Added support for more boards
- Board type chosen as project build target
- Several minor tweaks
Release 20120228
- Added Arduino Nano and Mini in board selection
- Fixed Arduino Mega binary not correctly built issue
- Fixed an include path issue
9 Responses to CodeBlocks Arduino IDE
a fantastic idea. I have been using CodeBlocks as an external editor (and compiling via the Arduino GUI) plus I have down some direct compilation of native AVR and also using the technique at http://www.johnhenryshammer.com/WOW2/pagesHowTo/atmelPage.php#CODEBLOCKS, but your method is way better for many situations.
I have run this under WINE on Linux (Ubuntu 11.1) and it works well.
I have made a start at placing your changes into a Linux build of CB and have got the wizard to run and create a project, but can’t get it to compile.
Compiling: cores/arduino/CDC.cpp
In file included from /usr/include/inttypes.h:26:0,
from cores/arduino/Platform.h:5,
from cores/arduino/CDC.cpp:19:
/usr/include/features.h:323:26: fatal error: bits/predefs.h: No such file or directory
compilation terminated.
Process terminated with status 1 (0 minutes, 1 seconds)
1 errors, 0 warnings
I added “/usr/include/i386-linux-gnu/” to compiler path – but this did not fix the issue (worked for the JohnHenryHammer method!).
I am keen to get this working for all platforms, and also as an “addon” install, so that there is no need to have multiple installs of CB (as some people do use CB for other uses!).
ps I hope to catch you at XCJ!
Finally I got some feedbacks on this project. 😉
I use it for all my arduino developments but few people tell me they are intereted in this.
You can temporarily remove CDC.cpp from the project to see if you can get through.
Maybe I should release a Linux distribution soon.
i have to say…your project is more than beautiful! i just downloadet it! i am new to arduino’ s enviroment an di will go on reading for it! thank you for your “share”!
Thanks for your compliment. It’s still under develop so many parts of it is still not so beautiful but I am improving it all the time.
Hello, let me first congratulate you on a great site, lots of information for me here. I was looking at the Code::Blocks program and noticed that the Arduino customisation isn’t for a Mac, what do I need to do to to convert it to run on my Mac. I have the Crosspack and ADVDude installed from my attempt to get Eclipse working but found it was just too hard. Is it just a matter of moving some files?
The release is for Windows only. I will post an article about how to make it work on MAC and Linux.
Firstly, BIG kudos on this wizard! It’s so much easier than the one that comes with the arduino with a LOT of features. Great work to the community!
I need help with the following:
I’ve been trying to add additional libraries to the arduino wizard however I cannot get the ones installed to show so maybe I am missing something. Here is what I did:
Modified:
C:\CodeBlocks\share\CodeBlocks\templates\wizard\arduino\wizard.script
I also added the libraries in the folder:
C:\CodeBlocks\arduino-1.0\libraries
There are several libraries that still do not show up even after the changes to the script and I am not sure why they are not.
Can’t seem to understand what other changes need to be done. Would appreciate your pointers on how to resolve this…
Источник


