- How to add new line of row in devexpress gridcontrol?(WinForms C#)
- 3 Answers 3
- Not the answer you’re looking for? Browse other questions tagged c# winforms devexpress or ask your own question.
- Linked
- Related
- Hot Network Questions
- Subscribe to RSS
- How to add new row in DevExpress Gridview using C# code in Winforms?
- 2 Answers 2
- Add and Remove Rows
- Common Requirements
- New Item Row
- Initialize New Rows
- Data Navigator
- External Control Navigator
- Add and Remove Rows in Code
- How to Save a Modified Row
- Add and Remove Rows
- New Item Row
- Initialize New Item Row
- Data Navigator
- Add and Remove Rows in Code
- Add Rows
- Working with Groups in Code
- Group and Ungroup Data
- Modify Group Row Content
- Custom Grouping
- Locate and Process Group Rows
- Expand and Collapse Rows
How to add new line of row in devexpress gridcontrol?(WinForms C#)
I want to add a new line of row when pressing a button. In datagridview it would be: datagridview1.Rows.Add()
What is the equivalent code for that in gridcontrol? Please help me.
3 Answers 3
You cannot add a new row directly to your GridControl , since this is just a container for the views. However, if you’re using a GridView inside your GridControl (or any other descendant of ColumnView), you can add a new row using AddNewRow() method.
EDIT: You can access your view in a different way, of course.
The DevExpress GridControl must always be bound to a datasource: you cannot add rows directly to the GridControl object or its child GridViews .
Instead, you must bind your GridControl to a data source (via the GridControl.DataSource property), and add/remove rows via this data source.
See the ‘Binding To Data’ documentation at the DevExpress site for more information on the kinds of data sources that can be used with a GridControl .

You can use AddNewRow to add new row and SetRowCellValue to insert value to that row.
Put yourgridName.RowCount-1 for rowhandle to insert the row at last.Put gridViewMappedFileds.Columns[«ColumnName»] to give your columnname.
Not the answer you’re looking for? Browse other questions tagged c# winforms devexpress or ask your own question.
Linked
Related
Hot Network Questions
Subscribe to RSS
To subscribe to this RSS feed, copy and paste this URL into your RSS reader.
site design / logo © 2021 Stack Exchange Inc; user contributions licensed under cc by-sa. rev 2021.10.19.40496
By clicking “Accept all cookies”, you agree Stack Exchange can store cookies on your device and disclose information in accordance with our Cookie Policy.
Источник
How to add new row in DevExpress Gridview using C# code in Winforms?
I wants to add new row in GridViewControl. I tried this following code. But It doesn’t adding any rows.
I created Column FilterValues using RunDesigner.
And then I am trying to add records using button click function by following code
2 Answers 2
First make that the GridView is bound to a datasource that supports adding new items and then try to add a row to the grid like this:
I suggest you to go through documentation — Adding and Deleting Records
To add a new row to a View, you can use the ColumnView.AddNewRow method. This method is only supported for data sources implementing the System.ComponentModel.IBindingList interface. In other cases, you should use the methods provided by your data source to add new rows.
You should use data source methods to add, delete and modify individual rows. Some data sources (for instance, arrays and read-only collections) do not support adding or deleting rows. There are some limitation on different data sources.
If you are grid control bound with correct data source then please go through the TableView.AddNewRow article to get information about the AddNewRow method.
If you working in unbound mode then please review this article:
Can the GridControl be used completely in unbound mode?
In this case you have to create custom data store which you have to maintain when you do any insert/update operation.
Источник
Add and Remove Rows
Common Requirements
To add and remove rows, Data Grid uses methods of a data source assigned to the DataSource property. You and your end-users can add and remove Data Grid rows only if your data source has such API. For example, the ExcelDataSource is a read-only data source; thus, data editing in a grid bound to this source is not available. Similarly, if a Data Grid is bound to a data source that implements the IBindingList interface, the row operations’ availability depends on boolean AllowNew and AllowRemove settings. Note that Lists with simple type objects (e.g., List ) are not supported — instead, you need to create a class with one property of this required simple type. This class must have an empty default constructor.
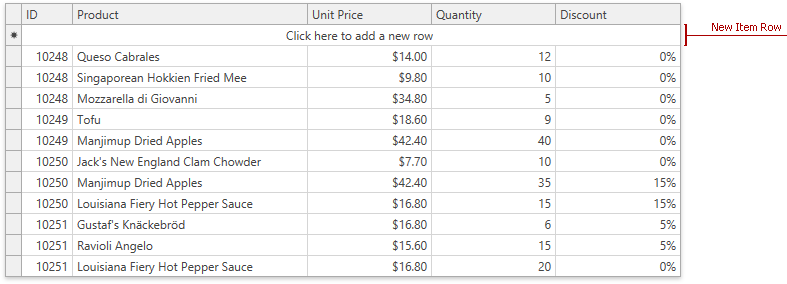
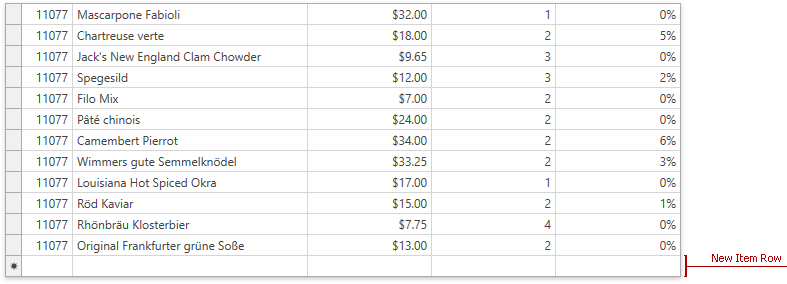
New Item Row
The Data Grid can display an empty row that end-users utilize to add new records. This row is identified by an asterisk (*) displayed within a corresponding row indicator cell. To cancel adding a new row, press Esc.
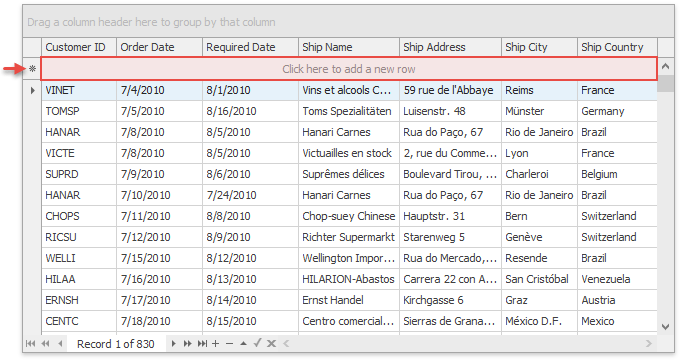
You cannot obtain or modify cell values until there is a row object that corresponds to a record. In case of new rows added via the New Item Row, Data Grid initializes new row objects for these rows only after a user modifies any cell.
Do not manually add or remove rows before a new row object is posted into an underlying Grid data source. Data Grid posts new row objects when the New Item Row loses focus, or when the UpdateCurrentRow method is called.
Related API
GridOptionsView.NewItemRowPosition — allows you to enable a new item row and select whether it should anchor to the View’s top or bottom edge.
GridControl.NewItemRowHandle — a constant that specifies the row handle for the New Item Row.
Initialize New Rows
The ColumnView.InitNewRow event fires whenever a user adds a new record. Handle this event and call corresponding SetValue and GetValue methods to facilitate user input and auto-fill new row cells with default values.
In the Init newly added rows in a custom manner demo module, every new row automatically receieves starting values for cells under “Record Date”, “Name” and “Notes” columns.
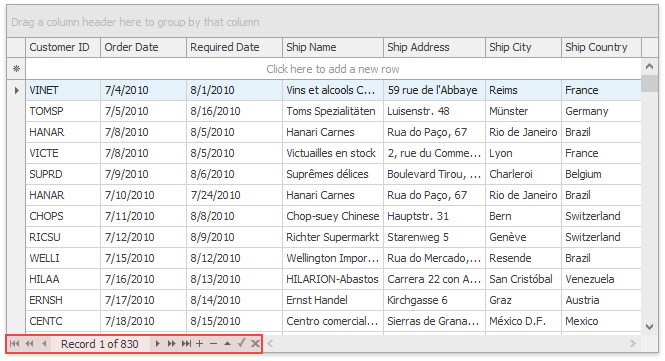
Data Navigator
The Data Navigator is an embedded toolbar that allows users to navigate through Data Grid records and add/remove rows.
Related API
GridControl.UseEmbeddedNavigator — specifies whether or not the Data Navigator is available.
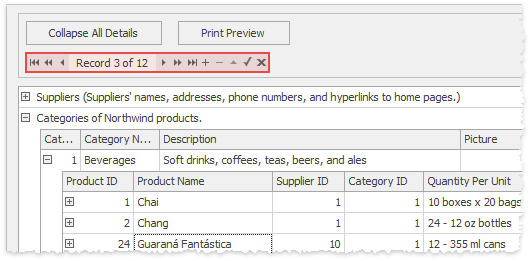
External Control Navigator
The Data Navigator is a ControlNavigator object displayed directly within a Data Grid. If needed, you can create a standalone Control Navigator and position it anywhere outside your Grid. Utilize the navigator’s ControlNavigator.NavigatableControl property to bind the navigator to a Data Grid. The Control Navigator can also navigate through records of the Tree List and Vertical Grid controls.
Add and Remove Rows in Code
Modifying the underlying data source
If your data source supports adding and removing records, you can use a data source API to modify Grid rows. If a data source does not implement the IBindingList interface, it does not send add/remove notifications to a Data Grid. In this case, call the GridControl.RefreshDataSource (updates main Grid view) or BaseView.RefreshData (updates this particular view) method to update the Data Grid manually. The GridOptionsNavigation.AutoFocusNewRow property allows the Data Grid to automatically focus new records added to a data source.
The code below adds a new record to a BindingList object that serves as a data source for a Data Grid. Since this data source supports update notifications, you don’t need to refresh the Data Grid manually.
Adds a blank row to the Data Grid. If the New Item Row is enabled, this method moves focus to this element. Otherwise, the new record is temporarily placed below the existing records. After a user has entered cell values and the row has been accepted, the new row moves to its final location according to the current Data Group filtering, grouping and sorting settings. To accept a new row manually, call the ColumnView.UpdateCurrentRow method from code. The following code shows how to add a new row to a data group. It is assumed that data within a Grid View is grouped against one or more columns. The row is added to the same group as the currently focused row.
Removes a data record or a group row from the View. If a data source contains multiple tables with master-detail relationships, this method removes a row together with its associated child rows. The code snippet below illustrates how to remove the focused row when a user presses the Ctrl+Del shortcut.
If the ColumnViewOptionsSelection.MultiSelect property is enabled, users can select multiple Data Grid rows (or row cells, depending on the current GridOptionsSelection.MultiSelectMode setting). The DeleteSelectedRows() method removes all selected rows and all rows with selected cells if individual cell selection is enabled.
How to Save a Modified Row
Data Grid and other DevExpress data-aware controls (Gantt Control, Vertical Grid, TreeList, etc.) do not interact with real data storages. Instead, they use data sources connected to these storages. Data-aware controls save user edits to data sources, but you need to manually post these changes to underlying storages. See this help topic for more information: Post Data to an Underlying Data Source.
Источник
Add and Remove Rows
New Item Row
The New Item Row is an empty row at the top or the bottom of the View. Users can enter data into this row to create new rows.
The TreeListView supports the New Item Row from v19.1.
To show the New Item Row, set the TableView.NewItemRowPosition / TreeListView.NewItemRowPosition property to Top or Bottom.
TableView: NewItemRowPosition = Top
TableView: NewItemRowPosition = Bottom
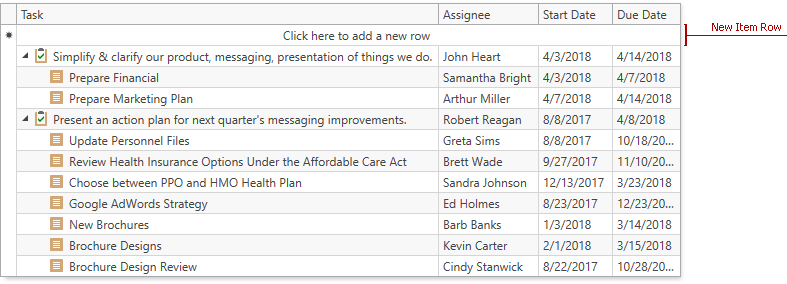
TreeListView: NewItemRowPosition = Top
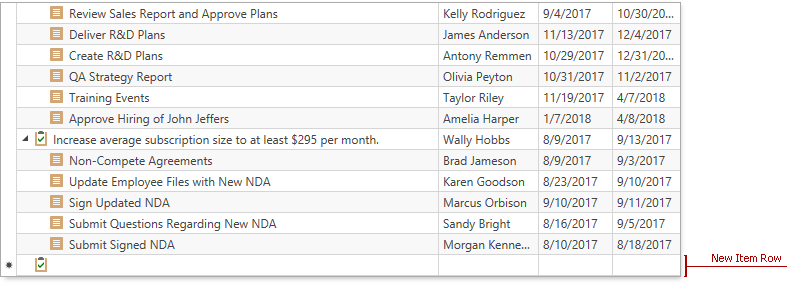
TreeListView: NewItemRowPosition = Bottom
A user should enter values in the New Item Row. The GridControl checks whether values are valid and displays the row at the place according to the current filter, group, and sort settings:
The GridControl validates the New Item Row‘s cells in the same way as other data cells. Refer to Input Validation for more information.
In TreeListView, a new row is added to the root level. Users can drag this row anywhere in the hierarchy. Set the DataViewBase.AllowDragDrop property to true to allow drag-and-drop operations.
Users can press Esc while the row is focused to cancel appending a new row.
If a cell is in edit mode, a user should press the Esc key twice to close an editor and cancel appending.
You can customize the New Item Row that has the NewItemRowPosition.Top position. Use the ColumnBase.NewItemRowCellStyle / TableView.NewItemRowCellStyle / TreeListView.NewItemRowCellStyle property to specify a style for the column cell(s) within the New Item Row.
Initialize New Item Row
You can initialize the New Item Row with default values:
Occurs before a new row is added to the View.
Occurs before a new row is added to the View.
Use this event to create a new row instance.
Use this event to set field values within the New Item Row.
The GridControl creates a new row instance if the datasource allows you to add new rows and the object provides a constructor without parameters. Otherwise, handle the GridViewBase.AddingNewRow / TreeListView.AddingNewNode event and specify the NewObject property.
In the TreeListView in Self-Referential mode, you cannot add the New Item Row with the duplicated primary key. Handle the TreeListView.InitNewNode / TreeListView.AddingNewNode event and initialize a field specified in the TreeListView.KeyFieldName property with a unique primary key.
Data Navigator
The embedded Data Navigator allows users to add and remove rows.

To add a new row, a user should click the Data Navigator‘s Append (+) button.
To remove a row, a user should focus the row and click the Data Navigator‘s Delete (-) button.
You can initialize a new row with default values. Refer to the Initialize New Item Row section for more information.
Use the DataViewBase.DataNavigatorButtons property to specify which buttons to display in the Data Navigator.
Add and Remove Rows in Code
Add Rows
If the New Item Row is enabled, these methods move focus to this element. Otherwise, they temporarily add an empty row at the bottom.
Use the DataControlBase.NewItemRowHandle to get the new row and set its values.
After values are set and accepted, the new row moves according to the current filter, group, and sort settings.
Источник
Working with Groups in Code
Group and Ungroup Data
Groups data against this column. If data is already grouped by other columns, this column will be added to the end of the grouping queue.
Removes data grouping by this column.
Removes all data grouping.
Accepts non-negative integer values that specify the column order according to which data is grouped. Values must be unique, which means you cannot apply merged column grouping by setting column group indexes. You can change this property only for columns that have already been added to a View.
A collection that stores specific ColumnSortInfo objects on every grid column involved in sorting and grouping. To apply complex grouping in code, modify this collection manually by calling the GridColumnSortInfoCollection.ClearAndAddRange method. The code below applies two grouping layers: merged grouping by “Ship Country”, “Ship City” and “Ship Region” columns, followed by tier two grouping by the “Customer ID” column.
Non-cancelable events that fire whenever a grouping operation takes place.
Modify Group Row Content
Allows you to modify group row content for individual Grid columns, or all columns at once.
Allows you to modify specific group row captions.
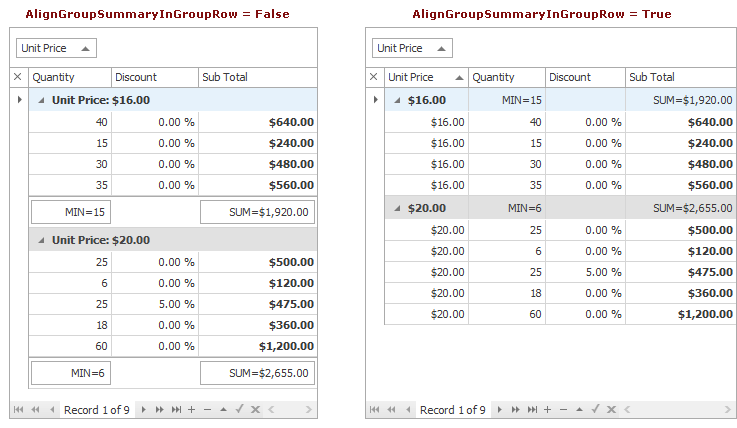
Allows you to display group summaries within group rows.
Custom Grouping
Set this property to Custom to implement custom grouping.
Fires for all columns with the custom sort mode when grid data is grouped against these columns. Allows you to implement custom grouping algorithms.
Handle any of these events to modify group row captions accordingly to your custom grouping algorithms. The sample below illustrates how to break order dates into four seasons and group orders by these seasons.

Locate and Process Group Rows
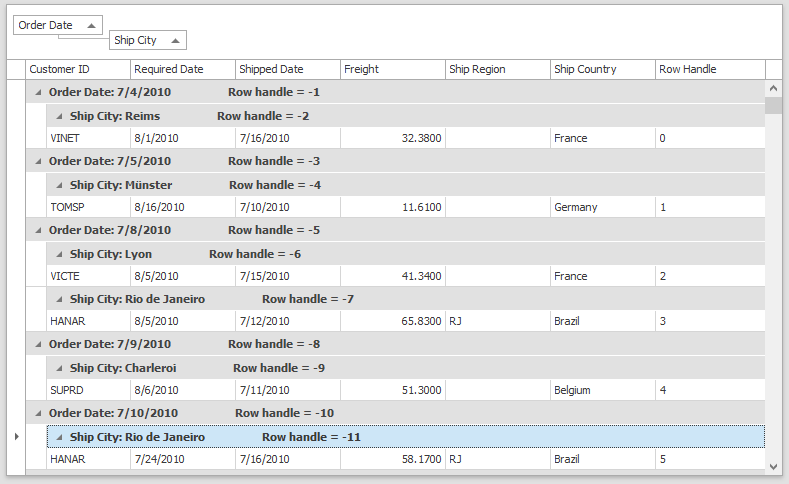
Row handles are integer values that identify both data (positive values) and group (negative values) rows.
Identifies the nesting level of a row.

Returns the number of immediate child rows for a group row.
Returns the row handle of a group row’s child data row. The following example shows how to change the “Price” column value for all the data rows belonging to the focused data group. Prices change when end-users press the “Discount” button.
Returns the row handle of a parent row.
Methods that retrieve System.Data.DataRowView or other objects, which represent data source rows.
Expand and Collapse Rows
Returns whether or not the row is expanded.
Call this method to expand or collapse a row.
Expands or collapses a row itself and (optionally) all of its child rows.
Cancelable events that fire when a group is to be expanded or collapsed.
These events occur after a row has been expanded or collapsed.
Scrolls the View to display the required row and selects this row. Expands the row’s parent group.
Scrolls the View to display the required row. If the row belongs to a group, this group expands. The code snippet below displays all rows whose “InStock” column values equal false.
Источник


