- Плохое обновление #118354
- Comments
- kryvoboker commented Mar 7, 2021
- vscode-triage-bot commented Mar 7, 2021
- Live HTML Previewer extension is not working #29
- Comments
- prabha05081997 commented Apr 16, 2019
- Live Preview
- Microsoft
- Live Preview — VS Code Extension 📡
- Table of Contents
- Features
- HTML File Previewing
- Embedded Preview
- Live Refreshing
- Persistent Server Task with Server Logging
- External Browser Previewing
- External Browser Debugging
- Console Output Channel (For Embedded Preview)
- Workspace-less Previewing
- Multi-root Support
- Prerequisites
- Running the extension
- Inspirations
- Markdown and Visual Studio Code
- Markdown extensions
- Markdown preview
- Dynamic previews and preview locking
- Editor and preview synchronization
- Outline view
- Extending the Markdown preview
- Using your own CSS
- Keep trailing whitespace in order to create line breaks
- Markdown preview security
- Strict
- Allow insecure content
- Disable
- Snippets for Markdown
- Compiling Markdown into HTML
- Step 1: Install a Markdown compiler
- Step 2: Create a simple MD file
- Step 3: Create tasks.json
- Step 4: Run the Build Task
- Automating Markdown compilation
- Step 1: Install Gulp and some plug-ins
- Step 2: Create a simple Gulp task
- Step 3: Run the gulp default Task
- Step 4: Terminate the gulp default Task
- Next steps
- Common questions
- Is there spell checking?
- Does VS Code support GitHub Flavored Markdown?
- In the walkthrough above, I didn’t find the Configure Task command in the Command Palette?
Плохое обновление #118354
Comments
kryvoboker commented Mar 7, 2021
После обновления программы, не работает плагин Image preview.
VS Code version: Code 1.54.1 (f30a9b7, 2021-03-04T22:38:31.419Z)
OS version: Windows_NT x64 10.0.18363
System Info
| Item | Value |
|---|---|
| CPUs | Intel(R) Core(TM) i5-7200U CPU @ 2.50GHz (4 x 2712) |
| GPU Status | 2d_canvas: enabled gpu_compositing: enabled multiple_raster_threads: enabled_on oop_rasterization: enabled opengl: enabled_on protected_video_decode: enabled rasterization: enabled skia_renderer: enabled_on video_decode: enabled vulkan: disabled_off webgl: enabled webgl2: enabled |
| Load (avg) | undefined |
| Memory (System) | 15.88GB (9.57GB free) |
| Process Argv | —crash-reporter-id 5108c8da-0b47-4c86-8757-a9aca9e162cc |
| Screen Reader | no |
| VM | 0% |
Extensions (11)
| Extension | Author (truncated) | Version |
|---|---|---|
| better-comments | aar | 2.1.0 |
| project-manager | ale | 12.0.1 |
| bracket-pair-colorizer | Coe | 1.0.61 |
| ecsstractor-port | diz | 0.0.3 |
| auto-close-tag | for | 0.5.10 |
| auto-complete-tag | for | 0.1.0 |
| auto-rename-tag | for | 0.1.6 |
| vscode-gutter-preview | kis | 0.26.2 |
| vscode-language-pack-ru | MS- | 1.54.1 |
| live-sass | rit | 3.0.0 |
| LiveServer | rit | 5.6.1 |
A/B Experiments
The text was updated successfully, but these errors were encountered:
vscode-triage-bot commented Mar 7, 2021
Спасибо за создание этого вопроса!
Однако, поскольку описание не на английском языке, нам трудно работать над ним. Если вы в состоянии, пожалуйста, отредактировать этот вопрос, чтобы быть на английском языке. Пожалуйста, не добавляйте новый комментарий или создайте новый выпуск, а редактируйте существующую проблему.
К сожалению, службы автоматического перевода не в состоянии справиться с техническим языком, необходимым для эффективного общения о проблемах программного обеспечения, поэтому мы рекомендуем найти человека-переводчика, который знаком с нашей технологией, чтобы помочь перевести.
В противном случае, эта проблема была отмечена как нуждающаяся в переводе, и член сообщества может быть в состоянии помочь перевести его.
Thanks for creating this issue!
Unfortunately, as the description is not in English, it’s hard for us to work on. If possible, please edit the original issue to be in English.
In our experience, automatic translation services are not able to handle the technical language needed to effectively communicate about software issues, so we recommend finding a human translator who is familiar with our technology to help.
Otherwise, we have marked this as needing translation and a community member may be able to help out.
Источник
Live HTML Previewer extension is not working #29
Comments
prabha05081997 commented Apr 16, 2019
I am using vscode 1.33.1 in ubuntu 18.04 machine. I am unable to see the preview for my html document even after I installed «Live HTML Previewer» via vscode and followed all the steps mentioned in the extension’s document. But my other extensions are working properly
Extension version: 0.3.0
VS Code version: Code 1.33.1 (51b0b28134d51361cf996d2f0a1c698247aeabd8, 2019-04-11T08:20:22.771Z)
OS version: Linux x64 4.15.0-47-generic
System Info
| Item | Value |
|---|---|
| CPUs | Intel(R) Core(TM) i5-5300U CPU @ 2.30GHz (4 x 1943) |
| GPU Status | 2d_canvas: enabled checker_imaging: disabled_off flash_3d: enabled flash_stage3d: enabled flash_stage3d_baseline: enabled gpu_compositing: enabled multiple_raster_threads: enabled_on native_gpu_memory_buffers: disabled_software rasterization: disabled_software surface_synchronization: enabled_on video_decode: unavailable_off webgl: enabled webgl2: enabled |
| Load (avg) | 2, 3, 3 |
| Memory (System) | 7.50GB (0.18GB free) |
| Process Argv | bootstrap-learning/ |
| Screen Reader | no |
| VM | 0% |
The text was updated successfully, but these errors were encountered:
Источник
Live Preview
Microsoft
Live Preview — VS Code Extension 📡
⚠️ WARNING: this extension is still under development! ⚠️
An extension that hosts a local server for you to preview your web projects on!
Note: this extension is intended for projects where a server is not already created (e.g. not for apps using React, Angular, etc.). To work with these, feel free to run the Simple Browser: Show command that is already built-in with VS Code.
Table of Contents
Features
HTML File Previewing
Preview your HTML files quickly by clicking the preview button in the top right corner of your editor or using the context menu.
Embedded Preview
A preview is available in-editor for the files hosted by the server.
The simple embedded browser features the following:
- Page history tracking
- URL bar for address-based navigation
- Expandable menu, allowing users to:
- Preview the current page in browser
- Perform a page search
- Tip: You can also use CTRL+F to open the find box and Enter to go to the next result
- Open the editor’s webview DevTools
Live Refreshing
See the changes as you make them. By default, changes appear as you make them in the editor. You can also change this in settings to refresh the preview on save or not at all.
Persistent Server Task with Server Logging
If you’re looking for a persistent server to run, you can run a Live Preview task, which can optionally log the server traffic. You can also click on the traffic to open the file location of the file returned by the server.
External Browser Previewing
Although all of the images above use the embedded browser, you can also experience the same features in an external browser.
You can edit the preview target in the extension settings.
External Browser Debugging
The external browser preview also supports debugging via the built-in js-debug extension and attaching to the Edge Devtools Extension. This allows support for features such as setting breakpoints and inspecting elements.
Run Live Preview: Show Debug Preview in the command palette to get these debugging features.
Console Output Channel (For Embedded Preview)
For a simple view of the embedded preview’s console messages, go to the Output tab and select Embedded Live Preview Console in the dropdown.
Workspace-less Previewing
No workspace? No problem! For a quick preview of your file, the server can also access files outside of your workspace to preview.
Notes about workspace-less extension use:
- Linked files for these pages may not be correct if they are relative to a specific root (e.g. a project root).
- Tasks do not work outside of a workspace, so a server will just launch in the background upon external preview when outside of a workspace. You can use the Live Preview: Stop Server command to kill the server in this case.
Multi-root Support
The different workspaces will be assigned specific server endpoints, allowing you to easily preview files in all of your workspaces.
Prerequisites
To use this extension, you must have Node JS v14+.
Running the extension
You can install the extension in the marketplace here. To contribute, see the contributing page.
Q. What does the «Previewing a file that is not a child of the server root. To see fully correct relative file links, please open a workspace at the project root.» message mean?
- You have no workspace open and opened a preview.
- You opened a preview for a file that is not a part of your workspace(s).
Why does this happen?
The server is hosted from the root of the workspace that the user opens. Files outside of this can be previewed, but some file paths (such as a link to the root) may not go to the right place. If you are working on a web project, it is advised that you open a workspace at the root of the project.
Q. I’m trying to use Live Preview in Codespaces and the embedded preview isn’t working.
A. Currently, you will need to manually navigate to the links host the forwarded port content before it works
In the area of the editor where the integrated terminal usually is, navigate to Ports and open the local address in the browser. You can do this by using CTRL+Click on the URL in the Ports menu.
Allow the browser to perform the necessary redirects, then close the windows. Re-open the preview window and it should work now.
Inspirations
Special thanks to the following extensions for inspiring Live Preview! 💡
Источник
Markdown and Visual Studio Code
Working with Markdown files in Visual Studio Code is simple, straightforward, and fun. Besides VS Code’s basic editing, there are a number of Markdown specific features that will help you be more productive.
Markdown extensions
In addition to the functionality VS Code provides out of the box, you can install an extension for greater functionality.
Tip: Click on an extension tile above to read the description and reviews to decide which extension is best for you. See more in the Marketplace.
Markdown preview
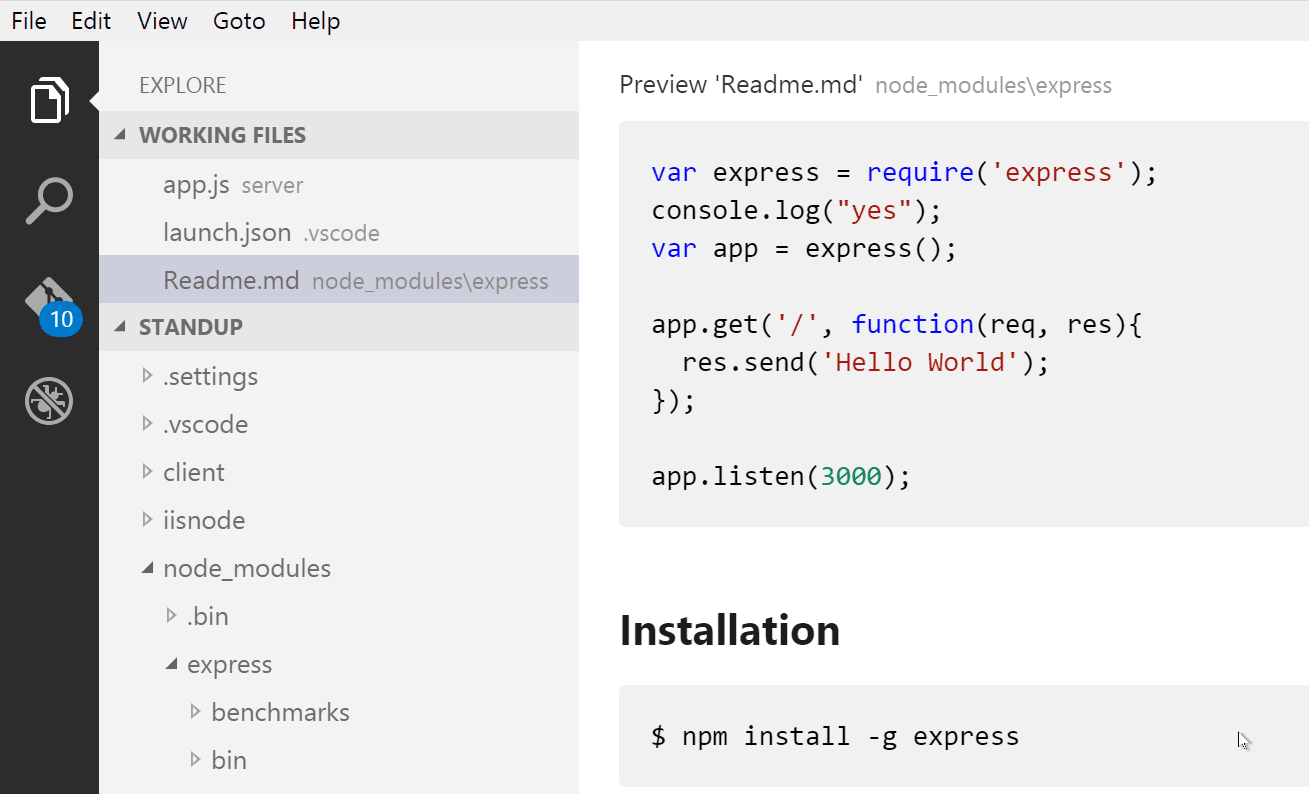
VS Code supports Markdown files out of the box. You just start writing Markdown text, save the file with the .md extension and then you can toggle the visualization of the editor between the code and the preview of the Markdown file; obviously, you can also open an existing Markdown file and start working with it. To switch between views, press ⇧⌘V (Windows, Linux Ctrl+Shift+V ) in the editor. You can view the preview side-by-side ( ⌘K V (Windows, Linux Ctrl+K V ) ) with the file you are editing and see changes reflected in real-time as you edit.
Here is an example with a very simple file.
Tip: You can also right-click on the editor Tab and select Open Preview ( ⇧⌘V (Windows, Linux Ctrl+Shift+V ) ) or use the Command Palette ( ⇧⌘P (Windows, Linux Ctrl+Shift+P ) ) to run the Markdown: Open Preview to the Side command ( ⌘K V (Windows, Linux Ctrl+K V ) ).
Dynamic previews and preview locking
By default, Markdown previews automatically update to preview the currently active Markdown file:

You can lock a Markdown preview using the Markdown: Toggle Preview Locking command to keep it locked to its current Markdown document. Locked previews are indicated by [Preview] in the title:

Editor and preview synchronization
VS Code automatically synchronizes the Markdown editor and the preview panes. Scroll the Markdown preview and the editor is scrolled to match the preview’s viewport. Scroll the Markdown editor and the preview is scrolled to match its viewport:

You can disable scroll synchronization using the markdown.preview.scrollPreviewWithEditor and markdown.preview.scrollEditorWithPreview settings.
The currently selected line in the editor is indicated in the Markdown preview by a light gray bar in the left margin:

Additionally, double clicking an element in the Markdown preview will automatically open the editor for the file and scroll to the line nearest the clicked element.
Outline view
The Outline view is a separate section in the bottom of the File Explorer. When expanded, it will show the symbol tree of the currently active editor. For Markdown files, the symbol tree is the Markdown file’s header hierarchy.
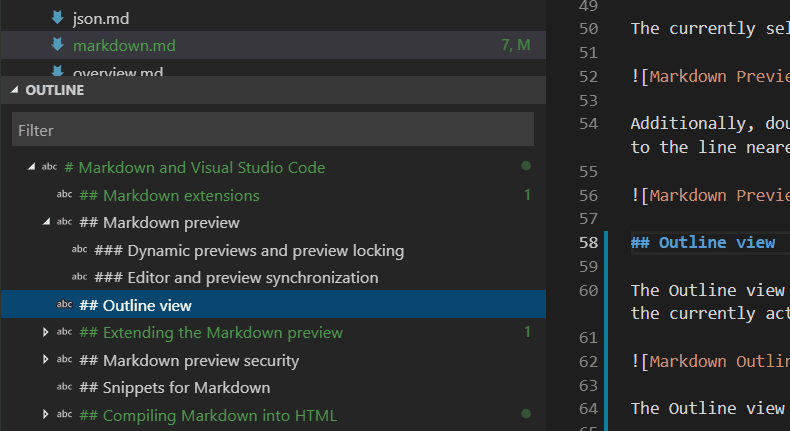
The Outline view is a great way to review your document’s header structure and outline.
Extending the Markdown preview
Extensions can contribute custom styles and scripts to the Markdown preview to change its appearance and add new functionality. Here’s a set of example extensions that customize the preview:
Using your own CSS
You can also use your own CSS in the Markdown preview with the «markdown.styles»: [] setting. This lists URLs for style sheets to load in the Markdown preview. These stylesheets can either be https URLs, or relative paths to local files in the current workspace.
For example, to load a stylesheet called Style.css at the root of your current workspace, use File > Preferences > Settings to bring up the workspace settings.json file and make this update:
Keep trailing whitespace in order to create line breaks
To create hard line breaks, Markdown requires two or more spaces at the end of a line. Depending on your user or workspace settings, VS Code may be configured to remove trailing whitespace. In order to keep trailing whitespace in Markdown files only, you can add these lines to your settings.json :
Markdown preview security
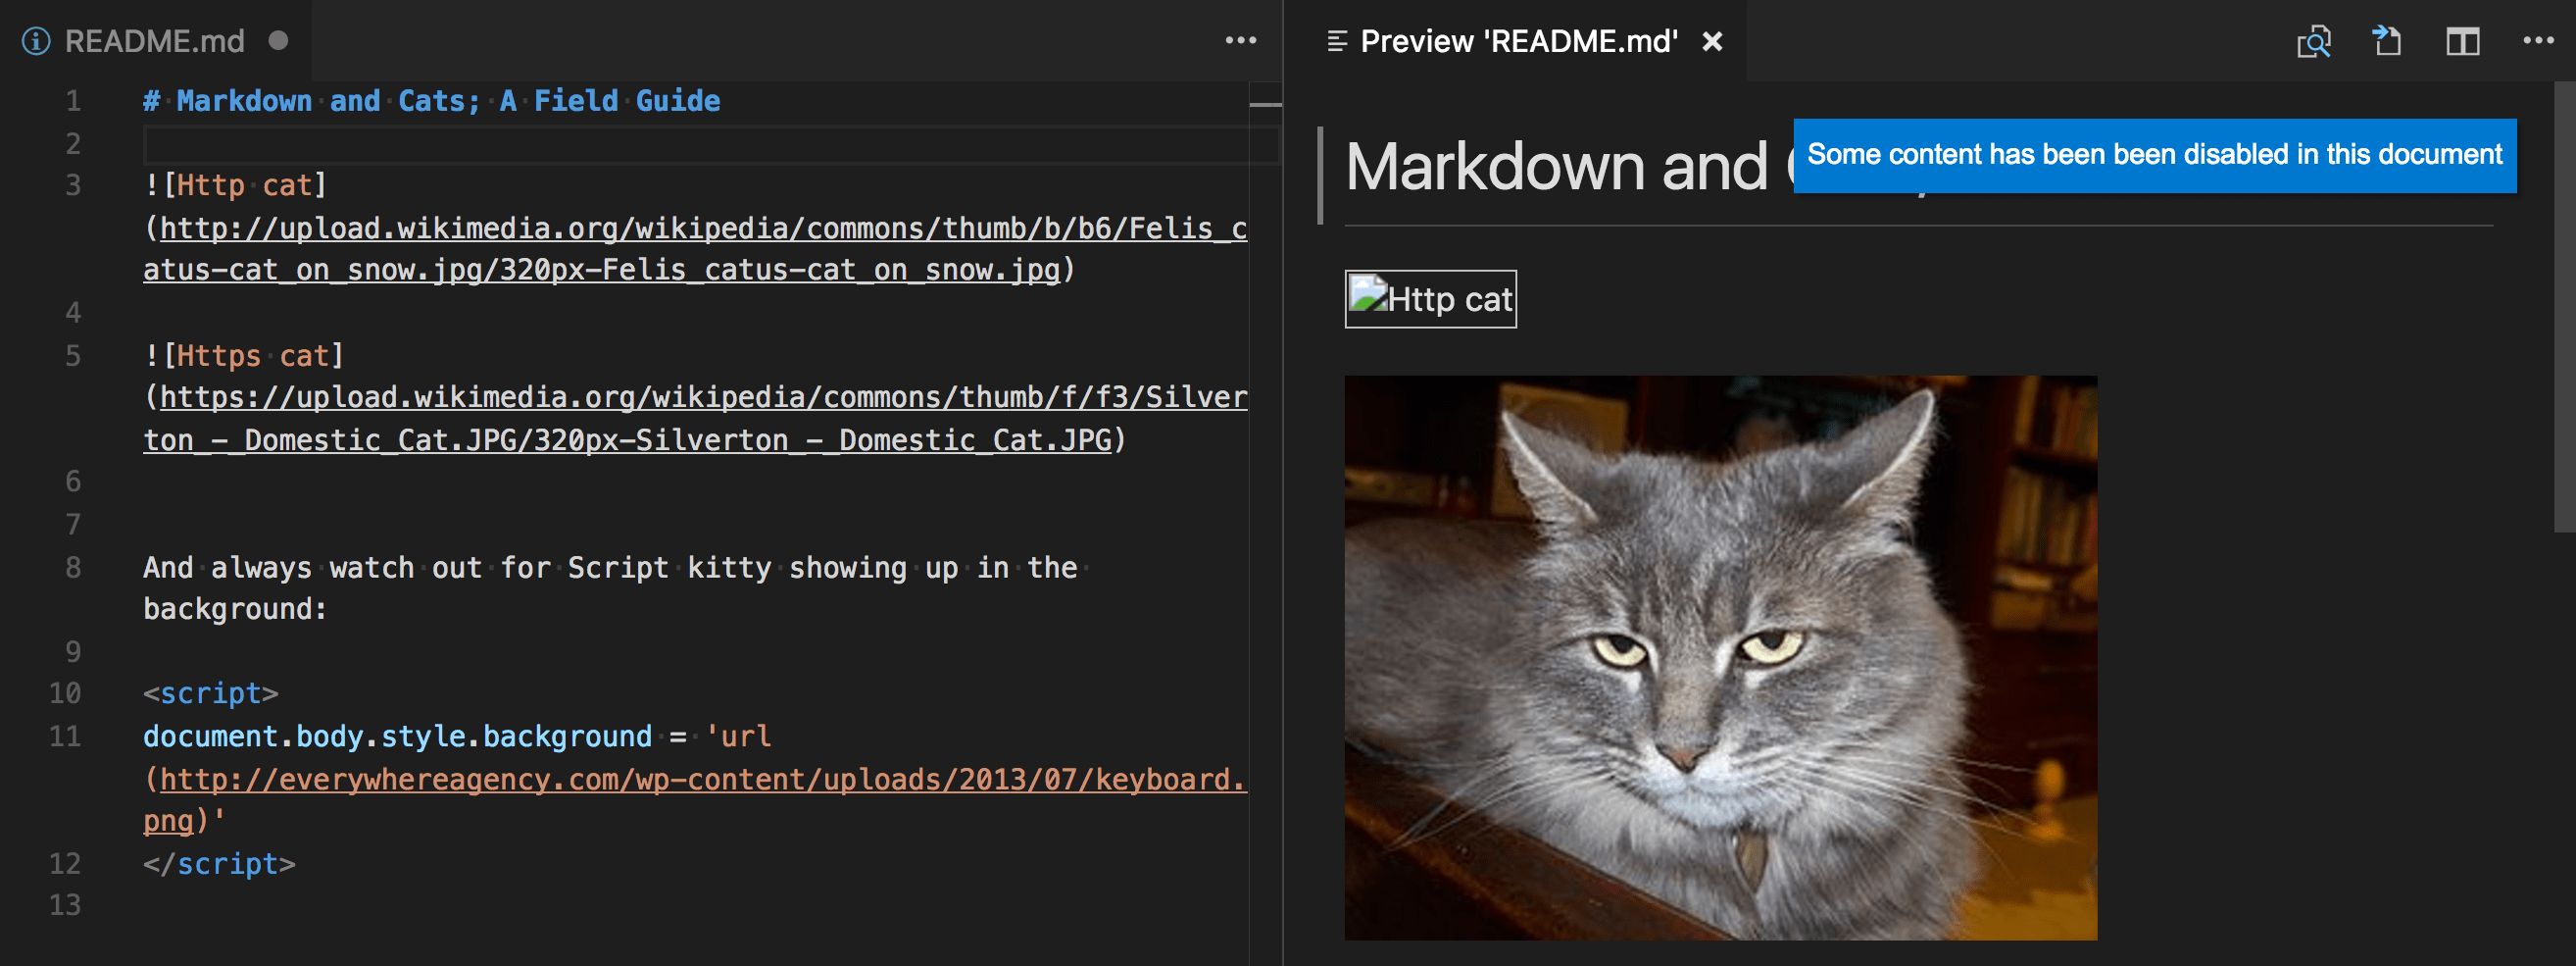
For security reasons, VS Code restricts the content displayed in the Markdown preview. This includes disabling script execution and only allowing resources to be loaded over https .
When the Markdown preview blocks content on a page, an alert popup is shown in the top right corner of the preview window:
You can change what content is allowed in the Markdown preview by clicking on this popup or running the Markdown: Change preview security settings command in any Markdown file:

The Markdown preview security settings apply to all files in the workspace.
Here are the details about each of these security levels:
Strict
This is the default setting. Only loads trusted content and disables script execution. Blocks http images.
It is strongly recommended that you keep Strict security enabled unless you have a very good reason to change it AND you trust all Markdown files in the workspace.
Allow insecure content
Keeps scripts disabled but allows content to be loaded over http .
Disable
Disables additional security in the preview window. This allows script execution and also allows content to be loaded over http .
Snippets for Markdown
There are several built-in Markdown snippets included in VS Code — press ⌃Space (Windows, Linux Ctrl+Space ) (Trigger Suggest) and you get a context specific list of suggestions.
Tip: You can add in your own User Defined Snippets for Markdown. Take a look at User Defined Snippets to find out how.
Compiling Markdown into HTML
VS Code integrates with Markdown compilers through the integrated task runner. We can use this to compile .md files into .html files. Let’s walk through compiling a simple Markdown document.
Step 1: Install a Markdown compiler
For this walkthrough, we use the popular Node.js module, markdown-it.
Note: There are many Markdown compilers to choose from beyond markdown-it. Pick the one that best suits your needs and environment.
Step 2: Create a simple MD file
Open VS Code on an empty folder and create a sample.md file.
Note: You can open a folder with VS Code by either selecting the folder with File > Open Folder or navigating to the folder and typing ‘code .’ at the command line.
Place the following source code in that file:
Step 3: Create tasks.json
The next step is to set up the task configuration file tasks.json . To do this, run Terminal > Configure Tasks and click Create tasks.json file from templates. VS Code then presents a list of possible tasks.json templates to choose from. Select Others since we want to run an external command.
This generates a tasks.json file in your workspace .vscode folder with the following content:
To use markdown-it to compile the Markdown file, change the contents as follows:
Tip: While the sample is there to help with common configuration settings, IntelliSense is available for the tasks.json file as well to help you along. Use ⌃Space (Windows, Linux Ctrl+Space ) to see the available settings.
Step 4: Run the Build Task
Since in more complex environments there can be more than one build task we prompt you to pick the task to execute after pressing ⇧⌘B (Windows, Linux Ctrl+Shift+B ) (Run Build Task). In addition, we allow you to scan the output for compile problems. Since we only want to convert the Markdown file to HTML select Never scan the build output from the presented list.
At this point, you should see an additional file show up in the file list sample.html .
If you want to make the Compile Markdown task the default build task to run execute Configure Default Build Task from the global Terminal menu and select Compile Markdown from the presented list. The final tasks.json file will then look like this:
Automating Markdown compilation
Let’s take things a little further and automate Markdown compilation with VS Code. We can do so with the same task runner integration as before, but with a few modifications.
Step 1: Install Gulp and some plug-ins
We use Gulp to create a task that automates Markdown compilation. We also use the gulp-markdown plug-in to make things a little easier.
We need to install gulp both globally ( -g switch) and locally:
Note: gulp-markdown-it is a Gulp plug-in for the markdown-it module we were using before. There are many other Gulp Markdown plug-ins you can use, as well as plug-ins for Grunt.
You can test that your gulp installation was successful by typing gulp -v . You should see a version displayed for both the global (CLI) and local installations.
Step 2: Create a simple Gulp task
Open VS Code on the same folder from before (contains sample.md and tasks.json under the .vscode folder), and create gulpfile.js at the root.
Place the following source code in that file:
What is happening here?
- We are watching for changes to any Markdown file in our workspace, i.e. the current folder open in VS Code.
- We take the set of Markdown files that have changed, and run them through our Markdown compiler, gulp-markdown-it .
- We now have a set of HTML files, each named respectively after their original Markdown file. We then put these files in the same directory.
Step 3: Run the gulp default Task
To complete the tasks integration with VS Code, we will need to modify the task configuration from before to run the default Gulp task we just created. You can either delete the tasks.json file or empty it only keeping the «version»: «2.0.0» property. Now execute Run Task from the global Terminal menu. Observe that you are presented with a picker listing the tasks defined in the gulp file. Select gulp: default to start the task. We allow you to scan the output for compile problems. Since we only want to convert the Markdown file to HTML select Never scan the build output from the presented list. At this point, if you create and/or modify other Markdown files, you see the respective HTML files generated and/or changes reflected on save. You can also enable Auto Save to make things even more streamlined.
If you want to make the gulp: default task the default build task executed when pressing ⇧⌘B (Windows, Linux Ctrl+Shift+B ) run Configure Default Build Task from the global Terminal menu and select gulp: default from the presented list. The final tasks.json file will then look like this:
Step 4: Terminate the gulp default Task
The gulp: default task runs in the background and watches for file changes to Markdown files. If you want to stop the task, you can use the Terminate Task from the global Terminal menu.
Next steps
Read on to find out about:
- CSS, SCSS, and Less — Want to edit your CSS? VS Code has great support for CSS, SCSS, and Less editing.
Common questions
Is there spell checking?
Not installed with VS Code but there are spell checking extensions. Check the VS Code Marketplace to look for useful extensions to help with your workflow.
Does VS Code support GitHub Flavored Markdown?
No, VS Code targets the CommonMark Markdown specification using the markdown-it library. GitHub is moving toward the CommonMark specification which you can read about in this update.
In the walkthrough above, I didn’t find the Configure Task command in the Command Palette?
You may have opened a file in VS Code rather than a folder. You can open a folder by either selecting the folder with File > Open Folder or navigating to the folder and typing ‘code .’ at the command line.
Источник


