- WorldBorder — Ограничение размеров мира
- Содержание
- Возможности
- Установка
- Использование
- Команды и права
- WorldBorder v1.8.5 — плагин ограничения размеров мира
- Скачать плагин WorldBorder | Ограничение мира | Установка границы мира сервера майнкрафт
- Описание плагина WorldBorder:
- Особенности плагина WorldBorder:
- Основные команды и права плагина WorldBorder:
- Как установить плагин?
- Bukkit
- WorldBorder
- Bukkit Plugins
- Pages
- Commands and Permissions
- Table of Contents
- The Fill command:
- The Trim command:
WorldBorder — Ограничение размеров мира
WorldBorder — плагин для Bukkit, который позволяет легко ограничивать границы мира на игровом сервере. Данный плагин превосходит по функциональности BorderGuard и rBorder, при этом обладает отличной производительностью и создан с целью минимального влияния на работу сервера.
Содержание
Возможности
- Вы можете установить отдельные границы для каждого из миров.
- Для каждого мира вы можете определить форму границ: квадратную (большая производительность) и круглую (больше нагрузка на сервер, но более приятная округлая форма карты).
- Границы миров задаются непосредственно из игровой консоли, при этом не обязательно находиться в нужном мире или стоять на координате центра границ.
- Информация о границах автоматически сохраняется в файл при установке или изменении границ.
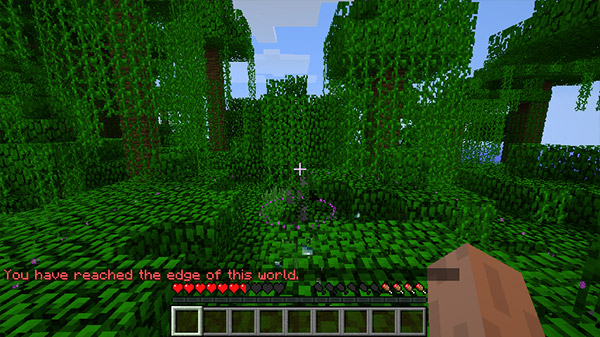
- Если игрок пересекает границу карты на средстве передвижения, он останавливается и телепортируется внутрь границ.
- При телепортации внутрь границ, игрок при необходимости перемещается на безопасную вертикальную позицию (т.е. не будет перемещён в толщу камня).
- Поддерживает плагины GroupManager и Permissions.
Установка
- Через Панель управления Myarena.ru, достаточно только нажать на кнопку установить рядом с плагином.
- Установка плагина через FTP.
- Скачать последнюю версию плагина: http://dev.bukkit.org/bukkit-plugins/worldborder/
- Поместить WorldBorder.jar в папку plugins/ на сервере.
- Перезапустить сервер.
Использование
Для настройки прав доступа нужно отредактировать файл permissions.yml по адресу plugins/PermissionsEx. Это можно сделать с помощью любого текстового редактора, но для удобности рекомендуется использовать Notepad++
Открыв его и опускаемся до admins:
Ниже permissions вам следует прописать права доступа для администраторов, worldborder.*. Пример:
Команды и права
С помощью следующих команд вы можете управлять WorldBorder через консоль или игровой чат.
- /wb [необязательный параметр]
- /wb — Посмотреть список доступных команд плагина.
- /wb set — Установить границы мира в заданном радиусе с центром на вас.
- /wb [название_мира] set — Установить границы указанного мира в заданном радиусе с центром в координатах X и Z.
- /wb [название_мира] radius — Изменить радиус границы для указанного мира, при этом мир уже должен иметь установленные границы. Координаты центра при этом не меняются.
- /wb [название_мира] clear — Удалить границу для указанного мира.
- /wb clear all — Удалить границы всех имеющихся миров.
- /wb list — Показать информацию о границах во всех мирах.
- /wb shape square — Установить для всех миров тип границы «квадрат» (по умолчанию).
- /wb shape round — Установить для всех миров тип границы «круг».
- /wb knockback — Расстояние (в блоках) на которое будет отталкивать игрока при пересечении границы.
- /wb wshape [название_мира] — Переопределить тип границы исключительно для указанного мира (square — квадрат, round — круг). Граница мира должна быть задана, координаты центра при этом не меняются.
- /wb getmsg — Показать сообщение, выводимое игроку при пересечении границы.
- /wb setmsg — Установить сообщение при пересечении границы.
- /wb delay — Количество серверных «тиков» между проверками пересечения границы. По умолчанию 4 тика (
200мс); каждый тик примерно равен 50 мс. (1 сек = 1000мс = 20 тиков).
Источник
WorldBorder v1.8.5 — плагин ограничения размеров мира
Этот плагин предназначен для установки границ (круглых или квадратных) для каждого из миров. Также доступны команды обрезания и генерации мира.
Старые плагины, которые первоначально легли в основу создания этого: rBorder и BorderGuard.
• Вы можете настроить отдельные границы для каждого мира, но только одна граница на мир.
• Граница может быть либо круглой или квадратной формы. Квадратные границы обеспечивают высокую производительность, а круглые — красоту карты. Различные миры могут иметь различные формы границу, если вы этого пожелаете.
• Конфигурация и установка границы осуществляется полностью с помощью команд в игре или через консоль сервера. Нет необходимости отредактировать файл конфигурации.
• Поддержка Permissions плагинов.
• Вы можете полностью сгенерировать (заполнить) свой мир до границы, заполнив недостающие куски, включая настраиваемый буферной зоне в непосредственной близости ваших границ.
• Вы можете обрезать любые куски мира за границами, чтобы избавиться от посторонних частей.
• Все данные плагина автоматически сохраняются.
• Если игрок пересекает границу на транспортном средстве, импульс теряется и он едет обратно.
• Когда игрок вернётся внутрь границ, он будет перемещён в безопасное место, если это необходимо.
200 мс), каждый сервер тик примерно
50 мс.
/wb whoosh — включить/выключить отбрасывание при достижении границ мира.
/wb reload — перезагрузить данные плагина.
/wb debug — включить/выключить вывод информации для отладки в консоль.
Источник
Скачать плагин WorldBorder | Ограничение мира | Установка границы мира сервера майнкрафт

- Опубликовано 29-09-2021, 22:39 Категория Плагины / 1.17 / 1.16 / 1.15 / Безопасность / РПГ / Редактор миров Просмотров 3 805
Описание плагина WorldBorder:
WorldBorder — плагин, который позволит создать невидимые границы на карте сервера майнкрафт, за которые игроки не смогут выйти. Плагин WorldBorder — ограничение мира — используется на многих серверах, чтобы игроки не бегали по всей карте, а располагались на каком-то отрезке карте. Плагин очень прост в настройке.
Особенности плагина WorldBorder:
— Вы можете настроить отдельные границы для каждого мира, но только одна граница на мир;
— Вы можете иметь круглые/эллиптические или квадратные/прямоугольные границы;
— Настройка конфигурации и границ выполняется полностью с помощью команд в игре или через консоль сервера;
— Вы можете использовать команду обхода, чтобы позволить определенным игрокам выходить за все границы;
— Все данные плагина автоматически сохраняются при изменении границ или настроек.
Основные команды и права плагина WorldBorder:
/wb — Список доступных команд;
Право: — worldborder.help
/wb set «Радиус Х» «Радиус Z» — Установить границы мира, центрированную на вас;
/wb «название мира» set «Радиус Х» «Радиус Z» «Х» «Z» — Установите границу с координатами Х и Z указанного центра;
/wb «название мира» set «Радиус Х» «Радиус Z» spawn — Установите границу с точкой спавна мира, используемой в качестве центра;
/wb set «Радиус Х» «Радиус Z» player «Имя игрока» — Установите границу по центру указанного игрока для мира, в котором они находятся в настоящее время;
/wb «название мира» setcorners «x1» «z1» «x2» «z2» — Установите границу на основе угловых координат от местоположения (x1, z1) до (x2, z2);
Право: — worldborder.set (Для всех команд выше)
/wb «название мира» radius «Радиус Х» «Радиус Z» — изменить радиус границы мира;
Право: — worldborder.radius
/wb «название мира» clear — Удалить границы в выбранном мире;
/wb clear all — Удалить границы во всех мирах;
Право: — worldborder.clear
/wb list — Показать полную информацию о границах во всех мирах;
Право: — worldborder.list
/wb setmsg «Сообщение» — Сообщение, которое будет высвечиваться, при достижении границы мира;
Право: — worldborder.setmsg
/wb reload — Перезагрузить плагин;
Право: — worldborder.reload
Как установить плагин?
1. Скачайте плагин.
2. Возьмите скачанный файл и перенесите в папку plugins вашего сервера.
3. Перезапустите сервер.
4. Готово.
Источник
Bukkit

WorldBorder
Bukkit Plugins
Pages
Commands and Permissions
Table of Contents
Key: primary command [optional value]
Note that [worldname] is actually required in the commands below if run from the server console, but optional if run in-game by you as a player, as it then defaults to the world you’re in if not specified.
/wb — list available commands like below (show help).
/wb set [radiusZ] — set world border of specified radius (in blocks), centered on you. Can only be run by an in-game player. If radiusZ isn’t specified, the radiusX value will be used for both.
/wb [worldname] set [radiusZ] — set border with the x and z coordinates of the center specified.
/wb [worldname] set [radiusZ] spawn — set border with the world’s spawn point used as the center.
/wb set [radiusZ] player
— set border centered on the specified player for the world they’re currently in.
/wb [worldname] setcorners — set a border based on corner coordinates from location (x1, z1) to (x2, z2).
Permission: worldborder.set (all commands above)
/wb [worldname] radius [radiusZ] — change border radius for this world. The world needs to have already had a border set, since the x and z values are not modified. If radiusZ isn’t specified, the radiusX value will be used for both. A «+» or «—» can be added to the start of radiusX or radiusZ to have the current radius increased or decreased a specified amount, for example «+100» would increase the existing border radius by 100 blocks.
/wb [worldname] clear — remove border for this world.
/wb clear all — remove all borders for all worlds.
Permission: worldborder.clear (both commands above)
/wb list — show full border information for all worlds.
/wb shape — set the primary border shape to elliptic/round (default), or rectangular/square. Note that «elliptic» and «round» are interchangeable here, as are «rectangular» and «square».
/wb knockback — how far to move the player back inside the border when they cross it.
/wb [worldname] fill [freq] [pad] [force] — generate all missing chunks for this world, out to the border. The freq value is the number of times per second it will try to check/generate a chunk (default 20). For a server with players on it, you should probably stick with the default or possibly even a lower value. If you just want it to finish as quickly as possible, try 1000 or so. The pad value is how much of a buffer to add beyond your borders (default 208, should keep any more chunks from being generated by players). Specify «true» for the force value if you want to force loading of all world chunks instead of automatically skipping chunks which are already fully generated. Read below for more info.
/wb [worldname] trim [freq] [pad] — trim off extra chunks for this world, beyond the border. The freq value is the number of chunks per second it will try to check (default 5000). The pad value is how much of a buffer to keep beyond your borders (default 208, should keep any more chunks from being generated by players). Read below for more info.
/wb bypass [player] [on|off] — enable/disable bypass mode for a player, allowing them to go beyond the border without being knocked back. The list of people with bypass mode enabled is stored between server restarts. The specified [player] name is optional if run in-game and defaults to the player running the command if not specified, but is instead required if run from console. [on|off] is optional and will simply toggle if you don’t specify «on» or «off».
/wb bypasslist — outputs a list of all players who have border bypass enabled.
/wb fillautosave — set the interval for automatic saving of the world during the Fill process. Default 30 seconds, set to 0 to disable automatic world saving (not recommended).
/wb wshape [worldname] — Override the shape for this world only. The world needs to have already had a border set. The default shape used by other worlds (set via /wb shape ) will not be changed by this. Note that «elliptic» and «round» are interchangeable here, as are «rectangular» and «square».
/wb wrap [worldname] — toggle border wrapping for the specified world (default off). This will make border crossings in that world send the player around to the opposite edge of the border instead of just knocking them back.
/wb getmsg — display the message shown to people who cross the border.
/wb setmsg — change the border message.
/wb delay — the number of server ticks it will wait between border checks, the default is 5 ticks (250ms); each server tick is roughly 50ms.
/wb whoosh — turn knockback «whoosh» effect on or off.
/wb portal — turn portal redirection on or off (default on). You should normally only need to turn it off if you have problems with Multiverse not creating portals or any other plugin incompatibilities.
/wb denypearl — toggle option which cancels ender pearls which are thrown past the border, rather than just adjusting their target location. (default on)
/wb dynmap — enable/disable DynMap integration. This will show your borders in DynMap, and they should update almost immediately if you change anything about the border. Defaults to true.
/wb dynmapmsg
— Borders shown in DynMap will have a label with this text. Defaults to «The border of the world.»
/wb remount — Set the delay in server ticks before remounting a player to their vehicle after they’re knocked back from the border. Defaults to 0, which disables re-mounting and leaves the vehicle next to the player. This value should not be set to a value lower than 10 (the former default value) on a public server as that would lead to client glitches. Even the former default value of 10 has been reported to rarely glitch on some servers, which is why remounting now defaults to disabled.
/wb reload — re-load data from config.yml. Normally should never be needed, but here just in case.
/wb debug — turn console debug output on or off. Also should normally never be needed.
Notes:
- The /wb command is an alias of the main command /wborder , so unless another plugin interferes, you can use /wb and /wborder interchangeably. From the console, you’ll of course need to leave off the «/» either way.
- If as a player you leave out [worldname] , it will use the current world you’re in; [worldname] is however required from the console.
- The , , and values must be a whole numbers (integers), but , , and can have a decimal point (they’re doubles).
- A border radius is the distance the border is in each direction from the center (x and z), so for example a radiusX of 600 and radiusZ of 300 would cover a 1200×600 area.
Examples:
/wb set 2000 — Sets a border for the current world with a radius of 2000 (total area 4000×4000 blocks), centered on exactly where you’re standing.
/wb set 2000 1000 — As above, but with an X radius of 2000 and a Z radius of 1000 (total area 4000×2000 blocks), making it wider on the X axis than the Z axis.
/wb netherworld set 250 -12.5 47.3 — Sets a border for the world named «netherworld» with a radius of 250 (area 500×500), centered at -12.5 (X) by 47.3 (Z).
/wb shape round — Sets the primary border shape to round/elliptic for all worlds.
/wb wshape square — Sets the border shape for the current world to square/rectangular, not affecting the default shape used by other worlds.
With your permission plugin of choice, you can also use the permission worldborder.* to grant all plugin commands to a group or player. Whether or not you’re using a plugin for permissions, Ops and people with access to the server console will be able to use all commands.
The Fill command:
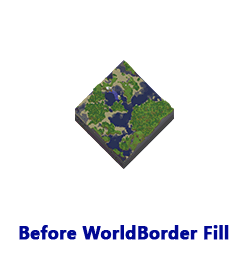
The «fill» command is a bit special, so I’ll devote an entire section to describing it. Maybe easier to show than describe, so. Here’s a world with a 512 radius round border set, the Before image being from a freshly generated world and the After image being right after WorldBorder’s fill command has completed (176 block buffer used here, though 208 is the default):

After initiating the fill command, you will receive a bit of info on the process, and will be required to enter /wb fill confirm to actually start the process. Every 5 seconds, it will give you a progress report along with an estimated completion percentage. To pause/unpause the process at any time while it’s running, you can use the /wb fill pause command. Likewise, to cancel the process you can use the command /wb fill cancel .
If it detects at any point that you are running extremely low on available memory (less than 200 MB), it will automatically pause the process, and will automatically resume if/when at least 500 MB of memory is available. If you shut down your server while the process is running, it will even mark its progress and will automatically continue on its own as soon as the server comes back up. That being the case, if you want it to finish as quickly as possible and it has hit low memory availability, simply stopping and restarting the server is generally much quicker than waiting for Java to decide to do garbage collection.
It is strongly recommended to only use the default frequency value of 20 for the fill process; higher values have sometimes proven to cause the process to slow to a crawl or crash for no clear reason.
The Trim command:
NOTE: If you are using the DynMap plugin and use our «trim» command, you will need to restart your server afterwards and then run a «fullrender» in DynMap to properly update their map display.
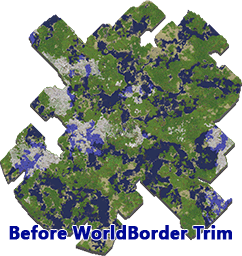
The «trim» command is a complement to the «fill» command, and similarly special. A visual demonstration is in order for it as well. Below is a backup of an old world which was largely unrestrained to begin with, as seen in the Before image. The After image shows it after the «trim» command has been run with a border radius of 750:

After initiating the trim command, you will receive a bit of info on the process, and will be required to enter /wb trim confirm to actually start the process. Every 5 seconds, it will give you a progress report along with an estimated completion percentage. To pause/unpause the process at any time while it’s running, you can use the /wb trim pause command. Likewise, to cancel the process you can use the command /wb trim cancel .
Источник


