- Запускаем собственный сервер Eco
- Требования к системе и окружению.
- 1) Белый (выделенный) статический IP адрес.
- 2) Выделенная машина для сервера.
- 3) Активный администратор.
- Необходимое для доступности сервера извне.
- 1) Наличие доступа сервера в сеть интернет.
- 2) При использовании роутера, сделана переадресация портов на сервер.
- 3) При использовании межсетевого экрана\брандмауера\файрвола, к серверу Eco разрешён доступ.
- Скачивание файлов сервера.
- 1) Установить из Steam
- 2.а) Скачать с официального сайта Strange Loop Games
- 2.б) Скачать с хранилища SLG на Amazon’е
- 3) Скачать из Steam с использованием SteamCMD
- Setting Up a Server
- Contents
- Server Through Steam [ edit | edit source ]
- Installing [ edit | edit source ]
- Running [ edit | edit source ]
- Updating [ edit | edit source ]
- Server Through SteamCMD [ edit | edit source ]
- Installing [ edit | edit source ]
- Manually [ edit | edit source ]
- With a bat file [ edit | edit source ]
- Server Without Steam [ edit | edit source ]
- Installing [ edit | edit source ]
- Running [ edit | edit source ]
- Updating [ edit | edit source ]
- Configuring [ edit | edit source ]
- Configuration Notes [ edit | edit source ]
- Server Folder Breakdown [ edit | edit source ]
- Eco Server UI [ edit | edit source ]
- Commands [ edit | edit source ]
- Server UI Notes [ edit | edit source ]
- Connecting to your server [ edit | edit source ]
- LAN [ edit | edit source ]
- Getting others to connect to your server [ edit | edit source ]
- Troubleshooting [ edit | edit source ]
- NAT and Network Settings [ edit | edit source ]
- Anti-Virus / Firewall [ edit | edit source ]
- For Further Help [ edit | edit source ]
Запускаем собственный сервер Eco
Требования к системе и окружению.
1) Белый (выделенный) статический IP адрес.
(Что такое белый\выделенный IP https://clck.ru/JNb5A)
Да, благодаря некоторым махинациям, Эко может работать и вообще без белого адреса. но ценой этого станет увеличение задержки (пинга) и большее количество разрывов связи\проблем с подключением.
Статический адрес имеет минимальный приоритет, т.к. при наличии связи с мастерсервером новый адрес будет незаметно подтянут с него и все ссылки в избранном\истории останутся рабочими.
2) Выделенная машина для сервера.
Это не обязательно должен быть сервер специально под Эко, но запускать серверную часть (разумеется если вы планируете что то большее чем «сервер на часик с друзьями») на домашнем ПК… Достаточно странно.
Запустили торрент и у всех игроков начались проблемы, в итоге такие сервера простаивают пустыми.
В целом, для 6-10 активных игроков достаточно следующего.
2-3GB свободной RAM (оперативной памяти), SSD со свободным местом под сохранения и резервные копии хотя бы в 10-15гб (что бы не было подвисания при автосохранении), свободная мощность процессора (из относительно современных) в 2-3GHz и пару потоков.
На сервере должна быть более-менее современная операционная система Windows (хотя бы W7+ или новее), запуск под Unix системами возможен, но сопряжён с таким количеством танцев с бубном что выходит далеко за рамки этой статьи.
3) Активный администратор.
Игроки не любят днями ждать прихода администратора, который всё починит. Именно поэтому если вы хотите популярный и оживлённый сервер… Вам придётся за ним следить.
Хотелось бы заметить, что «АА» (Admin Abuse, читерство при помощи админских прав) в Эко достаточно легко замечается игроками и такие сервера пустеют очень быстро. Если играете на сервере — играйте честно.
Необходимое для доступности сервера извне.
1) Наличие доступа сервера в сеть интернет.
(Я понимаю что для большинства читающих, этот пункт выглядит тупо, но я уже не один раз получал вопросы вида «я запустил сервер на не подключенной никуда машине, почему к нему никто подключится не может?»)
2) При использовании роутера, сделана переадресация портов на сервер.
По умолчанию, сервер Eco использует порты 3000 UDP и 3001 TCP
За более подробной информацией, обращайтесь к инструкции по вашему роутеру.
Например для роутеров Zuxel Keenetic пример можно посмотреть здесь — https://help.keenetic.com/hc/ru/articles/360000360760
3) При использовании межсетевого экрана\брандмауера\файрвола, к серверу Eco разрешён доступ.
По умолчанию, сервер Eco использует порты 3000 UDP и 3001 TCP
За более подробной информацией, обращайтесь к инструкциям используемого вами программного обеспечения.
Например для брандмауера Windows, пример настройки можно посмотреть здесь — https://ru.wargaming.net/support/ru/products/wot/article/15259/
Скачивание файлов сервера.
Есть три возможных варианта.
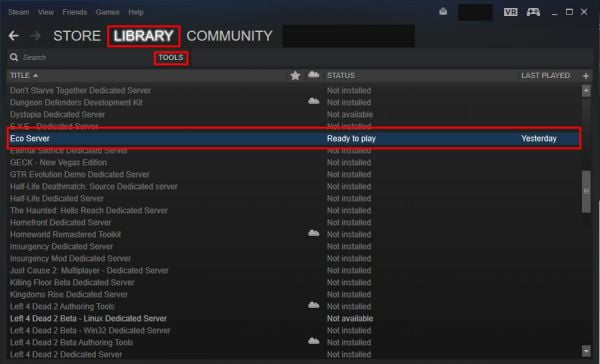
1) Установить из Steam
«Библиотека → Инструменты → Eco Server»
Обратите внимание, вам понадобится запущенный на серверной машине клиент Steam, с осуществлённым входом в учетную запись на которой куплена Eco.
Соответственно играть под этой учётной записью с другого компьютера у вас не получится.
Запускаем через кнопку «Запустить» в Steam или через \Eco Server\EcoServer.exe в папке куда ваш Steam скачивает игры.
2.а) Скачать с официального сайта Strange Loop Games
(нужен аккаунт на котором Eco куплена напрямую на сайте или связанный с учётной записью Steam на которой куплена Eco) → открываем https://accounts.strangeloopgames.com/home нажимаем «LOGIN» вводим данные своей учётной записи strange loop games, оказываемся в личном кабинете. Нас интересует секция «Options → Eco Download -> «желаемая версия» (например 0.8.3) → Server»
Обновлять придётся руками.
2.б) Скачать с хранилища SLG на Amazon’е
Скачанный архив извлекаем туда где у нас будет храниться серверная часть.
Непринципиально, но желательно что бы путь был как можно короче, не имел пробелов и не-латинских символов в пути (делайте C:\Server или D:\Server, не ошибётесь).
Запускаем EcoServer.exe в папке куда извлекли содержимое архива.
3) Скачать из Steam с использованием SteamCMD
Этот способ не требует авторизации. (Обратите внимание, утилита SteamCMD управляется через команды консоли или командные файлы .bat.)
Рассмотрим настройку с 0. (Готовые архивы в конце этой секции.)
Для начала, заходим на официальную страницу SteamCMD → скачиваем и разархивируем в C:\Server (напомню, непринципиально, но желательно что бы путь был как можно короче, не имел пробелов и не-латинских символов в пути, делайте C:\Server или D:\Server, не ошибётесь).
Обратите внимание, все консольные команды, приводятся в работоспособном виде. Работа с консолью требует внимательности, система НЕ БУДЕТ додумывать за вас или исправлять опечатки.
Для начала запустим и обновим SteamCMD
Вызываем консоль (Пуск → выполнить → CMD), вводим
(Та папка куда мы разархивировали скачанный steamcmd.)
(Запускаем непосредственно SteamCMD для обновления)
Когда обновление закончится, в окне консоли вы увидите строку
Указывая что мы будем работать без определённой учетной записи.
После успешной авторизации (вы увидите 2 строчки с ОК в окне консоли)
Вводим
Разумеется вы можете изменить желаемую директорию (в примере — ecoserver), желательно без пробелов, обязательно только на латинице.
Этой командой мы обновляем файлы выделенного сервера, если их нет — скачиваем.
После завершения вы можете увидеть надпись
В консольном окне.
Теперь серверная часть установлена в папку C:\Server\ecoserver и вы можете видеть исполняемый файл сервера EcoServer.exe
Через SteamCMD можно выполнять обновление серверной части (разумеется когда сервер остановлен), командой
Так же эта команда восстановит файлы сервера например после неудачного ковыряния.
Теперь можно набрать
В окне консоли для правильного завершения работы с SteamCMD.
Как ранее было обещано, вот готовые варианты архивов, содержащих командные файлы.
Источник
Setting Up a Server
| Accuracy | Spot checked |
| Depth | Basic |
| Readability | Acceptable |
Eco servers are relatively easy to get running, and there are a couple of ways to set one up.
If you own the game through Steam, you can get the server files and run the server through Steam. If you have a Strange Loop Games account, you can download the server files directly through Eco’s website.
There are many server hosting companies that offer to host for Eco servers if you don’t want to or can’t run an Eco server on your computer.
Contents
Server Through Steam [ edit | edit source ]
Installing [ edit | edit source ]
To run an Eco server through Steam, you must also own the game on Steam.
First, download and install the server. To do this, go to Steam -> Library -> Tools. There should be an entry in there called «Eco Server». Installing this will provide you with a copy of an Eco server that you can launch through Steam. The server is installed to:
Running [ edit | edit source ]
The server can be launched like any other Steam game. It will show up in your recently played games if it has been run recently, or it can be launched through the Tools section of your Steam library.
You are also able to navigate to the server’s install location and launch EcoServer.exe manually.
Updating [ edit | edit source ]
Eco Servers installed through Steam will update automatically just like any other Steam game.
To use other versions besides the current release, you can opt into «betas» like other Steam games. This can be done by viewing the server in your Steam Library -> Tools, right-clicking the server and selecting the properties, click the «Betas» tab, and selecting a different version from the drop-down.
If the drop-down menu has no options available, leave the code blank in the box below the drop-down and click «Check Code». You might need to close out of the properties window and re-open it to see the betas list after entering the blank code.
Updating a Steam server will not wipe the world, but may wipe configurations. Make sure you back up your configuration files before updating.
Server Through SteamCMD [ edit | edit source ]
Installing [ edit | edit source ]
Another way to install the Eco Server is to download it through SteamCMD. Steam WIKI article about steamCMD
Download steamCMD, unpack and launch it.
Manually [ edit | edit source ]
Guide to downloading the server manually through SteamCMD: Double Click the steamcmd.exe Wait until it finishes updating and deploying SteamCMD Once loaded login by typing in:
Set the install directory by typing:
This will install the server in a subdirectory within the SteamCMD directory called «Eco_Server». Finally to download the server itself type:
This will download the server. Or when you want to update the server will start downloading the latest version overwriting all the files of the downloaded server.
(Please make sure you do not run your server from the same directory just in case you decide to use this method to update and forget to back up your data.)
With a bat file [ edit | edit source ]
If you want to use a batch file (.bat) make a batch file and put one of the following codes into the file. These commands assume the .bat file is located inside the SteamCMD directory or pointing towards it.
These commands will automatically download the eco-server and place it in a folder named «Eco Server». (Inside the SteamCMD folder). Please copy the new folder and the server data in it to the location you want to host your server from.
When needing to update that server just run the .bat file again and it will update the base game server files inside the SteamCMD then you can follow the other update instructions to update your game server.
Do not run the downloaded server inside the SteamCMD folder itself. You want to keep that version as a backup and reference to an unedited server.
Server Without Steam [ edit | edit source ]
Installing [ edit | edit source ]

To run a server locally without Steam, you first need to grab the server files from Strange Loop Game’s website under «Account». This requires you to sign in to your SLG account and to have purchased Eco through that account or a linked Steam account. On the account page, there is a section that lists the current version of Eco and the current staging release with download links for both. Clicking on the «Server» link for the version you want will download a .zip file of the server.
When the server is done downloading, move the .zip file to wherever you want to install the server. It is recommended to install the server into an empty folder. When you have the .zip file in the location where you want to install the server, unzip it using whichever compression program you prefer (common programs include WinRar, 7-zip, and WinZip).
At this point, your install folder should have a handful of folders with various files and the EcoServer.exe. You are now able to run your server but to make the server publicly visible, you need to do port forwarding. The process for port forwarding is different for different routers, and there are plenty of detailed tutorials on how to this process around the internet. The ports you need to open are 3000 UDP and 3001 TCP.
IMPORTANT If you are installing a dedicated server on the same computer you have or will be running the client from, Network.eco will need to use 2 different ports other then 3000 and 3001. [Example = 4000 and 4001] Port Forward these two new ports.
Running [ edit | edit source ]
To run the server, you just have to launch the EcoServer.exe file in the server’s install.
The first time the server is run it may take a while for the world to generate. This is normal. Some settings, such as the world’s size, can make this a longer or shorter wait. The main server UI won’t appear until the world is done generating and loading.
Updating [ edit | edit source ]
Updating the server must be done manually. This will require you to go back to SLG’s website and download the new version of the server files. You can replace the older version of the server files with the newer version’s files. But if you want to keep the same world and the same configuration settings, you have to make sure not to overwrite those files (the Storage and Configs folders).
It is a good idea to always back up your server files before updating. That way you can revert to the old version if the install gets messed up or if there is some issue with the new version.
See Updating a Server for more details on updating your server manually.
Configuring [ edit | edit source ]
There are tons of options for configuring your server and your playing experience. You can edit these options by directly changing the files in the Configs folder of the server with any text editor. But doing the edits manually, you will need to restart the server to see the changes in-game. Most of these configurations can be changed from the server UI as well, and changes made in the UI don’t require a restart from the server.
If you are going to be playing on the same PC as the PC you are hosting the server from please change your ports to something else. The recommended ports are:
— Game Server Port: 4000 UDP (or UDP/TCP)
— Web Server Port: 4001 TCP (or UDP/TCP)
See Setting Up a Server (advanced) for more details on configuring your server.
Configuration Notes [ edit | edit source ]
- Edits to WorldGenerator.eco require a server wipe to take effect.
- Whitelisting allows whitelisted players to ignore the requirement for a password but for whitelisting to work you must set a password.
- When changing the map size keep the map values divisible by 4 or risk severe issues.
- When changing map height and depth you will have to do the maths to keep issues away, it is not recommended.
- When setting up whitelists/admins you must use either an SLG id or Steam64 id, just writing the username does not work. Here is a link to find your steam64id: http://www.steam64.com
Server Folder Breakdown [ edit | edit source ]
- Configs — Files in this folder contain the configurable settings for the server. You can edit any of the .eco files with a text editor but be careful doing so. Keep in mind none of your edits here will take effect unless you restart your game server (Turn it off and on again.)
- doc — Contains a single file with definitions for the webserver.
- Logs — This folder only appears if you’ve installed a mod that has crashed. It contains mod crash logs.
- Dump — Contains crash dump files for when the server crashes.
- Mods — Contains server game data. This is also the folder where you should place any mods you’ve made or downloaded.
- Storage — This folder contains a backups folder, a file named «Game.db» and a file named «Game.eco». This is where your current game saves is. When wiping the server data/map this is where you will have to go.
- Web Client — The web server files are found here.
Eco Server UI [ edit | edit source ]
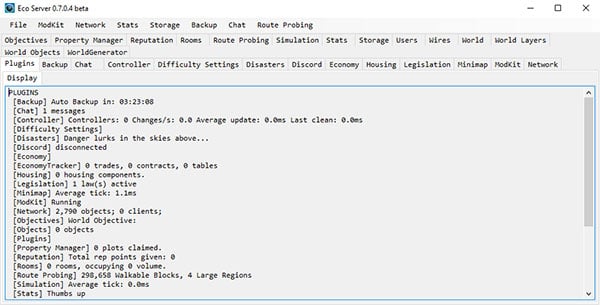
The server UI provides access to a wide variety of configuration options. Changes made to config options in the UI will apply to the server without needing to restart the server. However, with any changes you make (such as adding an admin), you must click «File» and «Save» or else you will lose the changes upon reloading the server.
If you are renting a server through a server hosting company, you most likely do not have access to the default server UI. These companies usually provide a custom UI or other options for easily editing the server’s configs.
Commands [ edit | edit source ]
See Chat Commands for a complete list of commands that are available to both admins and regular users in a default server.
Server UI Notes [ edit | edit source ]
(Please do check the normal configuration notes too.)
1. Changing world generator settings won’t take effect until you wipe and regenerate the map. This includes map sizes.
2. When making a change to your settings through the Server UI remember to click on file -> save to save the edit to the config files.
Connecting to your server [ edit | edit source ]
LAN [ edit | edit source ]
When first attempting to connect to your server, make sure it is running, then enter your game and visit the server browser.
Your server should appear in the server list under «LAN». If the server is public, you should be able to see it in the server browser.
Note: The latest server versions don’t require you to forward your ports, but server versions before 0.7.4 require manual port forwarding. If you are using an older server version you will have to manually forward.
Getting others to connect to your server [ edit | edit source ]
NOTE: Before giving others your IP please check that your server is visible with either of these websites:
Default ports to check are: 3000-UDP and 3001-TCP (Unless you changed them in the config phase.)
Gameport needs UDP and web port needs TCP (Both can be used for each if you want).
3000-TCP might be used when downloading mods from the server, but this is not totally confirmed.
Navigate to https://www.whatismyip.com/ and grab your public IP.
Now add the server’s configured game port at the end. (Game Port not Web Port) It should look something like this: xxx.xx.xx.xx:3000
For example: 290.94.93.89:3000
Now that you have the server address. Give that to your friends and they should be able to connect if you’ve set up the server correctly.
Troubleshooting [ edit | edit source ]
See Setting Up a Server (advanced) for more details on server troubleshooting.
NAT and Network Settings [ edit | edit source ]
(NOTE: NAT Punchthrough has been added since version 0.7.4 of the server and NAT based settings have been removed)
You can view the NAT settings for your server in the Network tab of the server UI. When the Network tab is clicked (tab, not the menu option at the top of the UI) it will show 3 tabs, Config, Display, and Graphs. The Display tab will show the status of NAT, and the Config tab will allow you to enable or disable auto-detection for NAT.
The Network option in the top menu of the server UI has a button to refresh NAT. This will cause the server to recheck the NAT and can potentially solve some NAT issues.
Anti-Virus / Firewall [ edit | edit source ]
Some Anti-Virus solutions will block your server from talking and subsequently prevent players from seeing it online.
Either allow the game ports to function through the Anti-Virus.
When it comes to firewalls and NAT your router may not be working correctly with NAT or not have it at all so you may have to manually port forward your ports. On both your pc firewall and the router. See Setting Up a Server (advanced) for more details.
For Further Help [ edit | edit source ]
Join the Discord Server and visit the #server-help channel for support.
Источник


