- Настройка VS Code для работы с Python.
- Шаг 5. Установка пакетов в окружении Python
- Просмотр окружений
- Установка пакетов с помощью окна «Окружения Python»
- Запуск программы
- Как настроить Visual Studio Code для C, C++, Java, Python
- 1. Устанавливаем Visual Studio Code
- 2. Настраиваем расширения
- 3. Настраиваем внешний вид редактора
- Getting Started with Python in VS Code
- Prerequisites
- Install Visual Studio Code and the Python Extension
- Install a Python interpreter
- Windows
- macOS
- Linux
- Other options
- Verify the Python installation
- Start VS Code in a project (workspace) folder
- Select a Python interpreter
- Create a Python Hello World source code file
- Run Hello World
- Configure and run the debugger
- Install and use packages
- Next steps
Настройка VS Code для работы с Python.

Mar 11, 2017 · 3 min read

Сегодня немного о моих мытарствах с VS Code и его настройкой для нормальной работы с Python разных версий. Сразу оговорюсь, что всё это настраивалось под меня, опыта у меня мало и вообще это большей частью “for fun”.
Редактор правда очень крутой, мощный (“навороченнее” какого-нибудь sublime text) и при этом очень лёгкий (запускается и работает шустрее PyCharm’a). Во всяком случае на мой неопытный взгляд (хотя авторитетные бобры тоже используют). Предполагается, что Python (2.x или 3.x, не важно) у вас уже установлен.
Скачать VS Code для Win, Mac и Linux можно совершенно бесплатно с официального сайта. Из коробки вы получаете редактор с IntelliSense, приятным дебагером, встроенной поддержкой Git и расширениями. Но для работы с Python этого недостаточно. Поэтому лезем во вкладку расширений, вбиваем в строке поиска “Python” и выбираем самое популярное расширение (1,5 млн мух, как мы знаем, ошибаться не могут). Жмём установить, немного ждём, перезапускаем приложение по требованию.
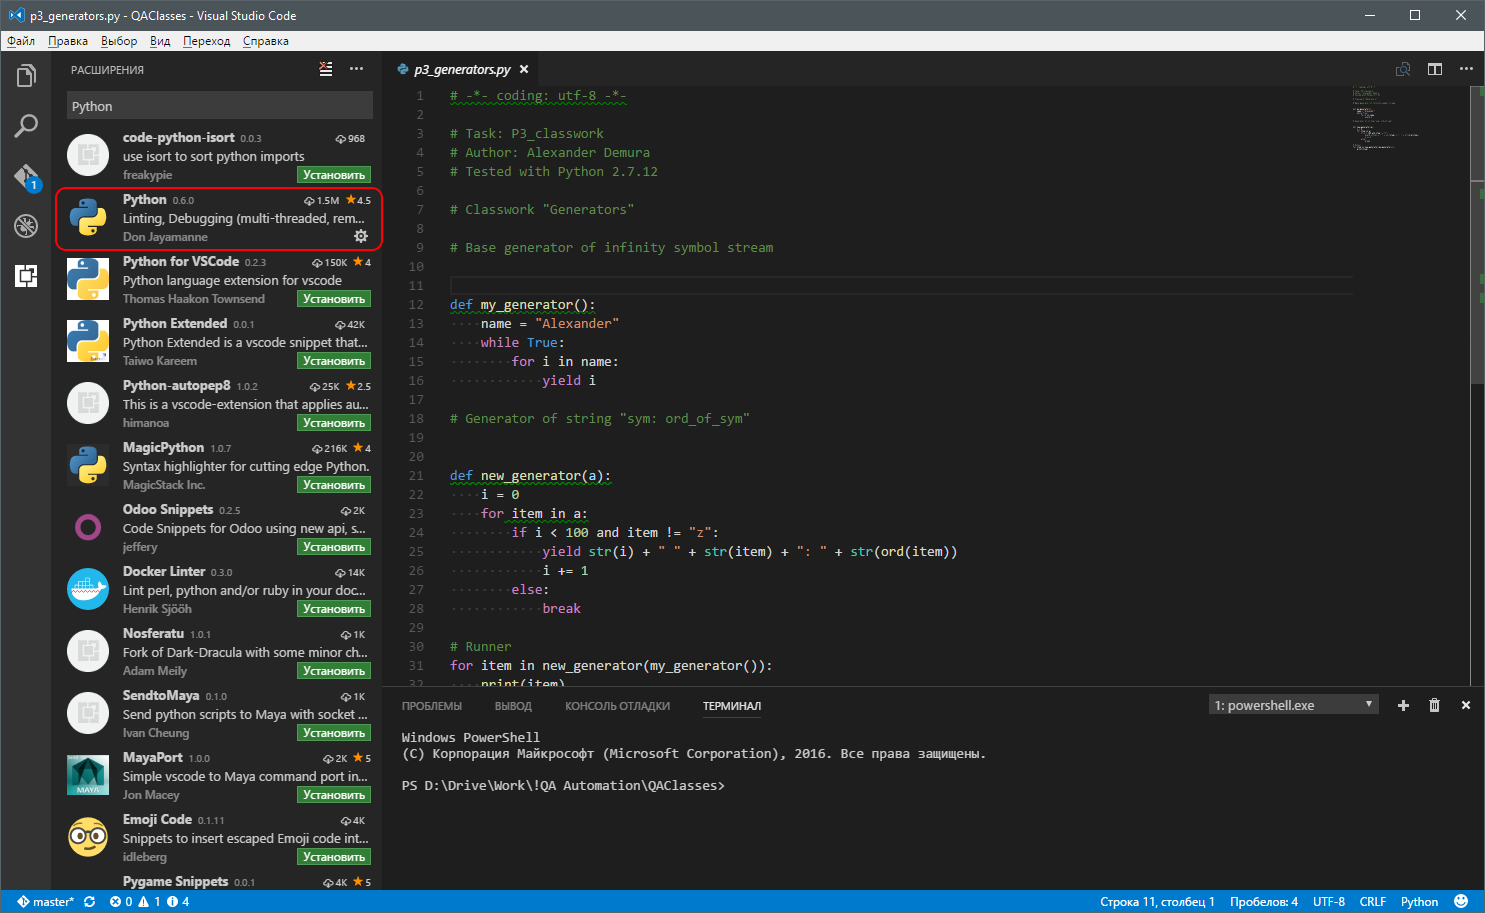
После установки он попросит установить pylint, но это не сложно сделать прямо здесь же из консоли:
На этом как бы и всё, формальная часть выполнена. Но. Сегодня мне понадобилось протестить один и тот же код на работоспособность в Python 2.7 и 3.6. В Ubuntu проблем не возникало: жмём Ctrl+Shift+P, ищем в появившемся меню “Python: Select Workspace Enterpreter” и выбираем нужное из списка. В Win10 почему-то это не сработало так просто: хотя на компьютере точно установлены 2.7, 3.5 и 3.6. в списке только 2.7. Как добавить элементы в этот список я не нашёл, но нашёл способ изменить и дебагер и текущую используемую версию python в файлах настроек.
Настраивается очень просто. При первом запуске дебагера вам будет предложено отредактировать конфигурацию, куда вам нужно дописать недостающие версии. Выглядит примерно так:

В этом блоке вам нужно изменить 2 строки: “ name” (имя конфигурации)и “ pythonPath” (путь до python.exe нужной версии). Не забудьте экранировать бэк-слэши:

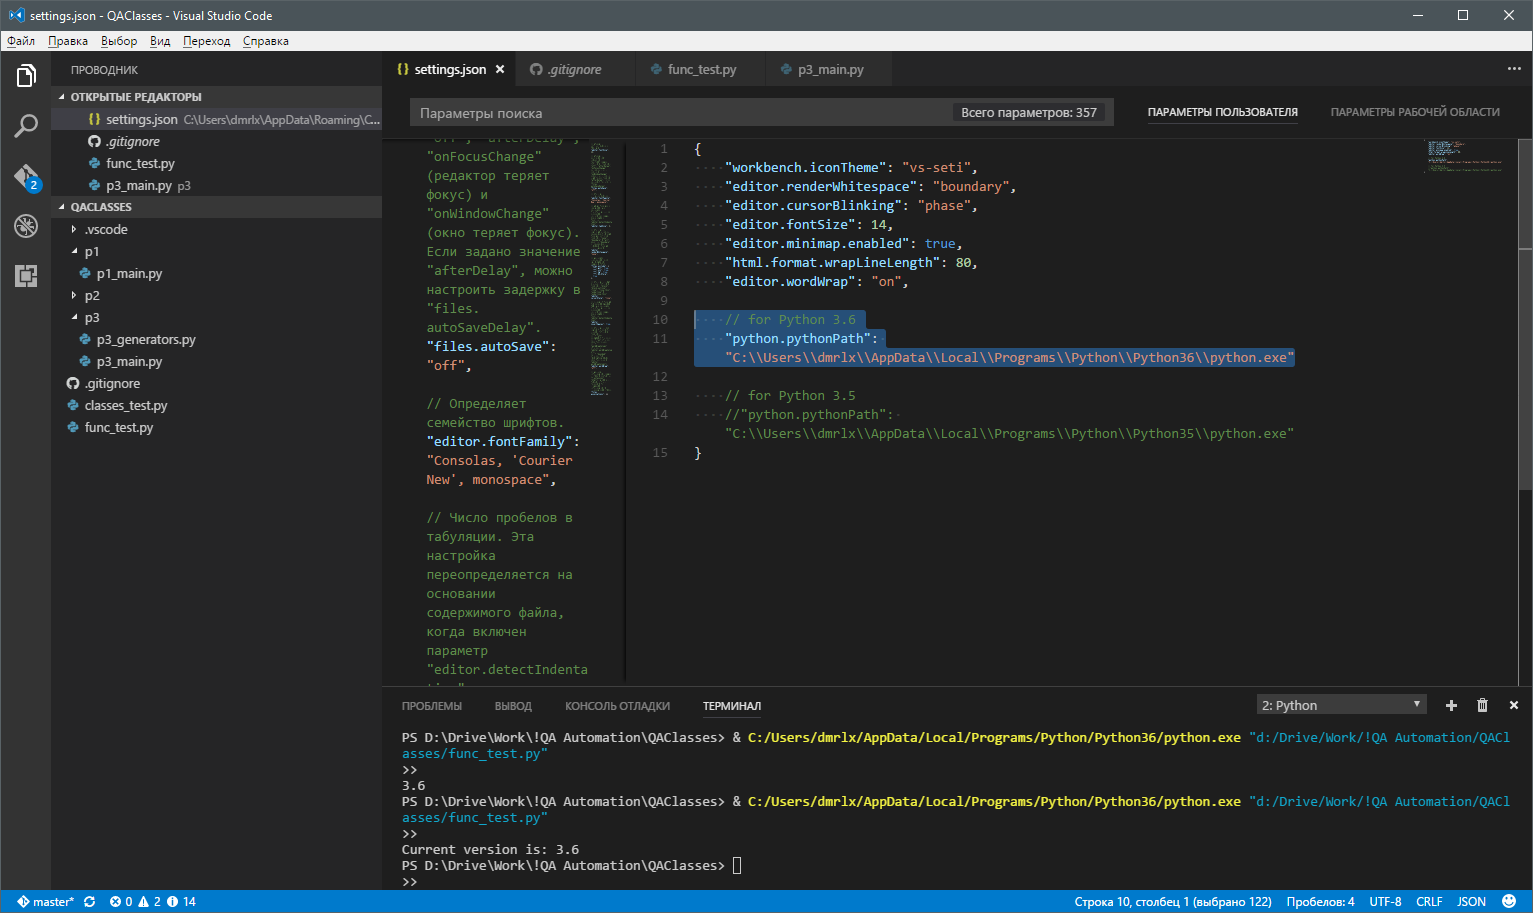
Текущая версия интерпретатора.
Можно изменить в настройках приложения (файл settings.json). Нужно добавить следующее (Python 3.6):
Сохраняем настройки и теперь ваши скрипты будут исполняться интерпритатором Python 3.6.

По дефолту в git пытается выгрузиться совершенно там ненужная папка .vscode, которая хранит разного рода служебную инфу. Чтобы этого не происходило создайте в корне проекта файлик .gitignore и добавьте в него следующее содержимое ( .gitignore — чтобы игнорировался сам этот файл, да):
Всё, указанное ниже, прописывается в файле settings.json
Я люблю всякие украшательства и использую встроенный пак иконок для разных типов файлов. Наглядно, стильно_модно_молодёжно.
Очень бывает удобно видеть количество пробелов перед строкой (особенно в python) и лишние пробелы между символами/словами:
Ну и красиво мигающий курсор ещё никому никогда не вредил 😉
Источник
Шаг 5. Установка пакетов в окружении Python
Сообщество разработчиков на Python создало тысячи полезных пакетов, которые вы можете включать в свои проекты. В Visual Studio имеется пользовательский интерфейс для управления пакетами в средах Python.
Просмотр окружений
Выберите команду меню Просмотр > Другие окна > Окружения Python. Откроется окно Окружения Python (как узел обозревателя решений), в котором представлены разные среды, доступные вам. Список содержит как среды, установленные с помощью установщика Visual Studio, так и среды, которые вы установили отдельно. В их число входят глобальные, виртуальные среды и среды Conda. Среда, выделенная полужирным шрифтом, — это среда, используемая по умолчанию для новых проектов. Дополнительные сведения о работе со средами см. в разделе Создание окружений Python и управление ими в средах Visual Studio.

Можно также открыть окно «Окружения Python», выбрав окно Обозревателя решений и нажав сочетание клавиш CTRL+K, CTRL+` . Если сочетание клавиш не работает и окно «Окружения Python» отсутствует в меню, возможно, не установлена рабочая нагрузка Python. Инструкции по установке Python см. в статье Установка поддержки Python в Visual Studio.
На вкладке Обзор среды можно быстро получить доступ к интерактивному окну этой среды, а также к ее папке установки и интерпретаторам. Например, щелкните ссылку Открыть интерактивное окно, и в Visual Studio откроется интерактивное окно для этой среды.
Теперь создайте проект, выбрав пункт меню Файл > Создать > Проект, а затем выбрав шаблон Приложение Python. В появившийся файл кода вставьте приведенный ниже код, который строит косинусоиду, как в предыдущих шагах учебника, но теперь в виде графика. Кроме того, можно использовать ранее созданный проект и заменить код.
В открытом проекте Python можно открыть окно «Окружения Python» из Обозревателя решений, щелкнув правой кнопкой мыши Окружения Python и выбрав Просмотреть все окружения Python.

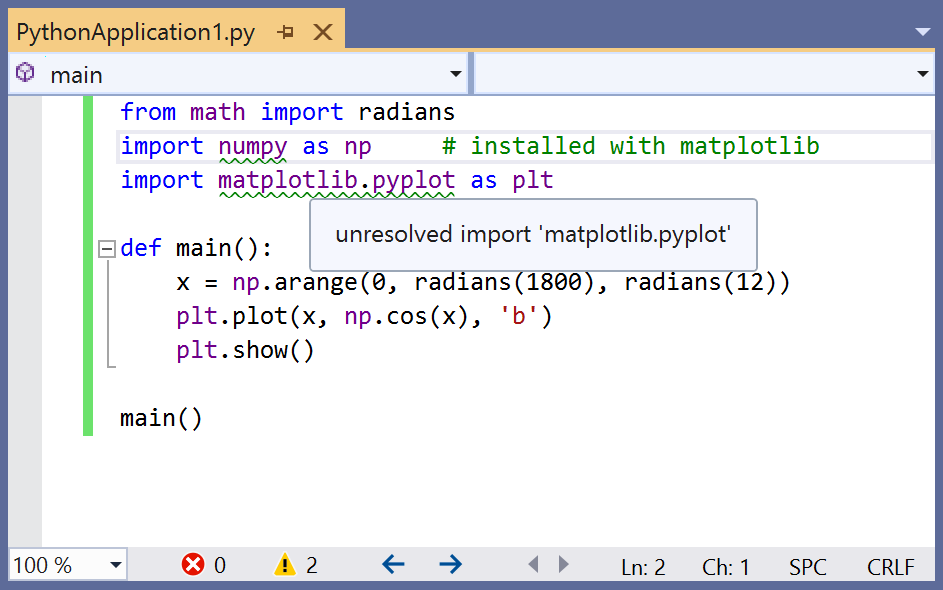
Если в окне редактора вы наведете указатель мыши на операторы импорта numpy и matplotlib , вы заметите, что они не разрешены. Это связано с тем, что пакеты не были установлены в глобальную среду по умолчанию.
Установка пакетов с помощью окна «Окружения Python»
В окне «Окружения Python» выберите среду по умолчанию для новых проектов Python и перейдите на вкладку Пакеты. На ней вы увидите список пакетов, установленных в настоящее время в среде.

Установите пакет matplotlib , введя его имя в поле поиска, а затем выбрав параметр Выполнить команду «pip install matplotlib» . Будет установлен пакет matplotlib , а также все пакеты, от которых он зависит (в данном случае — numpy ).

Согласитесь на повышение прав, если появится соответствующий запрос.
Установленный пакет появится в окне Окружения Python. Если щелкнуть знак X справа от пакета, он будет удален.

Под названием среды может появиться небольшой индикатор выполнения, который указывает на то, что Visual Studio создает базу данных IntelliSense для нового пакета. На вкладке IntelliSense также приводятся более подробные сведения. Имейте в виду, что, пока база данных не будет готова, функции IntelliSense, такие как автозавершение и проверка синтаксиса, будут неактивны для этого пакета в редакторе.
В Visual Studio 2017 версии 15.6 и более поздних версий используются другие (более быстрые) методы для работы с IntelliSense. На вкладке IntelliSense отображается соответствующее сообщение.
Запуск программы
После установки matplotlib запустите программу с отладчиком (F5) или без него (CTRL+F5), чтобы увидеть результат.
Источник
Как настроить Visual Studio Code для C, C++, Java, Python

May 26, 2020 · 6 min read
Visual Studio Code — популярный редактор кода, бесплатный и с открытым исходным кодом. Но я уверен: каждый из нас, кто пытался настроить Visual Studio Code для разработки приложений на C++, Java или Python, прошел через стадию: “О Боже! Почему нельзя как-нибудь попроще?” Я сам пробовал настроить VS Code пару раз и в итоге закончил тем, что использовал CodeBlocks. 🙁
Прочитав много документации, посмотрев ряд роликов на YouTube и потратив несколько дней на саму настройку VS Code, я пишу эту статью, чтобы все это не пришлось проделывать уже вам!
Сегодня я по к ажу, как настроить среду разработки для спортивного программирования на C++, Java и Python в VS Code с нуля. Мы также посмотрим, какие расширения больше всего пригодятся, чтобы начать работу с VS Code. В конечном счете, ваша среда разработки будет выглядеть примерно так:

1. Устанавливаем Visual Studio Code
Скачайте последнюю версию Visual Studio Code с официального сайта. Рекомендуется загрузить системный установщик ( System Installer), но если у вас нет прав администратора, то пользовательский установщик ( User Installer) тоже подойдет. Выполните все обычные шаги по установке и обязательно проставьте все следующие чекбоксы:

Если у вас уже установлен VS Code, но вы все равно хотите начать с чистого листа, следуйте этим инструкциям, чтобы полностью удалить VS Code.
2. Настраиваем расширения
Ниже приведен список расширений, которые нам понадобятся для правильной настройки VS Code. Откройте VS Code и перейдите на панель расширений ( Ctrl + Shift + X), которая находится на левой панели инструментов, и начните загружать друг за другом следующие расширения:
- C / C++ от Microsoft — [Важно] Для корректной работы этого расширения нам понадобится установленный и добавленный в PATH компилятор MinGW. Если у вас его нет, следуйте этому руководству.
- C++ Intellisense от austin.
- Python от Microsoft — вам нужно будет настроить Python для работы этого расширения. Загрузите и установите последнюю версию отсюда.
- Java Extension Pack от Microsoft — [ Важно] Перед установкой убедитесь, что в вашей системе настроены Java 8 JDK и JRE и указаны все необходимые переменные среды для Java. Если нет, посмотрите это видео о том, как настроить Java на вашем компьютере.
- Code Runner от Jun Han — мы будем использовать это расширение для запуска всех наших программ. Для этого необходимо выполнить некоторые шаги по настройке. Мы увидим эти шаги в следующих разделах.
Расширения, перечисленные ниже, необязательны для дальнейшей настройки, но я рекомендую вам обратить на них внимание, посмотреть, заинтересуют ли они вас, и если нет, то перейти к следующему разделу.
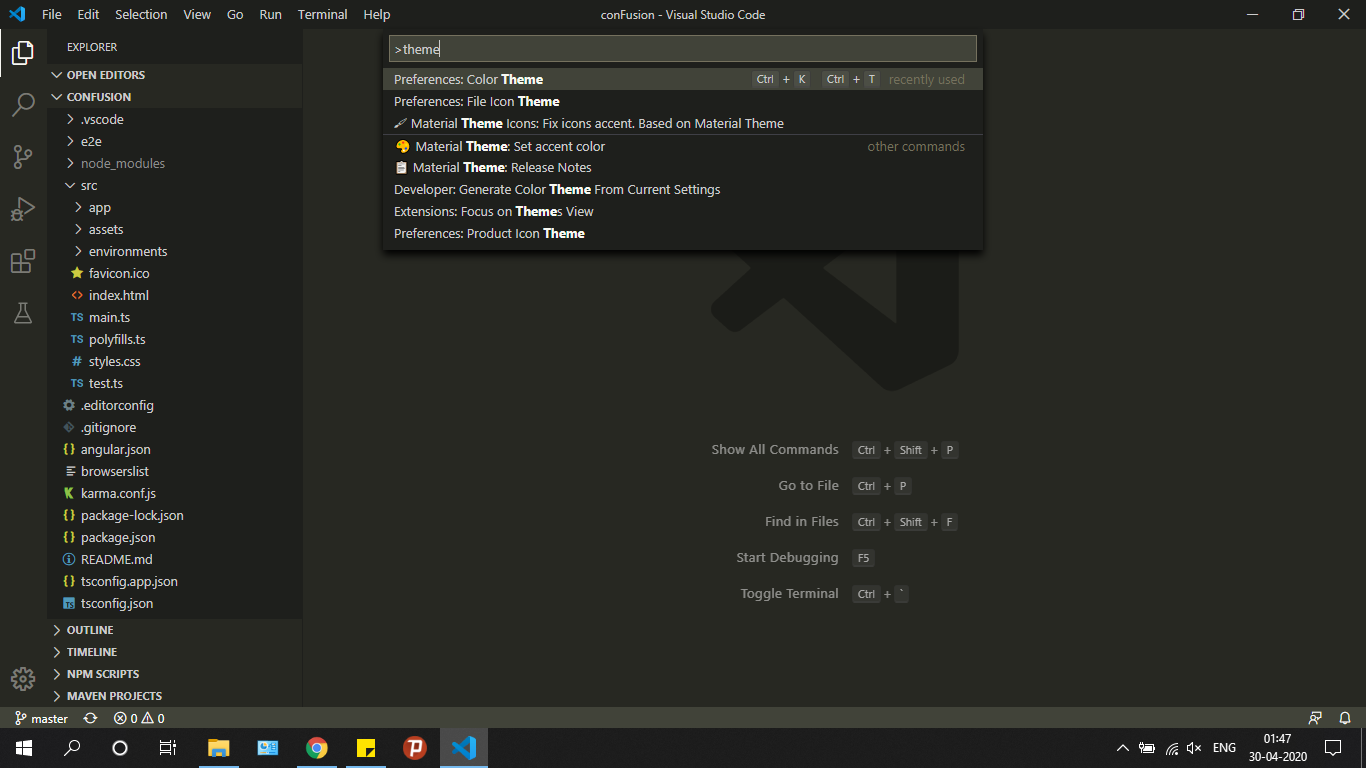
- ( Необязательно)Material Theme от Mattia Astronio — это расширение содержит множество приятных глазу тем. Вы можете выбрать любую, какая понравится. Лично я предпочитаю Monokai, которая доступна в VS Code по умолчанию, без каких-либо расширений.
Чтобы выбрать тему, нажмите Ctrl + Shift + P. Откроется палитра команд. Осуществите поиск по слову “ theme” и выберите опцию Color Theme. Чтобы настроить иконки, можете выбрать опцию File Icon Theme.
Расширения для тех, кто интересуется FrontEnd-фреймворками для веб-разработки, такими как Angular и React:
3. Настраиваем внешний вид редактора
Итак, мы уже установили VS Code и несколько расширений. Теперь мы готовы настраивать среду разработки. Я создал шаблон для спортивного программирования в VS Code и загрузил его в свой профиль на Github.
Перейдите по этой ссылке и загрузите шаблон себе на компьютер. Распакуйте его в любое место по вашему выбору. После этого откройте получившуюся папку в VS Code. Вы должны увидеть что-то вроде этого:
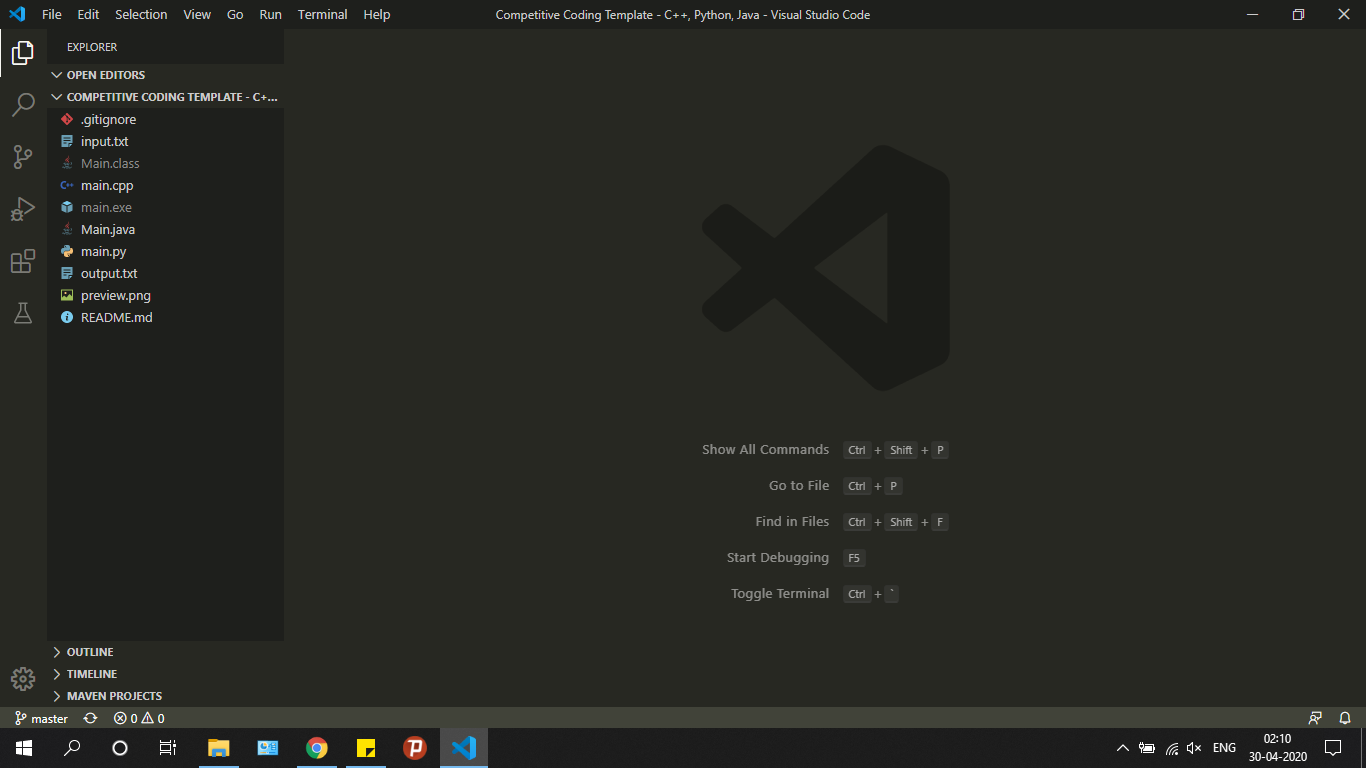
Пройдитесь по файлам main.cpp, Main.java и main.py и посмотрите на записанный в них образец кода. По сути, шаблонный код, предоставленный в образцах для каждого из этих трех языков, принимает входящие данные из файла input.txt и обеспечивает вывод в файл output.txt. Для каждой программистской задачи, которую вы хотите решить, просто создайте копию этого шаблона и напишите свой код в функции solve().
Теперь создадим ту разбивку экрана, которую вы могли видеть на самом первом изображении в этой статье. Эта разбивка позволяет сразу видеть как ввод, так и вывод вашего кода, что делает ее очень удобной в использовании.
Источник
Getting Started with Python in VS Code
In this tutorial, you use Python 3 to create the simplest Python «Hello World» application in Visual Studio Code. By using the Python extension, you make VS Code into a great lightweight Python IDE (which you may find a productive alternative to PyCharm).
This tutorial introduces you to VS Code as a Python environment, primarily how to edit, run, and debug code through the following tasks:
- Write, run, and debug a Python «Hello World» Application
- Learn how to install packages by creating Python virtual environments
- Write a simple Python script to plot figures within VS Code
This tutorial is not intended to teach you Python itself. Once you are familiar with the basics of VS Code, you can then follow any of the programming tutorials on python.org within the context of VS Code for an introduction to the language.
If you have any problems, feel free to file an issue for this tutorial in the VS Code documentation repository.
Prerequisites
To successfully complete this tutorial, you need to first setup your Python development environment. Specifically, this tutorial requires:
- VS Code
- VS Code Python extension
- Python 3
Install Visual Studio Code and the Python Extension
If you have not already done so, install VS Code.
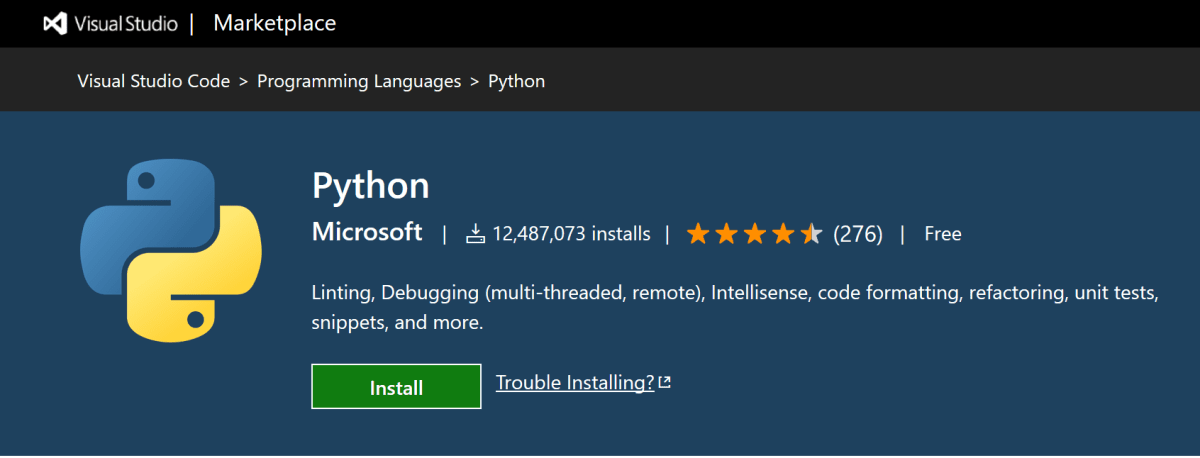
Next, install the Python extension for VS Code from the Visual Studio Marketplace. For additional details on installing extensions, see Extension Marketplace. The Python extension is named Python and it’s published by Microsoft.
Install a Python interpreter
Along with the Python extension, you need to install a Python interpreter. Which interpreter you use is dependent on your specific needs, but some guidance is provided below.
Windows
Install Python from python.org. You can typically use the Download Python button that appears first on the page to download the latest version.
Note: If you don’t have admin access, an additional option for installing Python on Windows is to use the Microsoft Store. The Microsoft Store provides installs of Python 3.7, Python 3.8, Python 3.9, and Python 3.10. Be aware that you might have compatibility issues with some packages using this method.
For additional information about using Python on Windows, see Using Python on Windows at Python.org
macOS
The system install of Python on macOS is not supported. Instead, an installation through Homebrew is recommended. To install Python using Homebrew on macOS use brew install python3 at the Terminal prompt.
Note On macOS, make sure the location of your VS Code installation is included in your PATH environment variable. See these setup instructions for more information.
Linux
The built-in Python 3 installation on Linux works well, but to install other Python packages you must install pip with get-pip.py.
Other options
Data Science: If your primary purpose for using Python is Data Science, then you might consider a download from Anaconda. Anaconda provides not just a Python interpreter, but many useful libraries and tools for data science.
Windows Subsystem for Linux: If you are working on Windows and want a Linux environment for working with Python, the Windows Subsystem for Linux (WSL) is an option for you. If you choose this option, you’ll also want to install the Remote — WSL extension. For more information about using WSL with VS Code, see VS Code Remote Development or try the Working in WSL tutorial, which will walk you through setting up WSL, installing Python, and creating a Hello World application running in WSL.
Verify the Python installation
To verify that you’ve installed Python successfully on your machine, run one of the following commands (depending on your operating system):
Linux/macOS: open a Terminal Window and type the following command:
Windows: open a command prompt and run the following command:
If the installation was successful, the output window should show the version of Python that you installed.
Note You can use the py -0 command in the VS Code integrated terminal to view the versions of python installed on your machine. The default interpreter is identified by an asterisk (*).
Start VS Code in a project (workspace) folder
Using a command prompt or terminal, create an empty folder called «hello», navigate into it, and open VS Code ( code ) in that folder ( . ) by entering the following commands:
Note: If you’re using an Anaconda distribution, be sure to use an Anaconda command prompt.
By starting VS Code in a folder, that folder becomes your «workspace». VS Code stores settings that are specific to that workspace in .vscode/settings.json , which are separate from user settings that are stored globally.
Alternately, you can run VS Code through the operating system UI, then use File > Open Folder to open the project folder.
Select a Python interpreter
Python is an interpreted language, and in order to run Python code and get Python IntelliSense, you must tell VS Code which interpreter to use.
From within VS Code, select a Python 3 interpreter by opening the Command Palette ( ⇧⌘P (Windows, Linux Ctrl+Shift+P ) ), start typing the Python: Select Interpreter command to search, then select the command. You can also use the Select Python Environment option on the Status Bar if available (it may already show a selected interpreter, too):

The command presents a list of available interpreters that VS Code can find automatically, including virtual environments. If you don’t see the desired interpreter, see Configuring Python environments.
Note: When using an Anaconda distribution, the correct interpreter should have the suffix (‘base’:conda) , for example Python 3.7.3 64-bit (‘base’:conda) .
Selecting an interpreter sets which interpreter will be used by the Python extension for that workspace.
Note: If you select an interpreter without a workspace folder open, VS Code sets python.defaultInterpreterPath in User scope instead, which sets the default interpreter for VS Code in general. The user setting makes sure you always have a default interpreter for Python projects. The workspace settings lets you override the user setting.
Create a Python Hello World source code file
From the File Explorer toolbar, select the New File button on the hello folder:
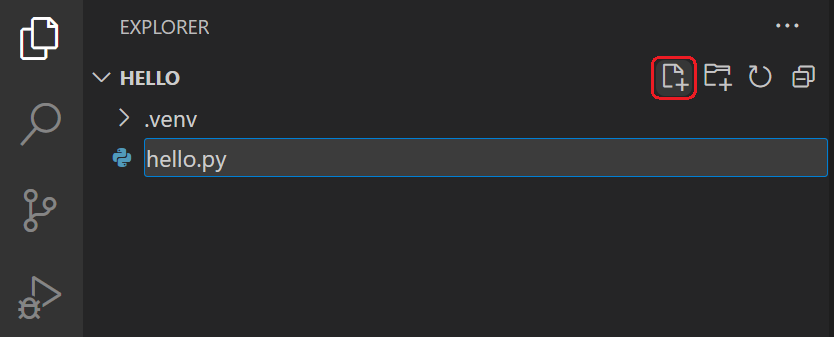
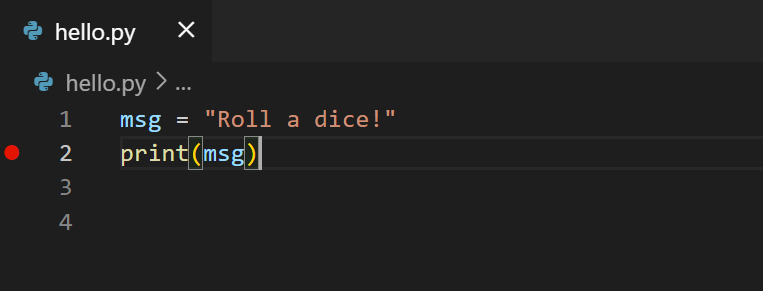
Name the file hello.py , and it automatically opens in the editor:
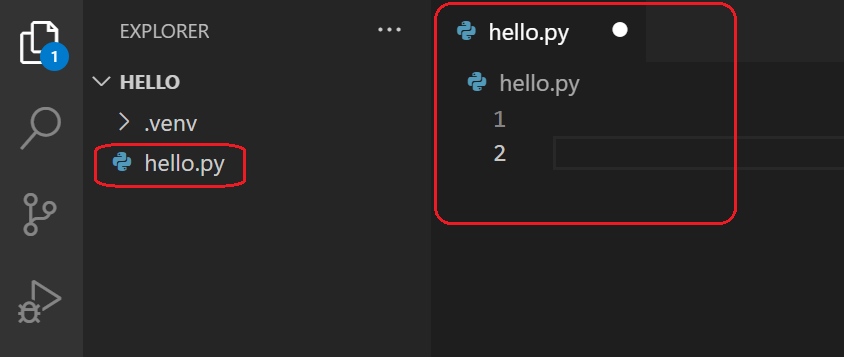
By using the .py file extension, you tell VS Code to interpret this file as a Python program, so that it evaluates the contents with the Python extension and the selected interpreter.
Note: The File Explorer toolbar also allows you to create folders within your workspace to better organize your code. You can use the New folder button to quickly create a folder.
Now that you have a code file in your Workspace, enter the following source code in hello.py :
When you start typing print , notice how IntelliSense presents auto-completion options.
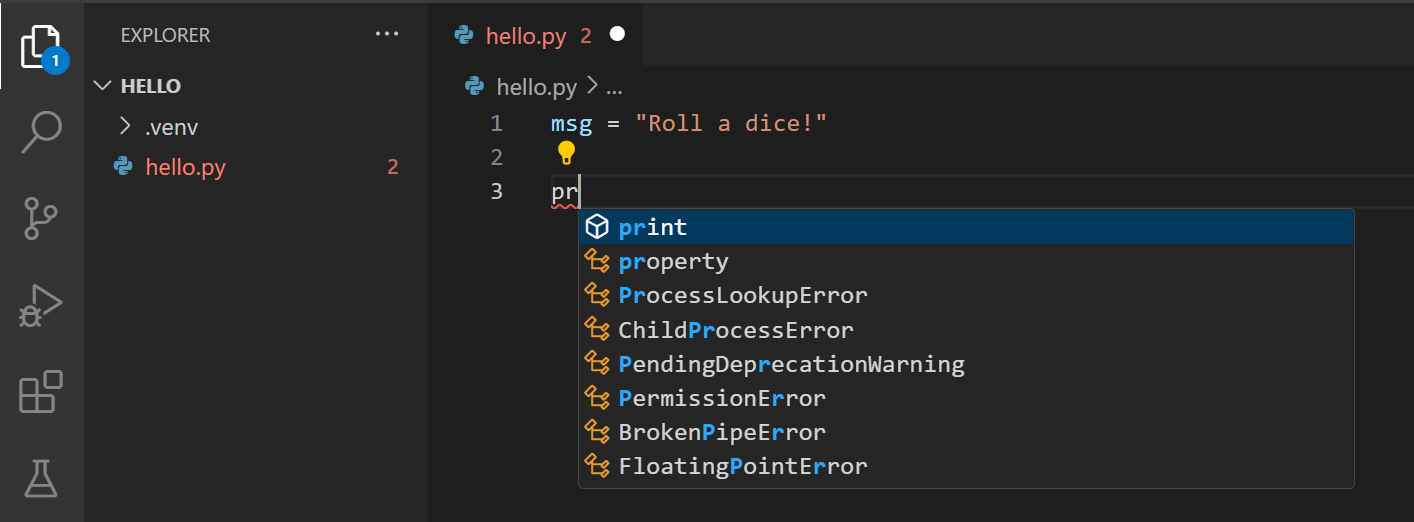
IntelliSense and auto-completions work for standard Python modules as well as other packages you’ve installed into the environment of the selected Python interpreter. It also provides completions for methods available on object types. For example, because the msg variable contains a string, IntelliSense provides string methods when you type msg. :
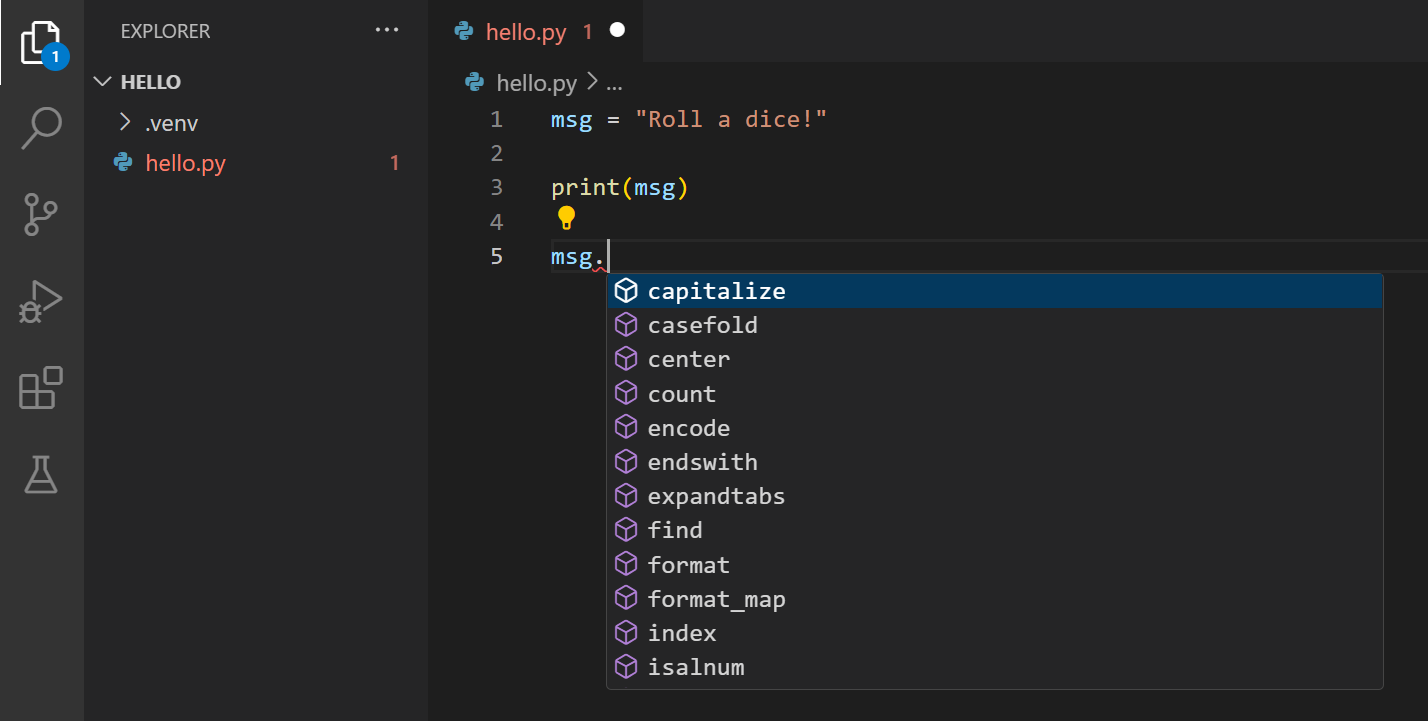
Feel free to experiment with IntelliSense some more, but then revert your changes so you have only the msg variable and the print call, and save the file ( ⌘S (Windows, Linux Ctrl+S ) ).
For full details on editing, formatting, and refactoring, see Editing code. The Python extension also has full support for Linting.
Run Hello World
It’s simple to run hello.py with Python. Just click the Run Python File in Terminal play button in the top-right side of the editor.
The button opens a terminal panel in which your Python interpreter is automatically activated, then runs python3 hello.py (macOS/Linux) or python hello.py (Windows):

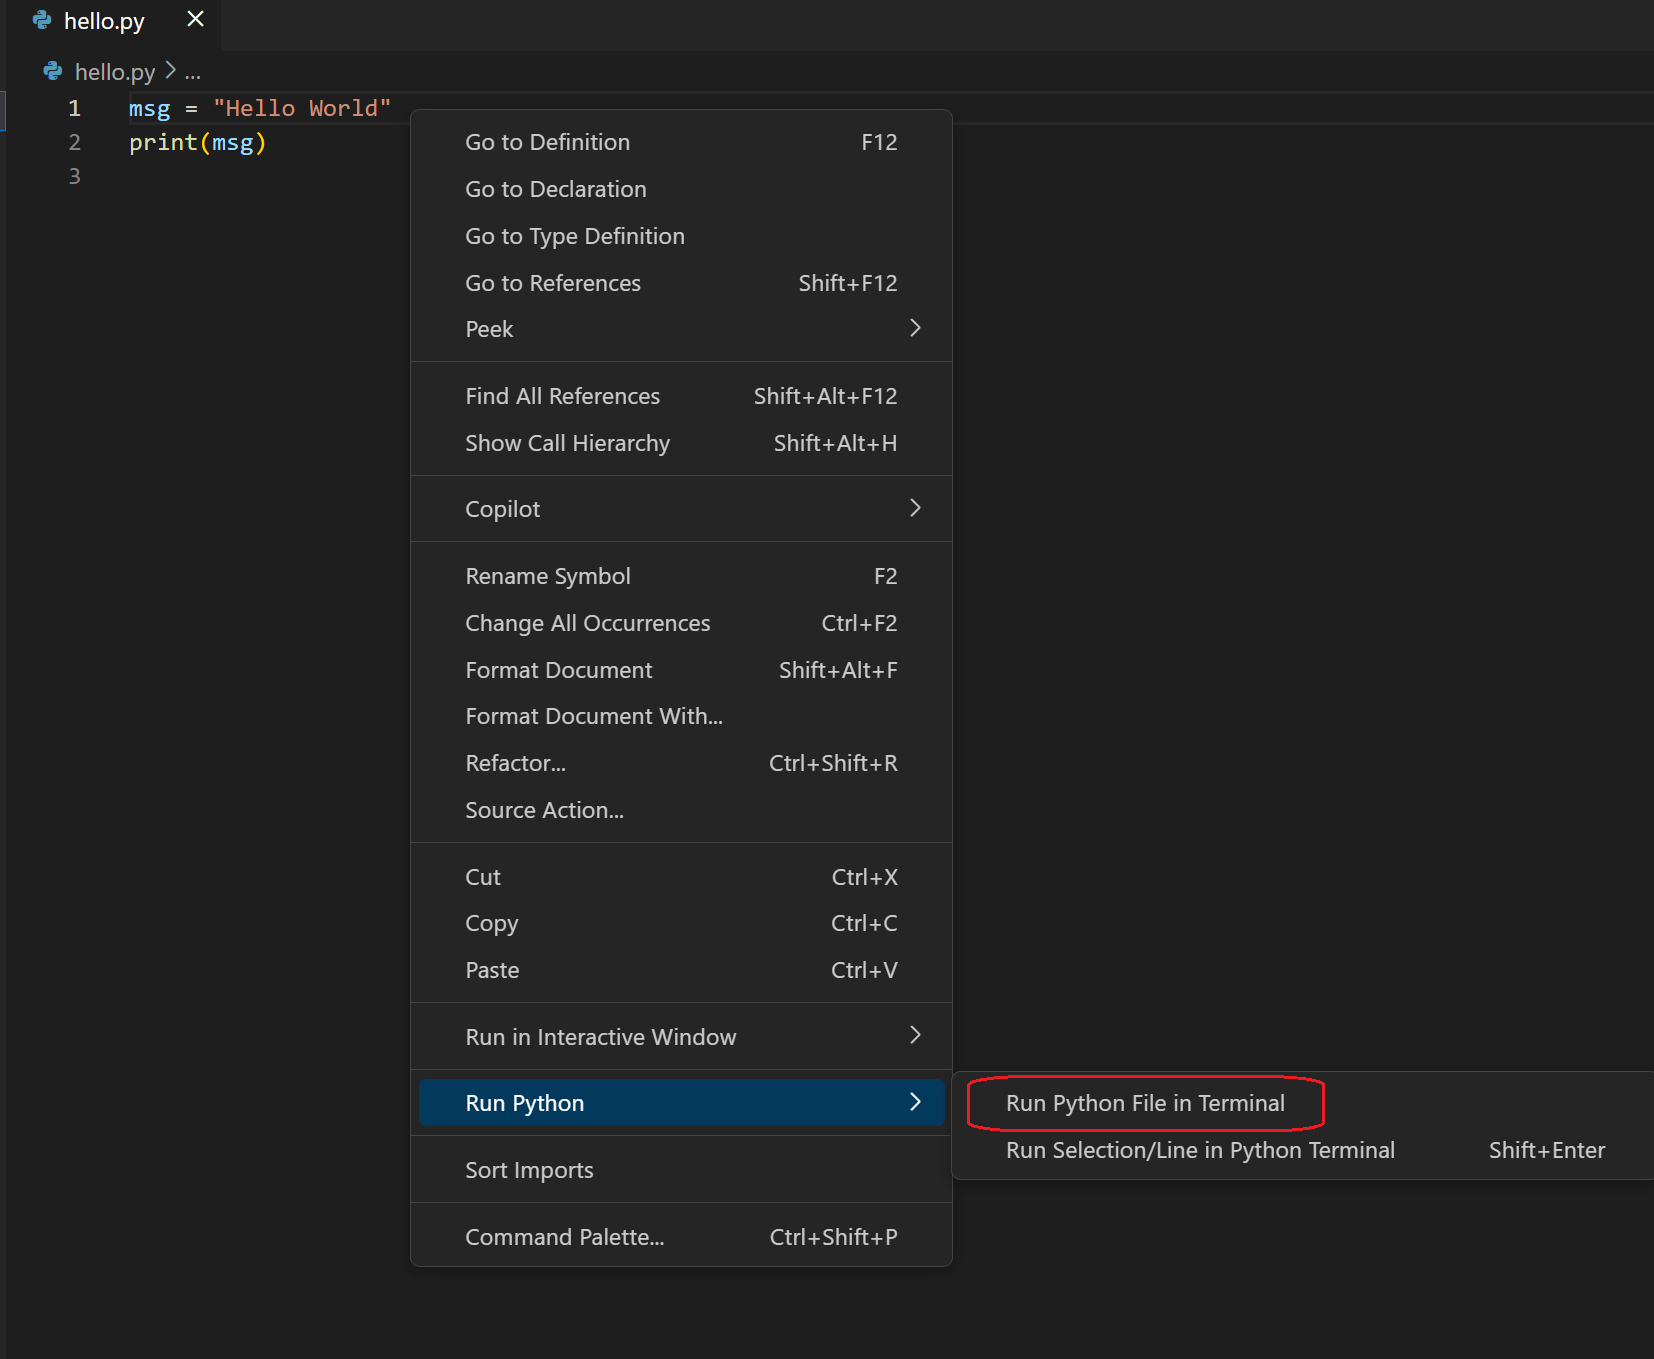
There are three other ways you can run Python code within VS Code:
Right-click anywhere in the editor window and select Run Python File in Terminal (which saves the file automatically):
Select one or more lines, then press Shift+Enter or right-click and select Run Selection/Line in Python Terminal. This command is convenient for testing just a part of a file.
From the Command Palette ( ⇧⌘P (Windows, Linux Ctrl+Shift+P ) ), select the Python: Start REPL command to open a REPL terminal for the currently selected Python interpreter. In the REPL, you can then enter and run lines of code one at a time.
Configure and run the debugger
Let’s now try debugging our simple Hello World program.
First, set a breakpoint on line 2 of hello.py by placing the cursor on the print call and pressing F9 . Alternately, just click in the editor’s left gutter, next to the line numbers. When you set a breakpoint, a red circle appears in the gutter.
Next, to initialize the debugger, press F5 . Since this is your first time debugging this file, a configuration menu will open from the Command Palette allowing you to select the type of debug configuration you would like for the opened file.

Note: VS Code uses JSON files for all of its various configurations; launch.json is the standard name for a file containing debugging configurations.
These different configurations are fully explained in Debugging configurations; for now, just select Python File, which is the configuration that runs the current file shown in the editor using the currently selected Python interpreter.
You can also start the debugger by clicking on the down-arrow next to the run button on the editor, and selecting Debug Python File in Terminal.
The debugger will stop at the first line of the file breakpoint. The current line is indicated with a yellow arrow in the left margin. If you examine the Local variables window at this point, you will see now defined msg variable appears in the Local pane.
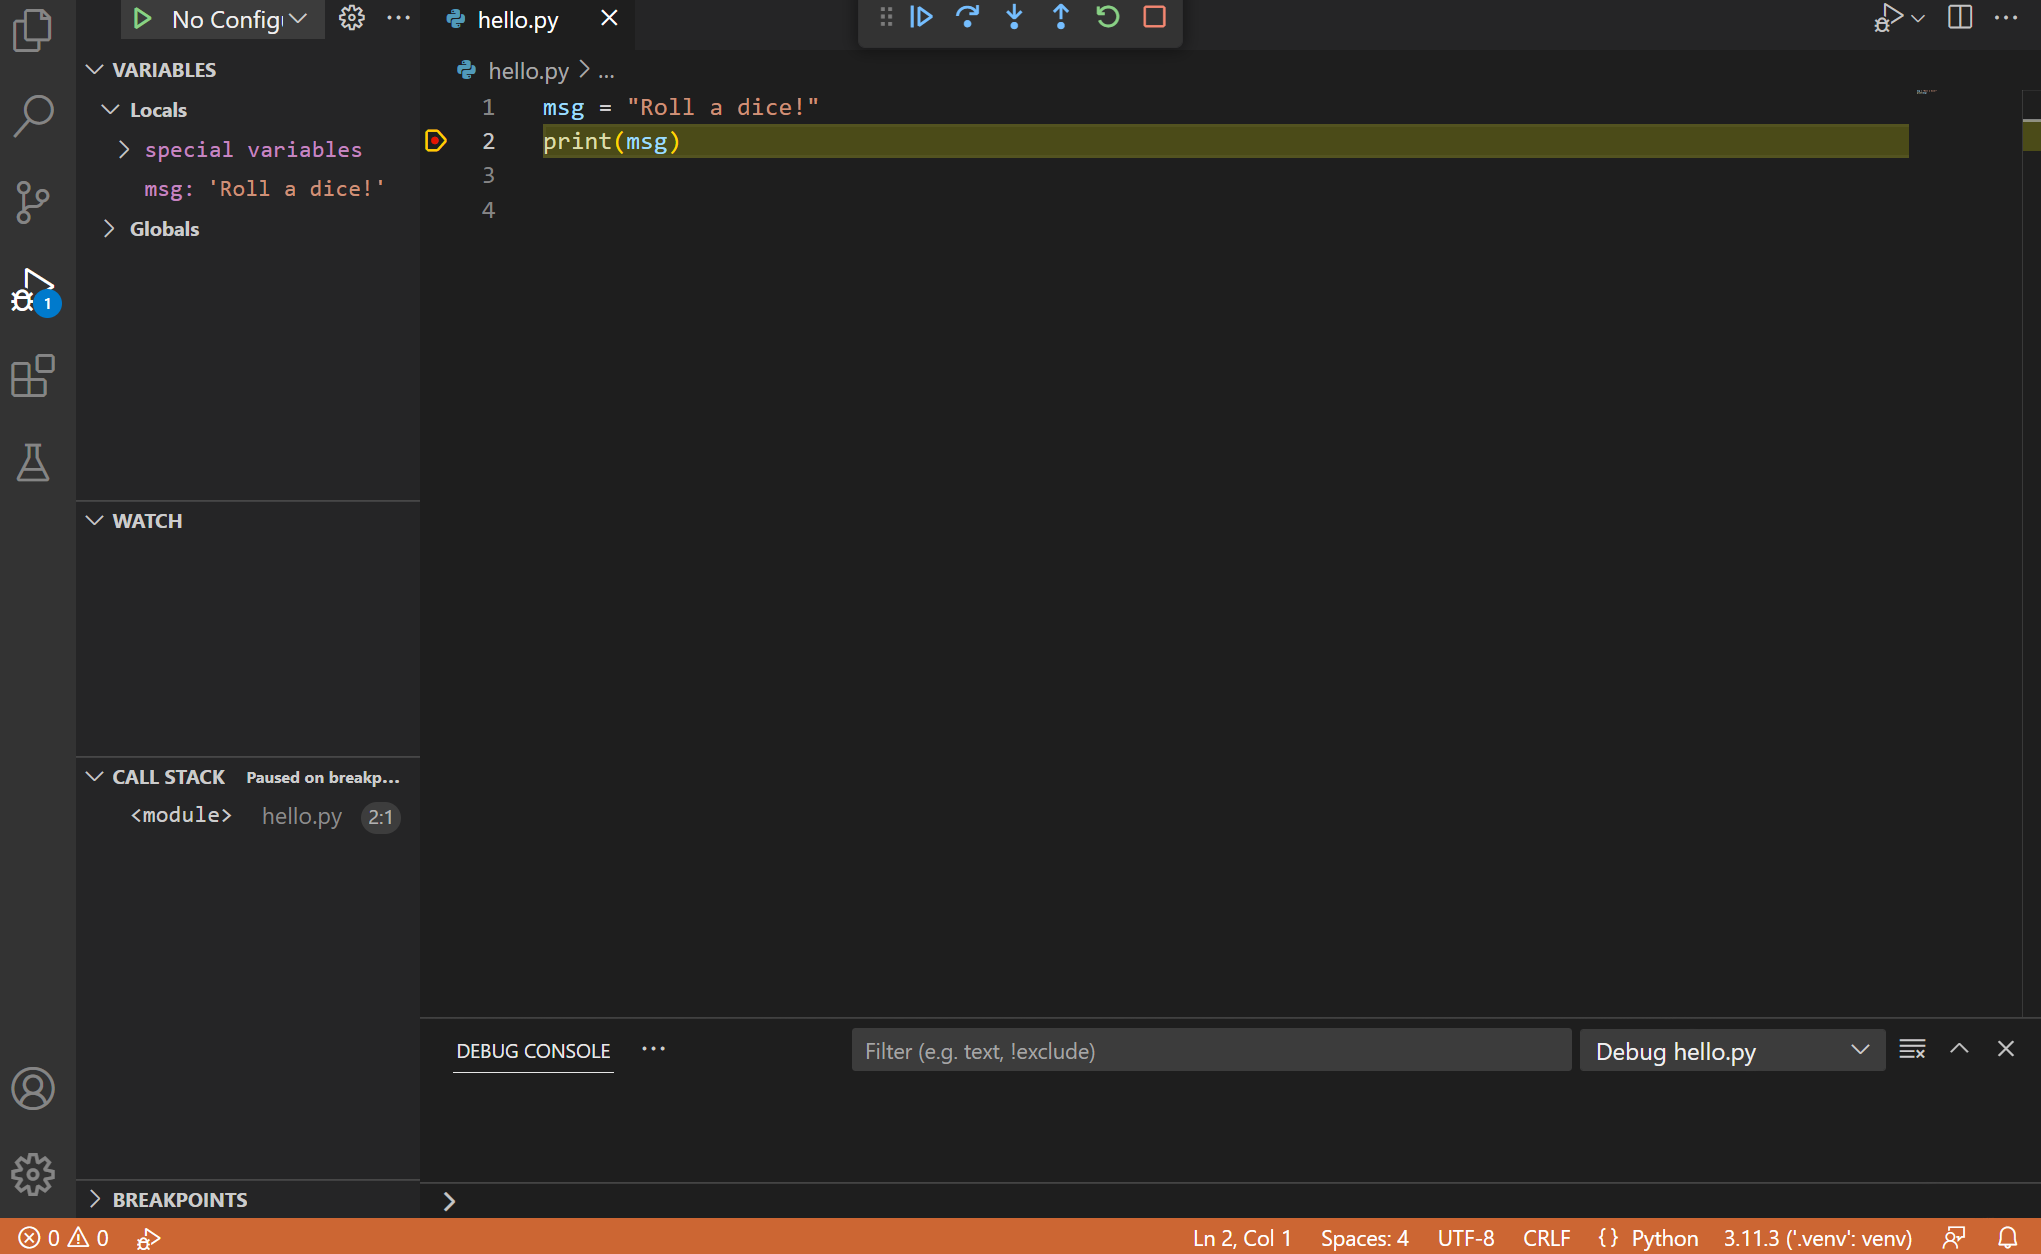
A debug toolbar appears along the top with the following commands from left to right: continue ( F5 ), step over ( F10 ), step into ( F11 ), step out ( ⇧F11 (Windows, Linux Shift+F11 ) ), restart ( ⇧⌘F5 (Windows, Linux Ctrl+Shift+F5 ) ), and stop ( ⇧F5 (Windows, Linux Shift+F5 ) ).

The Status Bar also changes color (orange in many themes) to indicate that you’re in debug mode. The Python Debug Console also appears automatically in the lower right panel to show the commands being run, along with the program output.
To continue running the program, select the continue command on the debug toolbar ( F5 ). The debugger runs the program to the end.
Tip Debugging information can also be seen by hovering over code, such as variables. In the case of msg , hovering over the variable will display the string Hello world in a box above the variable.
You can also work with variables in the Debug Console (If you don’t see it, select Debug Console in the lower right area of VS Code, or select it from the . menu.) Then try entering the following lines, one by one, at the > prompt at the bottom of the console:

Select the blue Continue button on the toolbar again (or press F5) to run the program to completion. «Hello World» appears in the Python Debug Console if you switch back to it, and VS Code exits debugging mode once the program is complete.
If you restart the debugger, the debugger again stops on the first breakpoint.
To stop running a program before it’s complete, use the red square stop button on the debug toolbar ( ⇧F5 (Windows, Linux Shift+F5 ) ), or use the Run > Stop debugging menu command.
For full details, see Debugging configurations, which includes notes on how to use a specific Python interpreter for debugging.
Tip: Use Logpoints instead of print statements: Developers often litter source code with print statements to quickly inspect variables without necessarily stepping through each line of code in a debugger. In VS Code, you can instead use Logpoints. A Logpoint is like a breakpoint except that it logs a message to the console and doesn’t stop the program. For more information, see Logpoints in the main VS Code debugging article.
Install and use packages
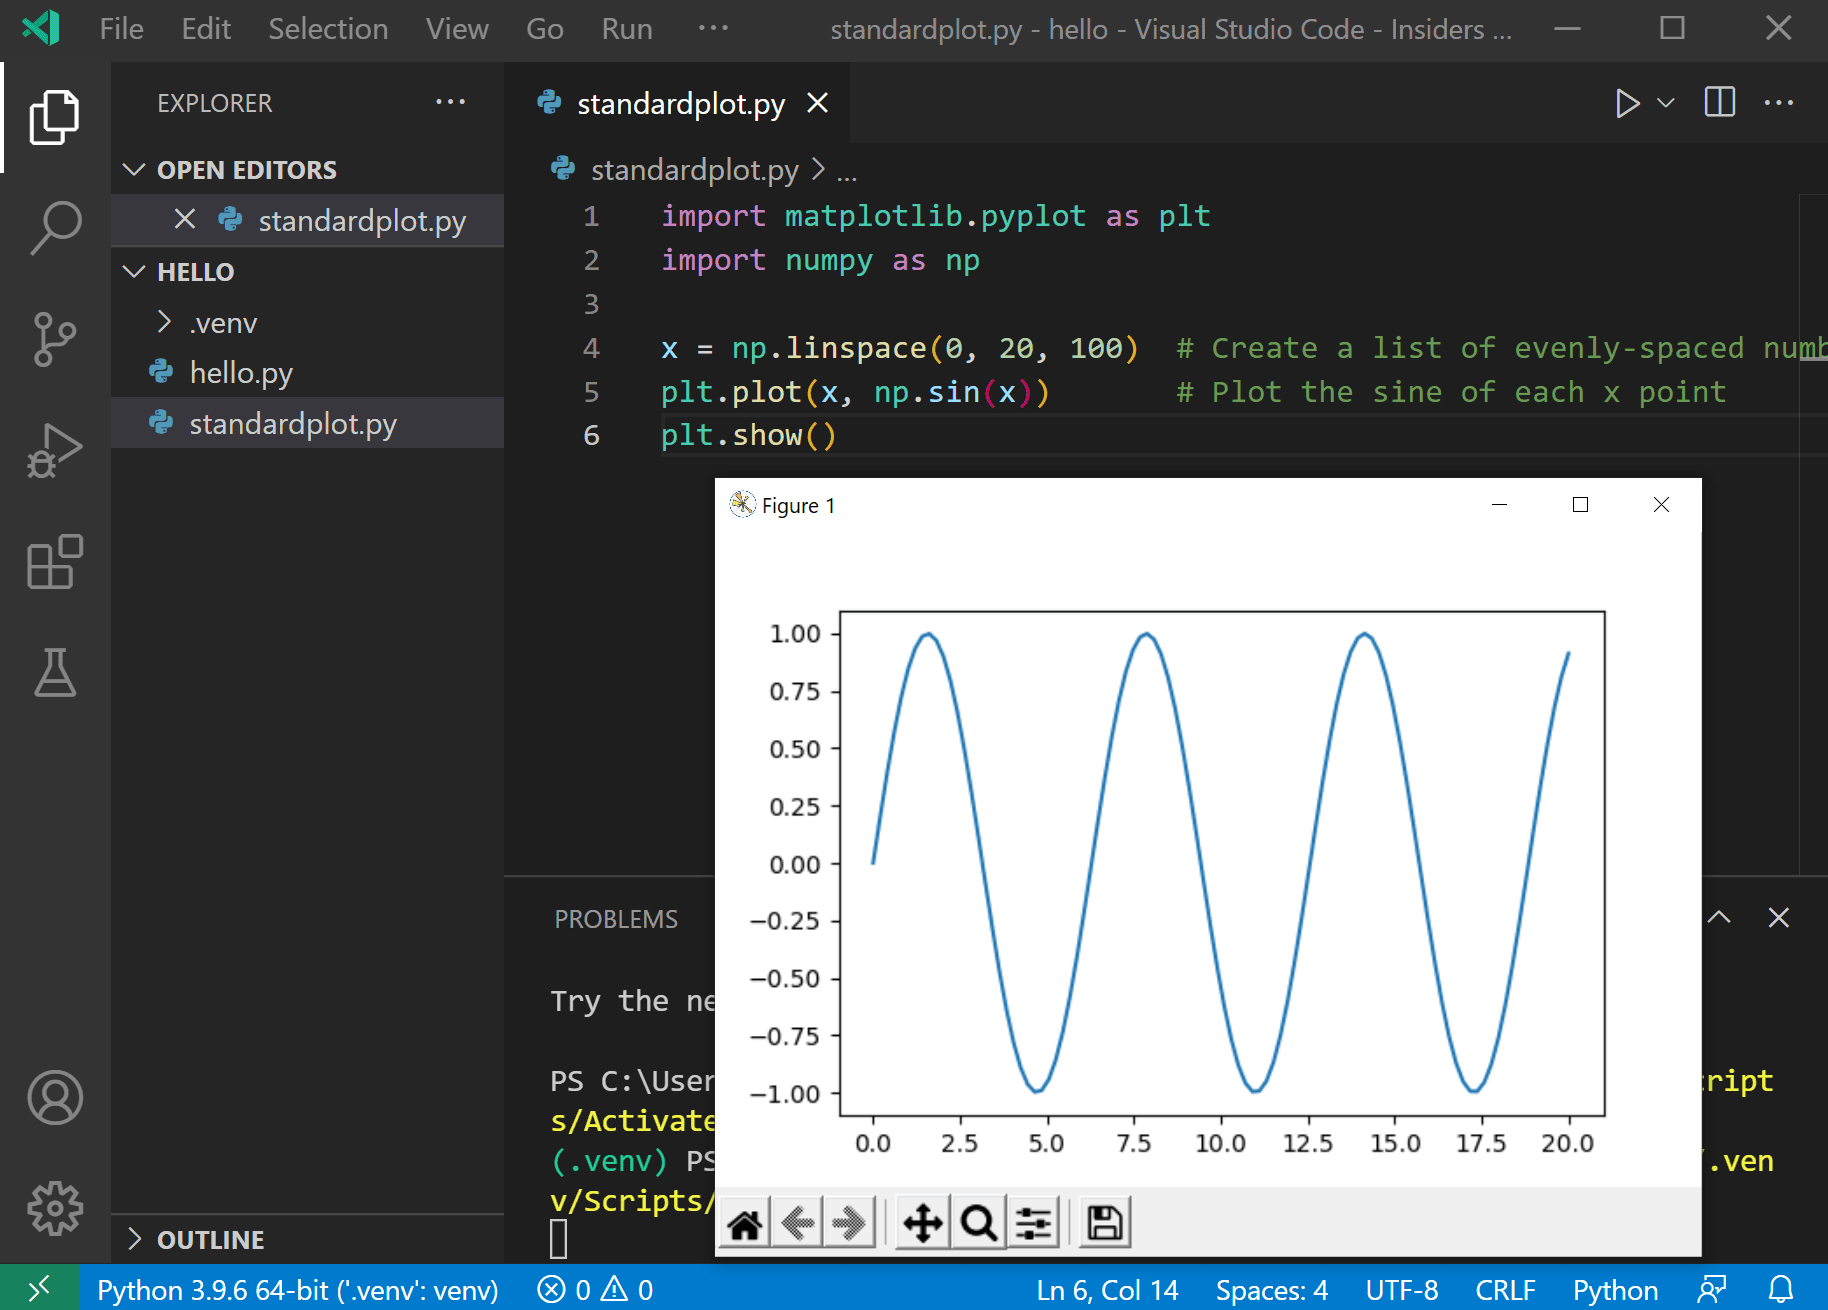
Let’s now run an example that’s a little more interesting. In Python, packages are how you obtain any number of useful code libraries, typically from PyPI. For this example, you use the matplotlib and numpy packages to create a graphical plot as is commonly done with data science. (Note that matplotlib cannot show graphs when running in the Windows Subsystem for Linux as it lacks the necessary UI support.)
Return to the Explorer view (the top-most icon on the left side, which shows files), create a new file called standardplot.py , and paste in the following source code:
Tip: If you enter the above code by hand, you may find that auto-completions change the names after the as keywords when you press Enter at the end of a line. To avoid this, type a space, then Enter .
Next, try running the file in the debugger using the «Python: Current file» configuration as described in the last section.
Unless you’re using an Anaconda distribution or have previously installed the matplotlib package, you should see the message, «ModuleNotFoundError: No module named ‘matplotlib'». Such a message indicates that the required package isn’t available in your system.
To install the matplotlib package (which also installs numpy as a dependency), stop the debugger and use the Command Palette to run Terminal: Create New Terminal ( ⌃⇧` (Windows, Linux Ctrl+Shift+` ) ). This command opens a command prompt for your selected interpreter.
A best practice among Python developers is to avoid installing packages into a global interpreter environment. You instead use a project-specific virtual environment that contains a copy of a global interpreter. Once you activate that environment, any packages you then install are isolated from other environments. Such isolation reduces many complications that can arise from conflicting package versions. To create a virtual environment and install the required packages, enter the following commands as appropriate for your operating system:
Note: For additional information about virtual environments, see Environments.
Create and activate the virtual environment
Note: When you create a new virtual environment, you should be prompted by VS Code to set it as the default for your workspace folder. If selected, the environment will automatically be activated when you open a new terminal.

For Windows
If the activate command generates the message «Activate.ps1 is not digitally signed. You cannot run this script on the current system.», then you need to temporarily change the PowerShell execution policy to allow scripts to run (see About Execution Policies in the PowerShell documentation):
For macOS/Linux
Select your new environment by using the Python: Select Interpreter command from the Command Palette.
Install the packages
Rerun the program now (with or without the debugger) and after a few moments a plot window appears with the output:
Once you are finished, type deactivate in the terminal window to deactivate the virtual environment.
For additional examples of creating and activating a virtual environment and installing packages, see the Django tutorial and the Flask tutorial.
Next steps
You can configure VS Code to use any Python environment you have installed, including virtual and conda environments. You can also use a separate environment for debugging. For full details, see Environments.
To learn more about the Python language, follow any of the programming tutorials listed on python.org within the context of VS Code.
To learn to build web apps with the Django and Flask frameworks, see the following tutorials:
There is then much more to explore with Python in Visual Studio Code:
- Editing code — Learn about autocomplete, IntelliSense, formatting, and refactoring for Python.
- Linting — Enable, configure, and apply a variety of Python linters.
- Debugging — Learn to debug Python both locally and remotely.
- Testing — Configure test environments and discover, run, and debug tests.
- Settings reference — Explore the full range of Python-related settings in VS Code.
- Deploy Python to Azure App Service using containers
- Deploy Python to Azure App Service on Linux
Источник


