- Wing Python IDE
- The Intelligent Development Environment for Python
- Navigation
- Wing Pro Reference Manual
- Как установить Wing Python IDE на Ubuntu 20.04 LTS
- Как установить Wing Python IDE на Ubuntu 20.04 LTS
- Установите Wing Python IDE на Ubuntu 20.04 LTS Focal Fossa
- Шаг 1. Во-первых, убедитесь, что все ваши системные пакеты обновлены, выполнив следующие apt команды в терминале.
- Шаг 2. Установка Wing Python IDE на Ubuntu 20.04
- Шаг 3. Доступ к Wing Python IDE в Ubuntu.
- Wing Python IDE
- The Intelligent Development Environment for Python
- Navigation
- Using Wing with Anaconda
- Configuring Your Project
- Creating a New Anaconda Environment
- Package Management
- About Anaconda Environments
- Wing Python IDE
- The Intelligent Development Environment for Python
- Navigation
- Tutorial: Setting Python Path
- Wing Python IDE
- The Intelligent Development Environment for Python
- Navigation
- Wing Pro Reference Manual
Wing Python IDE
The Intelligent Development Environment for Python
Navigation
Wing Pro Reference Manual

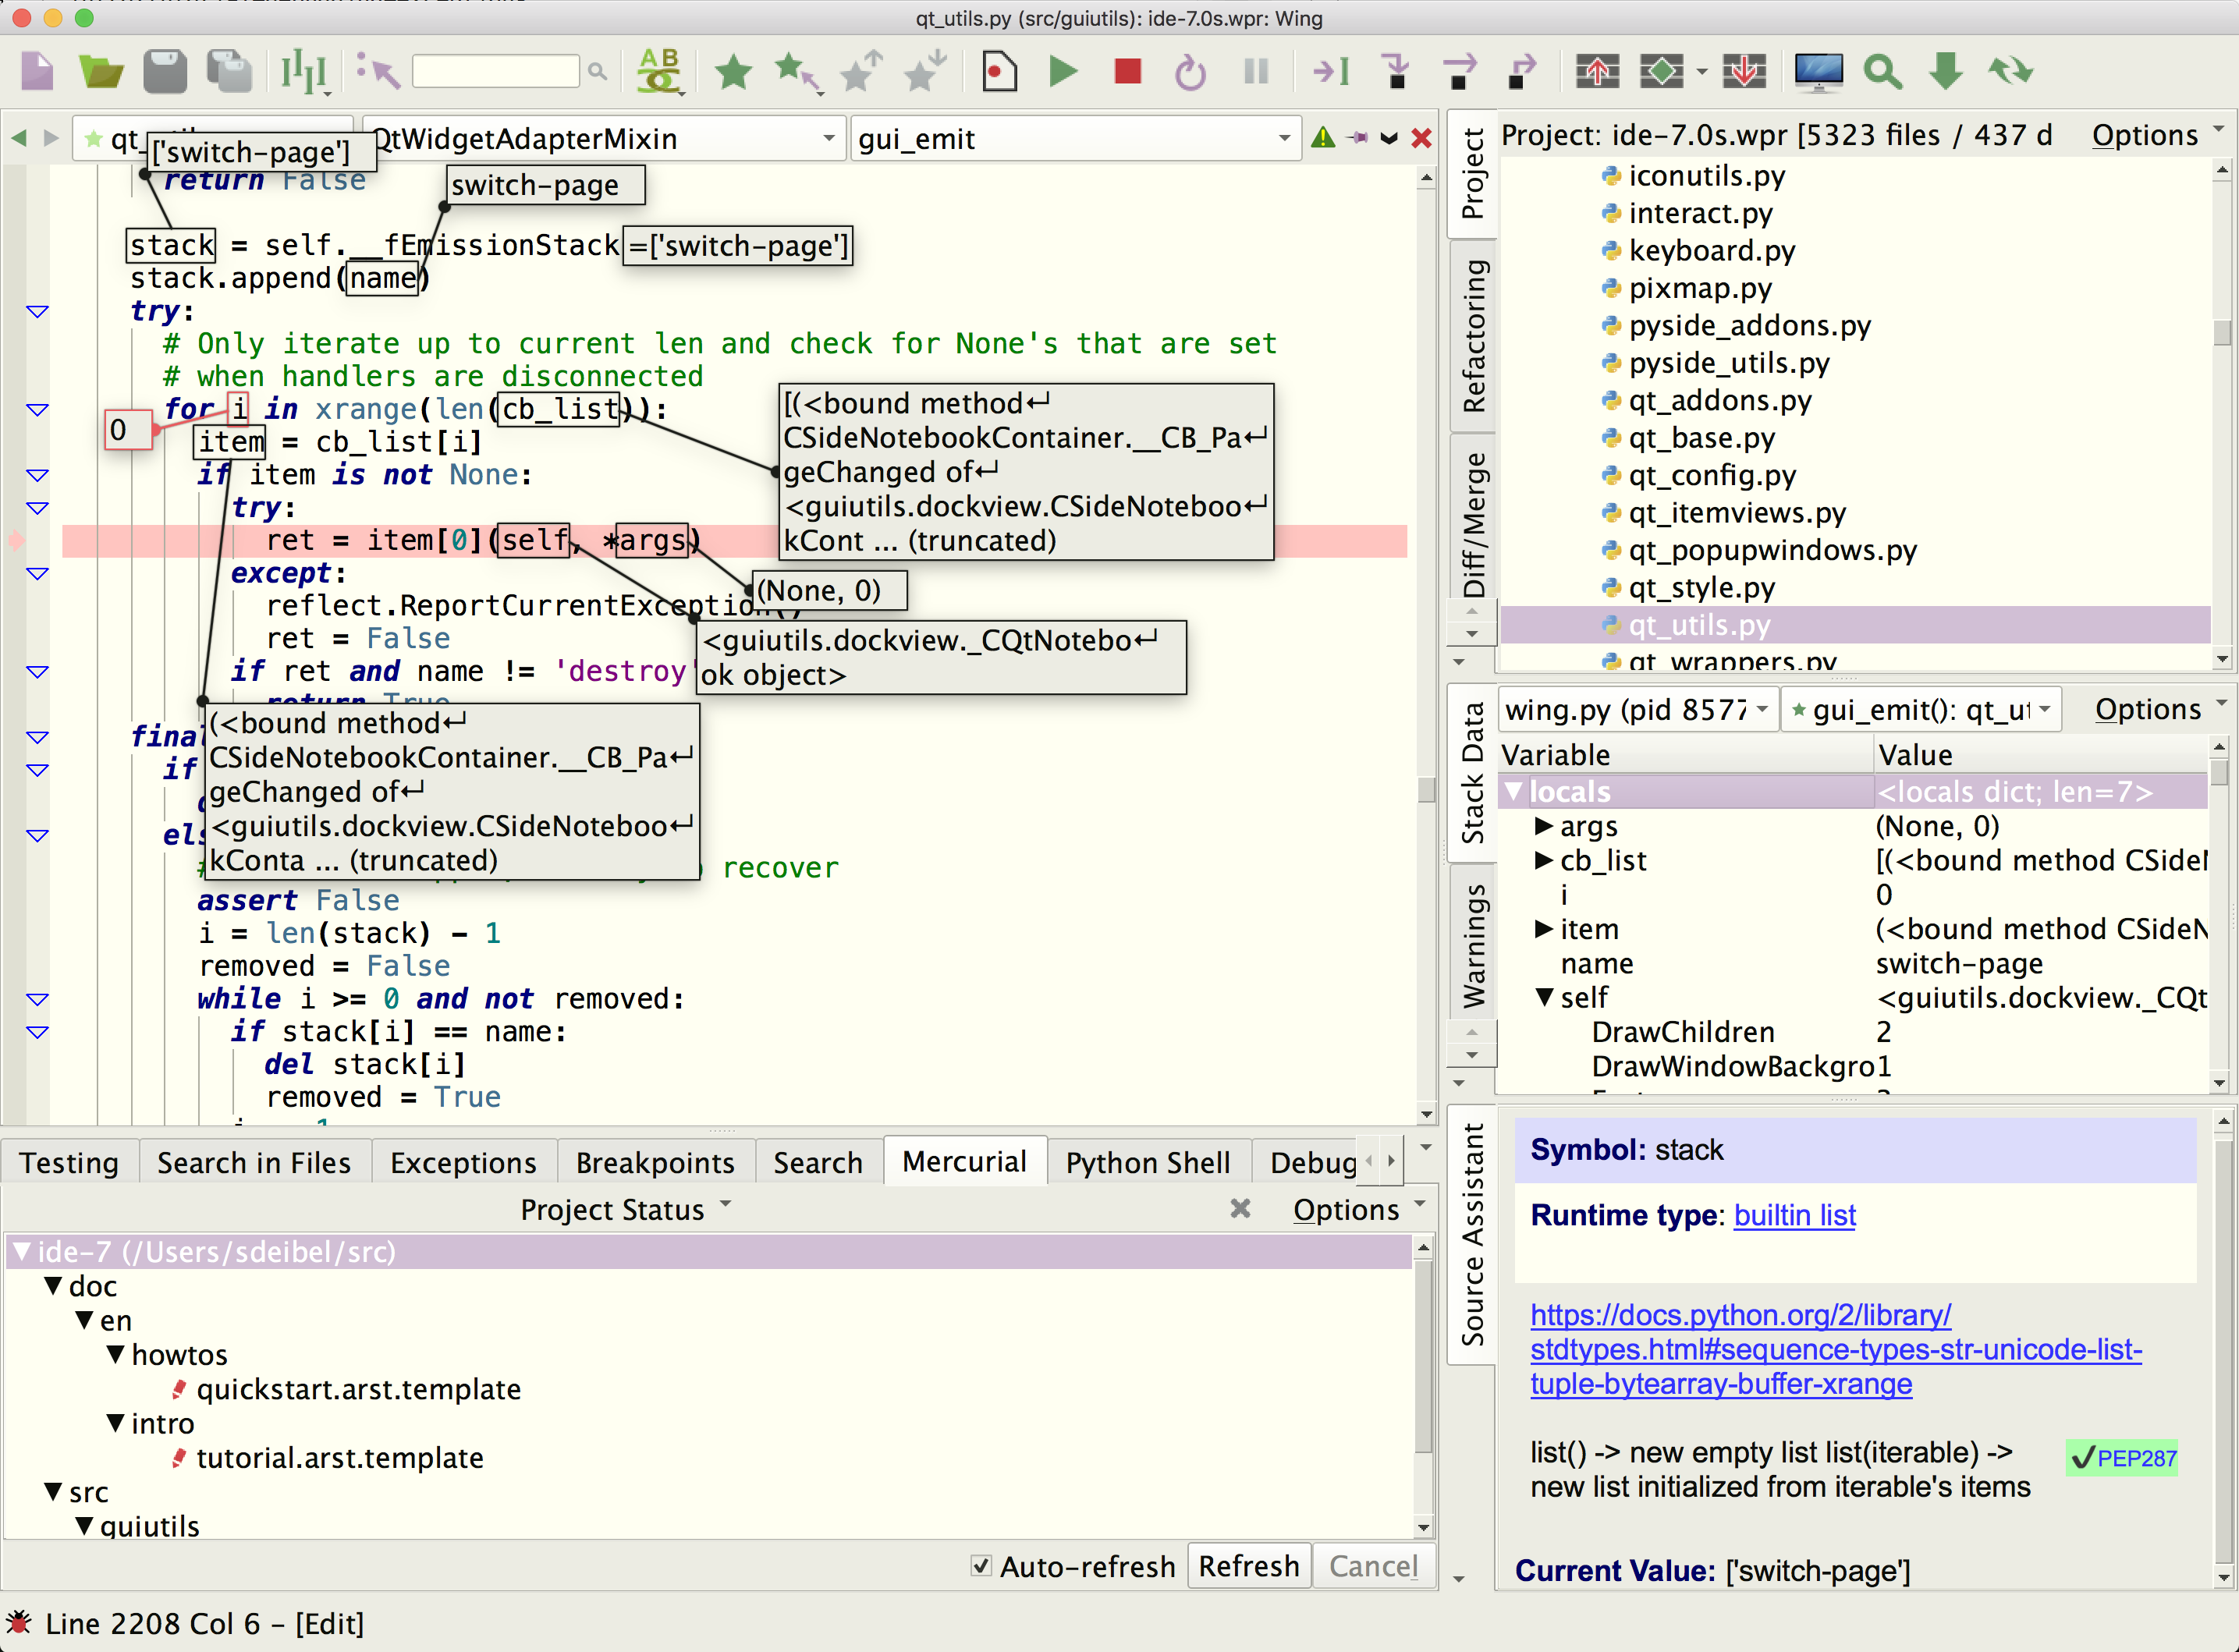
This manual documents the entire feature set of Wing Pro, which is a Python IDE designed for professional developers.
It covers installation, customization, setting up a project, package management, editing, code warnings, refactoring, comparing files and directories, navigating source code, using the integrated Python shell, executing operating system commands, unit testing, debugging, version control, source code analysis, remote development, and extending the IDE with user-defined scripts and plugins.
Trouble-shooting information is also included, for installation and usage problems, as well as a complete reference for Wing Pro’s preferences, command set, and available key bindings.
If you are looking for a gentler introduction to Wing’s feature set, try the Tutorial in Wing’s Help menu. A more concise overview of Wing’s features is also available in the Quick Start Guide.
Our How-Tos explain how to use Wing with specific Python frameworks for web and GUI development, 2D and 3D modeling, rendering, and compositing applications, matplotlib, Raspberry Pi, and other Python-based libraries and tools.
A collection of Wing Tips, available on our website and by weekly email subscription, provides additional tips and tricks for using Wing productively.
Wingware, the feather logo, Wing Python IDE, Wing Pro, Wing Personal, Wing 101, Wing IDE, Wing IDE 101, Wing IDE Personal, Wing IDE Professional, Wing IDE Pro, Wing Debugger, and «The Intelligent Development Environment for Python» are trademarks or registered trademarks of Wingware in the United States and other countries.
Disclaimers: The information contained in this document is subject to change without notice. Wingware shall not be liable for technical or editorial errors or omissions contained in this document; nor for incidental or consequential damages resulting from furnishing, performance, or use of this material.
Hardware and software products mentioned herein are named for identification purposes only and may be trademarks of their respective owners.
Copyright (c) 1999-2021 by Wingware. All rights reserved.
Источник
Как установить Wing Python IDE на Ubuntu 20.04 LTS
Как установить Wing Python IDE на Ubuntu 20.04 LTS
В этом руководстве мы покажем вам, как установить Wing Python IDE на Ubuntu 20.04 LTS. Для тех из вас, кто не знал, Wing Python IDE была разработана с нуля для Python, чтобы обеспечить вам более продуктивный опыт разработки. Полнофункциональная среда разработки Python с интеллектуальным редактором, мощным отладчиком, удаленной проверкой ошибок разработки, рефакторингом и многим другим. Крыло было спроектировано с нуля для интерактивной разработки на Python.
В этой статье предполагается, что у вас есть хотя бы базовые знания Linux, вы знаете, как использовать оболочку, и, что наиболее важно, вы размещаете свой сайт на собственном VPS. Установка довольно проста и предполагает, что вы работаете с учетной записью root, в противном случае вам может потребоваться добавить ‘ sudo ‘ к командам для получения привилегий root. Я покажу вам пошаговую установку Wing Python IDE на Ubuntu 20.04 (Focal Fossa). Вы можете следовать тем же инструкциям для Ubuntu 18.04, 16.04 и любого другого дистрибутива на основе Debian, например Linux Mint.
Установите Wing Python IDE на Ubuntu 20.04 LTS Focal Fossa
Шаг 1. Во-первых, убедитесь, что все ваши системные пакеты обновлены, выполнив следующие apt команды в терминале.
Шаг 2. Установка Wing Python IDE на Ubuntu 20.04
- Установите Wing Python IDE с официального сайта.
Затем установите его, используя следующую команду:
- Установите Wing Python IDE через Snap.
Чтобы установить Wing Python IDE через Snap, выполните следующие команды:
Шаг 3. Доступ к Wing Python IDE в Ubuntu.
После успешной установки вы можете запустить его из главного меню.
Поздравляю! Вы успешно установили Wing Python IDE. Благодарим за использование этого руководства для установки Wing Python IDE в системе Ubuntu 20.04 LTS Focal Fossa. Для получения дополнительной помощи или полезной информации мы рекомендуем вам посетить официальный сайт Python .
Источник
Wing Python IDE
The Intelligent Development Environment for Python
Navigation
Using Wing with Anaconda
Wing Pro is a Python IDE that can be used to develop, test, and debug Python code run with the Anaconda Distribution of Python.
If you do not already have Wing Pro installed, download it now.
This document describes how to configure Wing for use with Anaconda Python. To get started using Wing as your Python IDE, please refer to the tutorial in Wing’s Help menu or read the Quickstart Guide.
Configuring Your Project
To use Anaconda with an existing Wing project, simply set the Python Executable in Project Properties to the interpreter that you want to use. There are several options for this:
Command Line can be selected to enter the full path to Anaconda’s python.exe or python . In many cases, Wing will automatically find Anaconda and include it in the drop down menu to the right of the file selector shown for this option. The Python executable for Anaconda is typically located at the top level of the installation on Windows and in the bin sub-directory on other OSes. Another way to find the correct full path to use is to start Anaconda outside of Wing and then type the following:
Activated Env can be selected to use an existing environment created with conda create or virtualenv. This should be the command that activates the environment, for example activate venv1 . In this case, Wing starts Python by running python in that environment. If Anaconda is installed in a default location, Wing will find your existing environments, which can be selected with the drop down menu to the right of this field.
Note that using Activated Env does not work if the full path to Anaconda’s activate contains spaces. In that case, use Command Line option instead as described above.
If you are creating a new Wing project and want to use Anaconda, select New Project from the Project menu and configure Python Executable in the New Project dialog in the same way as described above. Note that you can create a new Anaconda environment from the New Project dialog by selecting Create New Environment on the second dialog page and choosing Conda Env from the dropdown menu.
In most cases, setting Python Executable is all that you need to do. Wing will start using your Anaconda installation immediately for source intelligence, for the next debug session, and in the integrated Python Shell after it is restarted from its Options menu.
Creating a New Anaconda Environment
Wing Pro can also create a new Anaconda environment with conda create at the same time that it creates a new project. To do this, select New Project from the Project menu, choose the source directory to use with your project, and press the Next button. Then select Create New Environment and choose Conda Env from the menu of available environment types.
You will need to enter the name for the new environment, choose the location to write the new environment, select the installation directory of the Anaconda that you want to use, and specify at least one package to install into the new environment.
Package specifications may either be entered directly into the New Project dialog, in a space-separate list, or read from an existing requirements.txt or Pipfile . In both cases, the package specifications may be anything accepted by conda install including just the package name, package==version , or package>=version :
When the New Project dialog is submitted, it will run conda create and then configure the project to use the new environment.
Package Management
Once you’ve configured your project to use an Anaconda environment, you can use the Packages tool in the Tools menu to list, add, remove, or update packages. See Package Manager for details.
About Anaconda Environments
On Windows, Anaconda may fail to load DLLs when its python.exe is run directly without using a named environment. This is due to the fact that by default the Anaconda installer no longer sets the PATH that it needs to run, in order to avoid conflicting with different Python installations on the same system. A typical error message looks like this:
The exact message you see will vary depending on which packages you are using, or you may not run into this at all if you are not using packages that are affected by it.
This may occur when running Anaconda Python outside of Wing without using a named Anaconda environment or when using virtualenv with Anaconda. The solution on the command line is to call conda activate base before starting Anaconda or activating the virtualenv.
The problem should not appear in Wing because it detects when Anaconda is being used and automatically activates the base environment before launching Anaconda.
Источник
Wing Python IDE
The Intelligent Development Environment for Python
Navigation
Tutorial: Setting Python Path
Python uses a search path referred to as the Python Path to find modules that are imported into code with the import statement. Most code only imports modules that are already on the default path, for example modules in the Python standard library, or modules installed into Python by pip , pipenv , conda , or some other package manager.
However, in some cases code will depend on a different path provided either by setting the environment variable PYTHONPATH before starting Python, or by modifying sys.path at runtime before importing modules.
If the Python Path is changed by one of these methods, you may also need to tell Wing about this change. This is done with Python Path in Project Properties , accessed from the Project menu:
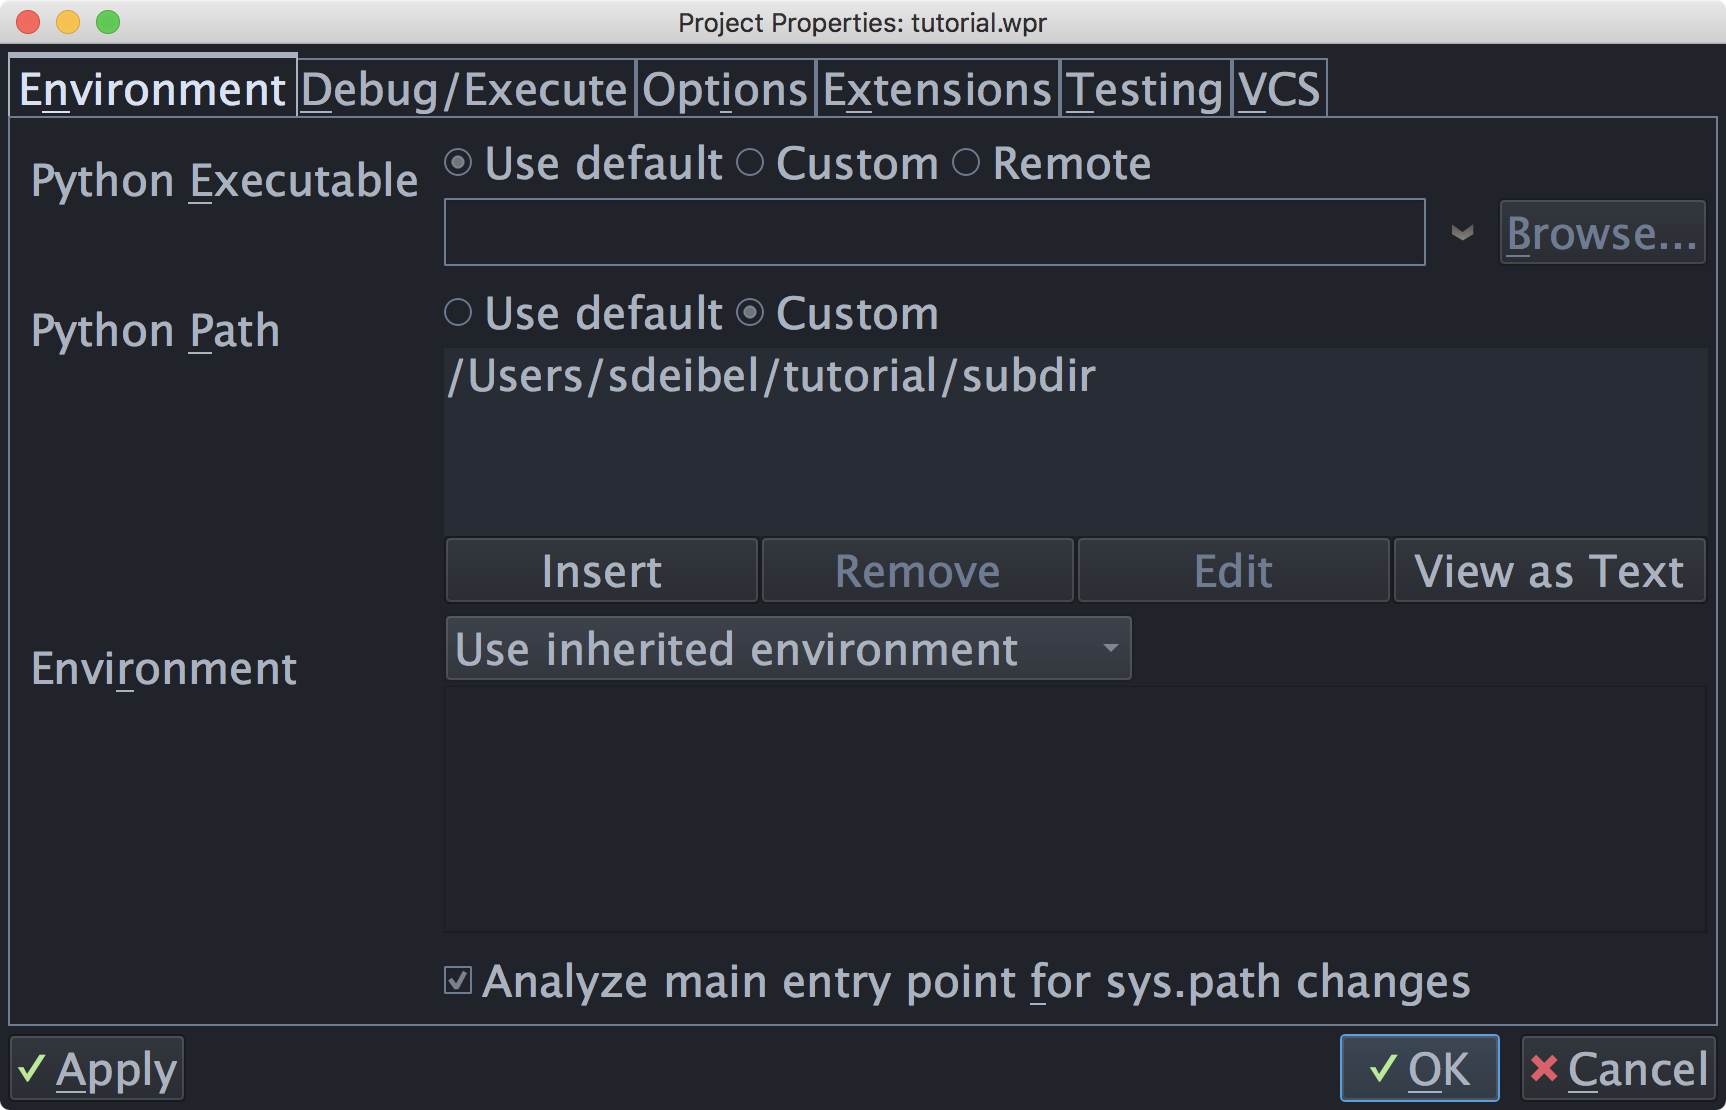
For this tutorial, you need to add the subdir sub-directory of your tutorials directory to Python Path , as shown above. This directory contains a module used as part of the first coding example.
Note that the full path to the directory subdir is used. This is strongly recommended because it avoids potential problems finding source code during debugging, if the starting directory is ambiguous or changes over time. If relative paths are needed to make a project work on different machines, use an environment variable like $
The configuration used here is for illustrative purposes only. You could run the example code without altering the Python Path by moving the path_example.py file to the same location as the example scripts.
Startup Environment
Wing uses its startup environment as the default environment for your Python code. As a result, if PYTHONPATH is set when you start Wing, it will also be used with your code. If this inherited path matches the needs of your code, then you don’t need to set Python Path in Wing. However, if you have different Python environments on your system or code with different path expectations, then you should set Python Path in the project so that switching projects will also switch to the correct environment.
Virtualenv and Anaconda Environments
If you are using virtualenv , Anaconda environments, or pipenv to set up your Python environment, you don’t need to set Python Path . Instead, set Python Executable to Activated Env and enter the command that activates your environment. This causes Wing to pick up the correct path and other environment needed to run code in the environment. In this case, Python is launched by running python in that environment.
You can also create a new virtualenv or Anaconda environment at the same time as creating a Wing project by selecting the Create New Virtualenv or Create New Anaconda Environment project types in the New Project dialog, accessed from the Project menu.
But don’t do this now; you’ll need the current project as you work through this tutorial.
Источник
Wing Python IDE
The Intelligent Development Environment for Python
Navigation
Wing Pro Reference Manual
This manual documents the entire feature set of Wing Pro, which is a Python IDE designed for professional developers.
It covers installation, customization, setting up a project, package management, editing, code warnings, refactoring, comparing files and directories, navigating source code, using the integrated Python shell, executing operating system commands, unit testing, debugging, version control, source code analysis, remote development, and extending the IDE with user-defined scripts and plugins.
Trouble-shooting information is also included, for installation and usage problems, as well as a complete reference for Wing Pro’s preferences, command set, and available key bindings.
If you are looking for a gentler introduction to Wing’s feature set, try the Tutorial in Wing’s Help menu. A more concise overview of Wing’s features is also available in the Quick Start Guide.
Our How-Tos explain how to use Wing with specific Python frameworks for web and GUI development, 2D and 3D modeling, rendering, and compositing applications, matplotlib, Raspberry Pi, and other Python-based libraries and tools.
A collection of Wing Tips, available on our website and by weekly email subscription, provides additional tips and tricks for using Wing productively.
Wingware, the feather logo, Wing Python IDE, Wing Pro, Wing Personal, Wing 101, Wing IDE, Wing IDE 101, Wing IDE Personal, Wing IDE Professional, Wing IDE Pro, Wing Debugger, and «The Intelligent Development Environment for Python» are trademarks or registered trademarks of Wingware in the United States and other countries.
Disclaimers: The information contained in this document is subject to change without notice. Wingware shall not be liable for technical or editorial errors or omissions contained in this document; nor for incidental or consequential damages resulting from furnishing, performance, or use of this material.
Hardware and software products mentioned herein are named for identification purposes only and may be trademarks of their respective owners.
Copyright (c) 1999-2021 by Wingware. All rights reserved.
Источник


