- Как сделать прайс-лист на сайте – плагин для WordPress
- Как сделать прай-лист плагином Pricing Table by Supsystic
- Как сделать таблицу с ценами и характеристиками
- WordPress.org
- Русский
- Pricing Table by Supsystic
- Описание
- Pricing Table Features
- Pricing Table Drag-and-Drop Builder
- Pricing Table Structure
- Pricing Table Design
- Comparison Table
- Pricing Tables are fully-responsive
- Скриншоты
- Установка
- Часто задаваемые вопросы
- How to set up a Pricing Table Plugin
- Pricing Table main settings and options
- How to customize Pricing Table visual editor?
- How to add a table to website content?
- How to use a Schedule Column option?
- Can I set the custom width for the column?
- Can I upload images/media to table cells?
Как сделать прайс-лист на сайте – плагин для WordPress
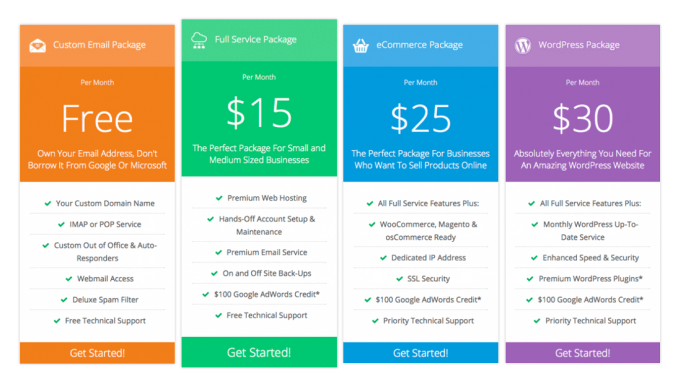
Прайс-лист – это перечень товаров или услуг с их ценами, возможно, с характеристиками. Этот элемент является неотъемлемой частью любого сайта, который предлагает посетителям что-то приобрести, в том числе и интернет-магазина. В этой статье мы расскажем вам, как сделать прайс-лист на сайте под управлением WordPress.
Решать задачу мы будем с помощью отличного бесплатного плагина, и сразу скажем, какие именно прайс-листы он может создавать. Многим, пожалуй, представляется, что прайс – это большая таблица, где мелким шрифтом написаны товары с ценами. Плагин, о котором пойдёт речь, позволяет сделать прайс-лист дизайнерского типа: немного позиций (только самые выгодные или покупаемые) и красивое, привлекательное оформление. Подобное вы могли видеть, например, на страницах хостинг-провайдеров, где описывают разные тарифные планы.
Итак, как сделать прайс-лист на сайте. Короткая инструкция.
Как сделать прай-лист плагином Pricing Table by Supsystic
Pricing Table by Supsystic – это плагин, который позволяет сделать прайс-лист, который будет выглядеть привлекательно и состоять из нескольких (3-7 шт.) позиций с описаниями. Чтобы начать работать, скачайте, установите и активируйте данный плагин. В консоли у вас образуется новый пункт «Pricing Table by Supsystic». Чтобы сделать новый прайс-лист, необходимо выбрать подпункт «Add new table». Здесь всё будет очень легко и интересно.
Перед тем, как создать прайс-лист, необходимо вписать в строку «Table Name» название для новой ценовой таблицы. А потом внизу вам надо будет выбрать какой-то дизайн. Всего есть четыре разнообразных оформления, которые, кроме того, что сами собой могут подойти к разнообразным шаблонам сайта, но ещё и могут быть кастомизированны почти по все признакам.
Когда название вписано и дизайн выбран, переходим к следующему этапу, и тут у вас будет возможность сделать прайс-лист, то есть заполнить его собственными данными: названиями товаров/услуг, ценами и описаниями. Из основных инструментов для кастомизации имеются следующие:
Column. Добавление новой графы. По умолчанию в каждом дизайне 3-5 графы для товаров, но можно добавить необходимые или удалить лишние. И хоть добавить можно сколько угодно граф, слишком много будет смотреться плохо.
Rows. Операции со строками. Можно добавлять или удалять строки, и вписывать в них какую-то информацию, например характеристики или цены.
Внизу имеется интерактивный предпросмотр сделанного прайс-листа. И это не просто предпросмотр, а с возможностью редактирования, то есть если прям там кликнуть мышкой, то можно изменить все надписи, размеры шрифтов, его цвета и цвета фонов.
Когда вам удалось сделать прайс-лист, вы можете сохранить все изменения и вывести созданный элемент на сайте с помощью шорткода в записях или странице или с помощью PHP кода в файлах шаблона. Все эти данные предоставляются на странице редактирования. А как устанавливать коды в WordPress, мы рассказывали в этой статье.
Источник
Как сделать таблицу с ценами и характеристиками
Сегодня мы расскажем о плагине, с помощью шорткода или php можно создавать таблицы цен и характеристики. В данном плагине есть 7 бесплатных шаблонов, которые можно настроить под себя, изменять слова и размер текста. В плагине есть 19 платных шаблонов.![]()
Плагин можно проинсталировать из админ-панели wordpress. Сделать это можно так: -> Перейдите по вкладке > Плагины -> Добавить новый -> в поле поиска введите Pricing Table by Supsystic, установите и активируйте плагин.
![]()
Для того что-бы создать и настроить ценовую таблицу, перейдите по вкладке: Pricing Table by Supsystic — Add New Table.
![]()
На следующей странице, выберите таблицу, нажав по ней, введите название таблицы в поле Table Name и нажмите на кнопку — Save. Бесплатные шаблоны обозначаются надписью — Select.
![]()
Далее, у вас откроется страница для настройки таблицы, которую вы выбрали.
Columns: Add Column, количество колонок в таблице, можно добавить колонку в таблицу, нажав на кнопку: Add Column.
Rows: Add Row, количество строк в таблице, можно добавить строку в таблицу, нажав на кнопку: Add Row.
Table Width, ширина таблицы, в пикселях или процентах.
Font, стиль шрифта по умолчанию для всего текста в таблице.
Description Text Color, цвет для текста описания тарифов в самом верху таблицы.
Header Text Color, цвет текста заголовков, где указаны цены.
Background Color, цвет фона таблицы.
Column Width, ширина колонок.
Enable Description Column, если уберёте здесь галочку, то из таблицы исчезнет колонка с названием характеристик.
Enable Footer Row, если уберёте здесь галочку, то из таблицы исчезнет футер, низ таблицы, где находятся кнопки.
Enable Hover Animation, если уберёте здесь галочку, то отключится всплывающая анимация.
Rows Text Color, цвет для текста в основной таблице.
Enable Head Row, можно убрать самый верх таблицы, где указаны названия тарифов.
Enable Description Row, можно убрать раздел, где указаны цены.
Text Align, расположение текста.
Enable Responsivity, если стоит галочка, значит таблица адаптивная.
![]()
Изменить текст в таблице просто, нажмите на текст, выделите его и вставьте текст который вам нужен. После выделения текста, появится меню с редактором, где можно изменить размер текста, сделать его жирным или курсивом, вставить гипер ссылку, изображение или видео. Можно менять местами элементы в таблице с помощью стрелок и т.д.
![]()
После того как настроите таблицу, сохраните её, нажав на кнопку — Save. Чтобы добавить таблицу на сайт, скопируйте шорт-код для вставки в нужное место страницы.
Источник
WordPress.org
Русский
Pricing Table by Supsystic
Описание
Create amazing pricing tables without any programming skills.
It’s possible with Pricing Table WordPress plugin by Supsystic. Choose pricing table template, edit content with Pricing table builder and publish on the website.
Pricing Table Features
- Responsive pricing tables
- Drag-and-drop builder
- Unlimited pricing tables, columns and rows
- Preset Templates
- Column images, videos and icons
- Schedule Column
- Switching Toggle
- Custom Header, Features list, and Button styling
- Hover Animation
- Comparison price tables
- Tables export/import
- All the Pricing Table Examples
It has never been so easy to create and manage pricing and comparison tables with table builder. Any element of the table can be customized with a couple of clicks.
Pricing tables are used as a way to illustrate how features of a product differ as the price changes.
Pricing tables must be chosen very carefully so that visitors should get the information they would be interested in. Available features, options and costs available as well as refund. Price tables by Supsystic with nice templates and drag-and-drop builder are totally unique.
When you create your pricing table, it is good to consider the following points:
- Visually separate plans in pricing table by using alternating background colours. You can attract attention to the plan that you want to be bought by user.
- Utilize different price table font sizes and colours for elements you want to stand out: titles, prices plan, headlines, etc.
- Be aware that users scroll down long tables. Prices at the top of a pricing table might not be visible when they’ve reached the table bottom. One solution is to place prices both at the top and bottom, another – is to keep the pricing table short.
Pricing Table Drag-and-Drop Builder
The Pricing Table Drag-and-Drop builder allows you to showcase the prices for your product, services, or packages in a beautiful and responsive pricing table. Design your pricing table just as you wish. Allows you to choose an icon which you can insert beside your header, add pricing table rows and columns, or enlarge a pricing column where you would like to emphasize a certain price.
In the pricing table user should carefully examine its portfolio and pick the most important features to present in its pricing plans. Visitors should be given only the information they would be interested in: available price features, options and costs. The rule of thumb is: every unnecessary cell in your pricing table increases the probability of losing potential customers, because you make it more difficult for them to compare various price plans and select the best one.
Pricing Table Structure
Most of the pricing tables are horizontal because it’s easier to compare the offers and see features. That doesn’t mean you should always use the horizontal pricing table layout, though. It really depends on the variety and complexity of the price plans information you want to display in the pricing table chart. Best practice is to use a horizontal table solution when you have to display a lot of features and a vertical table when you don’t have a lot of plans to offer and you’re not planning to include a long list of features in your pricing table.
Pricing Table Design
Design can do one of two things to your business – either sink it or raise it to the top. You have to be very careful when designing a pricing table. Fonts, headlines, layout of pricing table – it all has to be balanced and done neatly. Furthermore you have to make sure the pricing chart’s design works with the main site. However don’t forget about your main goal. In pricing tables, design is just a tool to achieve your objectives, namely – increase sales. Simplicity is the key to success of price chart. Remember that you’re not creating a collage for school, you’re creating a price table design for a specific reason. Don’t clutter your chart with unnecessary elements. A common mistake is to write down a list of features most of the plans in the pricing table don’t offer and then put dozens of red crosses in your pricing table chart. Consumers don’t want to see what you’re not offering, they want to see what you’ve got and for what price.
Comparison Table
Adding a pricing or product comparison table to your website makes it easier for your visitors to come to a decision on whether to make purchase or not, giving them the ability to compare prices and features at a glance.
Offering your own products with comparison table in a number of packages can also help increase the amount of revenue that is generated. These versions and upgrades can then be displayed in a comparison table. Also by comparing the products you are promoting against the competition, you can let your visitors do their research on your site, and increase the chances of them making a purchase through your affiliate link, rather than going elsewhere. Create comparison table from any pricing template with image or video embedding.
Pricing Tables are fully-responsive
Responsiveness is one of the standard practice if you want to create a good customer experience across any device or platform.
Our Pricing Table plugin is a mobile-ready, means that it will render on the devices with different screen size. The responsive mode is turn on by default, but you can switch off it anytime. Also, plugin provides an opportunity to set a minimum column size.
Скриншоты


Simple Pricing Table

Most modern commercial WordPress pricing table template provide built in Pricing Tables builder

Pricing Table by Supsystic Admin Area

WordPress Pricing Table Plugin is the Drag and Drop way to build pricing table or comparison table or feature table

WordPress pricing table plugins are really useful for business websites selling any kind of product or providing service

Flat Price Table

Comparison Table. The Comparison Table option offers a feature to create tables for comparing reviews boxes


Установка
- Download Pricing Table by Supsystic plugin
- Unarchive plugin Pricing Table plugin
- Copy the folder with plugin
- Open ftp \wp-content\plugins\
- Paste the plug-ins folder in the folder
- Go to admin panel => open item «Plugins» => activate Pricing Table by Supsystic plugin.
Часто задаваемые вопросы
How to set up a Pricing Table Plugin
You can create a beautiful, responsive and even highly converting Pricing Table in less than 5 minutes with the help of Pricing Table plugin by Supsystic. No coding required.
There are not so many steps to get your best result. Check an article — Getting started with pricing table plugin
Pricing Table main settings and options
After you have created your first Pricing Table, you can manage a table settings. The wide range of different options will help you to make the Pricing Table up to your requirements. Pricing Table plugin Main settings — here you can find all options of the Pricing Tables plugin
How to customize Pricing Table visual editor?
The visual editor of the Pricing Table is available below the main settings table on the preview of your future table.
There are three main types of editors:
* Item editor
* Column editor
* Cell/Row editor
Check the tutorial — Editor settings to see all the settings.
How to add a table to website content?
There are 2 ways to add table to your site, using:
- Table shortcode
- Table Part shortcode
Table shortcode and PHP code can be found on the left navigation menu if you click “Tables”. For each table its own shortcode and PHP code are written here.
You can also find table shortcode when you open table to change table settings. Simply choose Table Shortcode from the dropdown menu and copy the code.
Copy and paste the shortcode into your post or page. Read more in our short tutorial.
How to use a Schedule Column option?
With a Schedule Column features of Pricing Table Plugin, you can add a schedule to enable and disable the display of the columns at the specified time. It’s helpful if you need to display some additional column for special event, sale time, etc.
You can set any date to hide columns or display them in the certain time you require easily in one click with simple settings.
Can I set the custom width for the column?
Yes. In case you need to set the width of the column of your Pricing table, follow the next instruction:
- Create or open Pricing Table you need
- Disable Enable Responsivity option
- Point on the first column to see the Column editor
- Click on Attribute
- In Styles row enter — width: 14%;
- Repeat the identical things with other columns
- Save the changes
Note that total columns width must be 100%.
Can I upload images/media to table cells?
Pricing Table plugin is fully customizable and was creating with customer needs in the mind. we added an option that allows you to upload media files to your table:
* Images
* Videos
* Icons
* Buttons
To add images, videos, icons, or buttons you need to make several easy steps.
Источник


