- Repetier-Host отказывается подключаться к принтеру.
- Подпишитесь на автора
- Подпишитесь на автора
- Еще больше интересных статей
- Как я втулки в 3D-печатной форме отливал для замены пружин стола Anycubic I3 Mega S
- Подпишитесь на автора
- Creality Halot-sky. Pixel tolerance
- Подпишитесь на автора
- Blue Pill & SSD1306, ну очень маленькие. но 32 бит!
- Подпишитесь на автора
- Читайте в блогах
- Адресная табличка 450мм чёрно-белая из PETG.
- Новости 3D печати и не только с Сергеем Пушкиным | Стрим Вечерний аддитив 20 октября
- Пластиковая крепёжка..
- Реле отключение питание Принтера с Klipper для Armbian
- Оснастка для печати шкатулок шелкографией
- Проект «Ночная фурия» из мотоцикла Kawasaki Ninja zx-9r
- Популярные 3D-принтеры
- Комментарии и вопросы
- СООБЩЕСТВО
- РАЗДЕЛЫ
- НОВОСТИ
- СОЦСЕТИ
- Вы успешно зарегистрированы
- Пароль успешно изменен
- Пожалуйста, проверьте Вашу почту
- принтер не реагирует на команды repetitor host.
- Connection Problems
- Please remember that only one program can be connected to the printer!
- We recommend: Connect Repetier-Host via Repetier-Server
- Connecting via Repetier-Server
- Step 1: Connecting your 3d printer to Repetier-Server
- Upload Config File
- Printer Configuration Wizard
- Step 2: Connecting Repetier-Host to Repetier-Server
- Serial Connection
- TCP/IP Connection
Repetier-Host отказывается подключаться к принтеру.
Подпишитесь на автора
Подпишитесь на автора, если вам нравятся его публикации. Тогда вы будете получать уведомления о его новых статьях.
Отписаться от уведомлений вы всегда сможете в профиле автора.
Статья относится к принтерам:
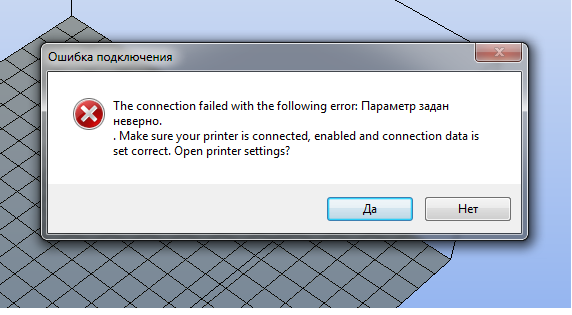
Не понимаю в чем проблема.
И может данный софт автоматически определить характеристики принтера?
Подпишитесь на автора
Подпишитесь на автора, если вам нравятся его публикации. Тогда вы будете получать уведомления о его новых статьях.
Отписаться от уведомлений вы всегда сможете в профиле автора.
Еще больше интересных статей
Как я втулки в 3D-печатной форме отливал для замены пружин стола Anycubic I3 Mega S
Подпишитесь на автора
Подпишитесь на автора, если вам нравятся его публикации. Тогда вы будете получать уведомления о его новых статьях.
Отписаться от уведомлений вы всегда сможете в профиле автора.
С вами ЕРМАК и… литьё силикона в 3D печатную форму.
Creality Halot-sky. Pixel tolerance
Подпишитесь на автора
Подпишитесь на автора, если вам нравятся его публикации. Тогда вы будете получать уведомления о его новых статьях.
Отписаться от уведомлений вы всегда сможете в профиле автора.
Blue Pill & SSD1306, ну очень маленькие. но 32 бит!
Подпишитесь на автора
Подпишитесь на автора, если вам нравятся его публикации. Тогда вы будете получать уведомления о его новых статьях.
Отписаться от уведомлений вы всегда сможете в профиле автора.
Решил я тут попробовать перейти с 8 бит на 32.
Читайте в блогах
Адресная табличка 450мм чёрно-белая из PETG.
Новости 3D печати и не только с Сергеем Пушкиным | Стрим Вечерний аддитив 20 октября
Пластиковая крепёжка..
Реле отключение питание Принтера с Klipper для Armbian
Оснастка для печати шкатулок шелкографией
Проект «Ночная фурия» из мотоцикла Kawasaki Ninja zx-9r
Популярные
3D-принтеры
Комментарии и вопросы

Я заменил все пластиковые на м.
По своей работе общался недавн.
Держат идеально. Каркас принте.
Здравтвуйте.Принтер с двумя го.
доброго вечера, установил на a.
Добрый день!Имеется вышеуказан.
Друзья, выручайте, помогите по.
СООБЩЕСТВО
РАЗДЕЛЫ
НОВОСТИ
СОЦСЕТИ


Вы успешно зарегистрированы
Пароль успешно изменен
На ваш e-mail высланы новые регистрационные данные.

Пожалуйста, проверьте Вашу почту
Вам было отправлено письмо с инструкцией по восстановлению пароля. Если вы не получили письмо в течение 5 минут, проверьте папку спам, попробуйте еще раз.
Источник
принтер не реагирует на команды repetitor host.
Статья относится к принтерам:
Проблема заключается в том что принтер не получает сигналы от компа. Программа только сообщает ‘ожидание команды 1’
ТО ЧТО ОПИСЫВАЛОСЬ ТУТ http://3dtoday.ru/questions/printer-ne-reagiruet-na-repetier-host/
мне конкретно не помогло.
Принтер Принтер Prusa i3 из китая
вот что выдает программа после подключение принтера
16:16:59.747 : No start signal detected — forcing start
16:16:59.748 : N1 M110*34
16:16:59.748 : N2 M115*36
16:16:59.748 : N3 M105*36
16:16:59.748 : N4 M114*35
16:16:59.787 : N5 M111 S6*98
16:16:59.790 : N6 T0*60
16:16:59.790 : N7 M20*22
16:16:59.791 : N8 M80*19
16:16:59.791 : N9 M105*46
16:17:02.805 : N10 M105*22
16:17:42.880 : Communication timeout — reset send buffer block
16:17:42.880 : N11 M105*23
16:17:45.611 : N12 M105*20
16:17:48.673 : N13 M105*21
16:17:51.730 : N14 M105*18
16:17:54.784 : N15 M105*19
16:17:57.841 : N16 M105*16
16:18:00.904 : N17 M105*17
16:18:03.958 : N18 M105*30
16:18:07.015 : N19 M105*31
16:18:47.089 : Communication timeout — reset send buffer block
16:18:47.089 : N20 M105*21
16:18:49.821 : N21 M105*20
16:18:52.883 : N22 M105*23
16:18:55.940 : N23 M105*22
16:18:58.994 : N24 M105*17
16:19:02.056 : N25 M105*16
16:19:05.113 : N26 M105*19
16:19:08.168 : N27 M105*18
16:19:11.226 : N28 M105*29
16:19:51.299 : Communication timeout — reset send buffer block
16:19:51.299 : N29 M105*28
16:19:54.031 : N30 M105*20
16:19:57.092 : N31 M105*21
16:20:00.150 : N32 M105*22
16:20:03.206 : N33 M105*23
16:20:06.261 : N34 M105*16
16:20:09.324 : N35 M105*17
16:20:12.378 : N36 M105*18
16:20:15.435 : N37 M105*19
16:20:55.512 : Communication timeout — reset send buffer block
Источник
Connection Problems
There are several ways to connect Repetier-Host with your printer:
Please remember that only one program can be connected to the printer!
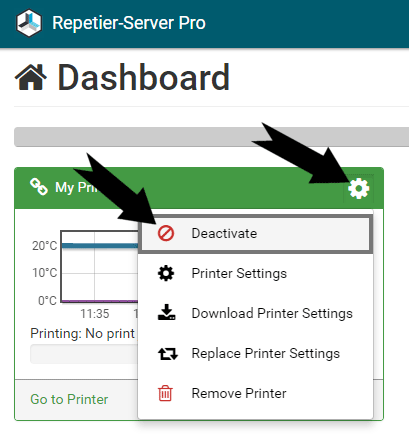
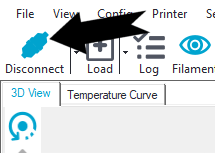
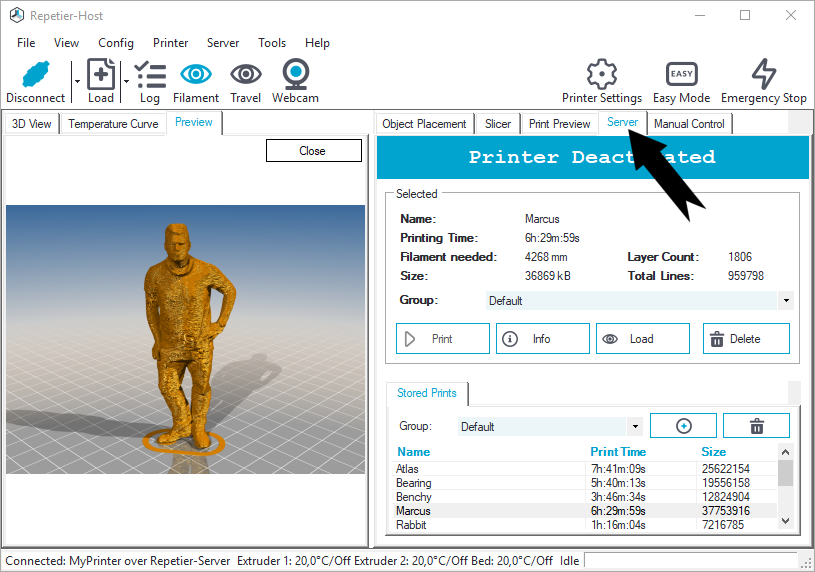
So if Repetier-Server is connected to the printer, you can not connect Repetier-Host directly to the printer. In this case you have to connect Repetier-Host to Repetier-Server, what gives you the most advantages, or you can deactivate the printer in Repetier-Server:
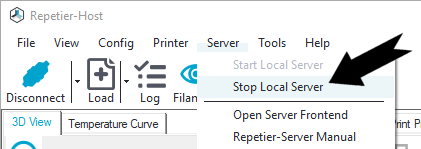
Another way is to stop Repetier-Server in the host:
We recommend: Connect Repetier-Host via Repetier-Server
When Repetier-Server is connected to the printer, you can connect multiple Repetier-Hosts to Repetier-Server at the same time. This gives you a lot of advantages:
- Repetier-Server runs even on small and cheap PCs like Raspberry Pi, … with Linux, Windows and Mac. Of course you can run Repetier-Server on the same machine as Repetier-Host.
- You can control your printer even from your smartphone and tablet und see via webcam, what the printer is doing.
- Full flexibility – Access and control your 3D printers from anywhere.
- You get rendered preview images for all stored G-Codes.
- Small memory requirement – Prints files of any size with new file management. Prints prefetch only the next 5,000 lines. G-Code preview only loads single layers.
- The print continues even when the Repetier-Host is closed.
- Price calculation – You get the production costs before printing. We even split usage by extruder.
- Multi printer support – Repetier-Server connects and prints on multiple printers simultaneously.
Connecting via Repetier-Server
First you should install and start Repetier-Server, after that you can connect Repetier-Host to Repetier-Server.
Step 1: Connecting your 3d printer to Repetier-Server
Upload Config File
The easiest way to set up a new printer is to upload an existing config file. Go to and click on Upload Printer Configuration. Enter a printer name, select the configuration file and click Create Printer.
That’s all. Maybe you must select the COM port.

To set the port, select your new printer on the left side and go to Settings -> Printer Settings.
To create a configuration file, go to Dashboard and click Actions -> Download Configuration in the printer
overview.

Printer Configuration Wizard
Another very simple way to add a new printer is our Configuration Wizard. Go to and click on -> Add new Printer.
Step 1: Naming
In the first step you just have to enter the printer name and click Continue with Step 2 .

Step 2: Connecting printer
Here you have to select, which firmware is used, you have to set the Device / Port.
The boud rate can be set to autodetect, which will test the typical rates. In case autodetect fails, you have to set it yourself.
To speed up communication, the server sends as many commands as possible in a row. To prevent data loss, it is essential to know
how many bytes the firmware can store, before the firmware buffer overflows. All known firmwares support at least 63 bytes.
AVR based firmwares normally support 127 bytes.
Click Continue with Step 3 to connect the printer.

The configuration wizard now tries to read as many data as possible from the firmware. Whatever it detects gets set to the
detected values. In the following detected values are marked with grene circles.

Step 3: Geometry
Here you can set the dimensions and bed shape of your printer.
Then click Continue with Step 4 .

Step 4: Extruders and bed
Set the number of extruders and the filament diameter.
Typical filament diameters are 1,75 mm and 2,85 mm.
Then click Continue with Step 5 .

Step 5: Features
Check if you have installed a fan, a sd card reader and if you can enable main power
with software command. Then click Finizsh Wizard . That’s all.

Select your printer on the left side and go to Settings -> Printer Settings or call it
from your Dashboard at Actions -> Printer Settings.
Here you can set all printer related parameter. So it is a good idea, to check these settings once your printer works.
The settings are split into several categories to make navigation easier. To save the changed settings, press
Save Configuration. If you leave settings without saving, you will get a security question to prevent accidential data loss.
For parameters which may be difficult to understand you get a popover with detailed information when you click on the text field.

To calculate exact printing times, you should run the Heatup and Cooldown Wizard. This feature measures heating and cooling speed needed for accurate printing time prediction.
- Go to Settings -> Printer Settings -> Extruder and click Start Wizard.

- Make sure your printer has power! Then enter the temperatures for extriders and beds, then click Start Measurement.
- Now you have to wait. The wizard tracks the warming and cooling speeds, which will take some time, especially the cooling of the bed is time intensive.
- When sou see Heating and cooling speeds were computed and stored., the wizard is ready. The exact values for Heatup Speed and Cooldown Speed are stored autamatically.


Step 2: Connecting Repetier-Host to Repetier-Server
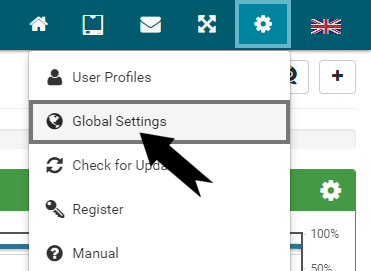
Open Repetier-Server and go to -> Global Settings.
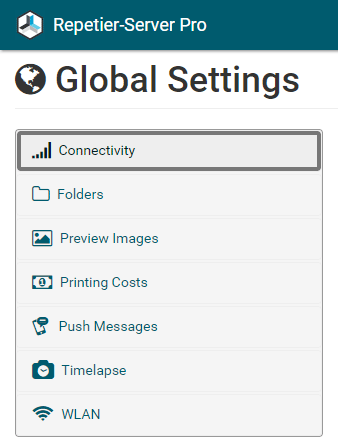
Then click Connectivity.
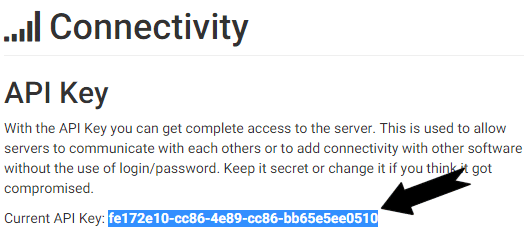
Copy the API Key to the clipboard.
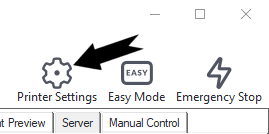
Open Repetier-Host and click Printer Settings.
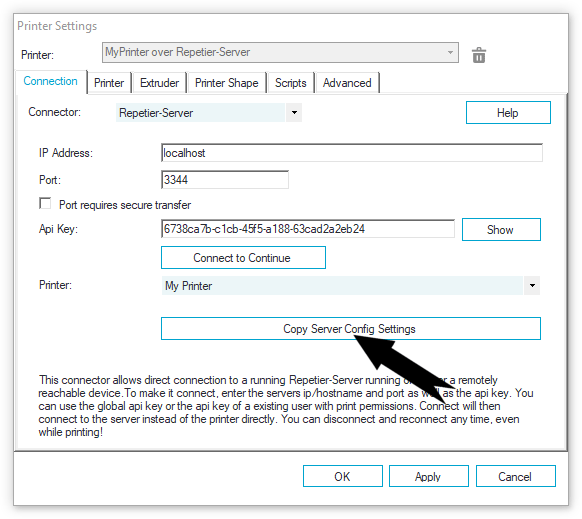
- Printer: Enter your printer name.
- Connector: Select Repetier-Server as Connector.
- IP Address: Enter localhost or the used IP Address.
- Port: Enter 3344.
- API Key: Enter the saved API Key from the clipboard.
- Click Connect to Continue

Now you can select your printer from the printer list and the click Copy Server Config Settings.
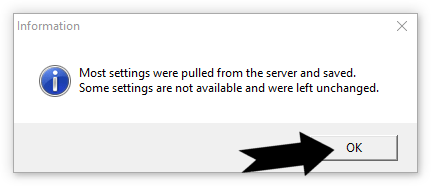
Repetier-Host will import the most settings from Repetier-Host, so this is quite easy.
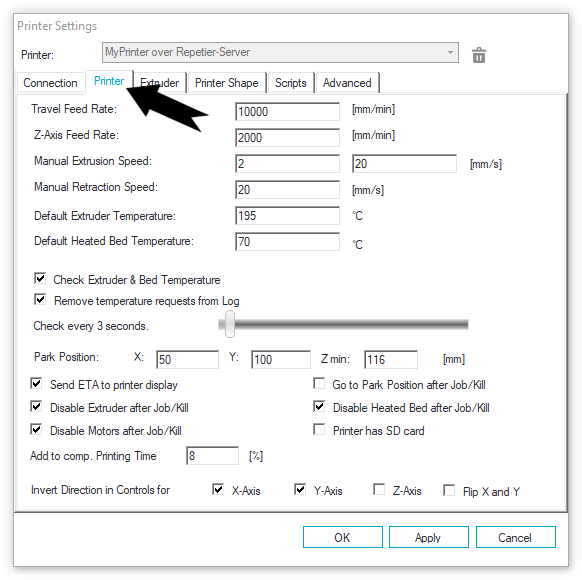
Now you can check the printer and extruder settings and click OK.
Now you can Connect/Disconnect your printer in Repetier-Host to the server. If you disconnect your printer in Repetier-Host, the printer will still be connected to Repetier-Server.
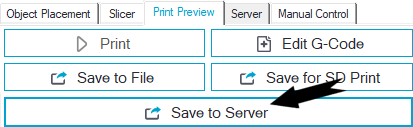
When the printer is connected you can slice and print regulary (you can close Repetier-Host once the print job has started without stopping printing), but you also have the opportunity to upload the G-Code to Repetier-Server, to use it again and to get rendered preview images. Just click Save to Server. Of course also the Manual Contol will work as used.
If the printer is connected via Repetier-Server, you will get the new tab Server. Here you can see your stored G-Codes. When you mark them, you will get the preview image and you can start the print job. While printing you can stop or pause the print and get some printing informations.
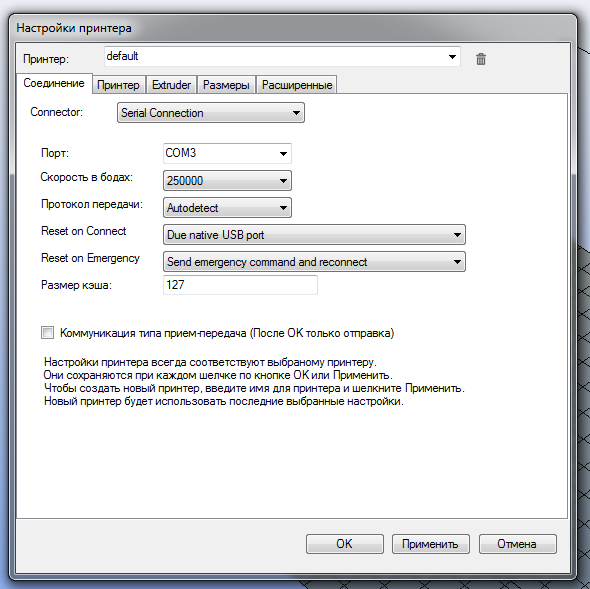
Serial Connection
If you want to connect Repetier-Host directly with your printer, you should use the serial connection.
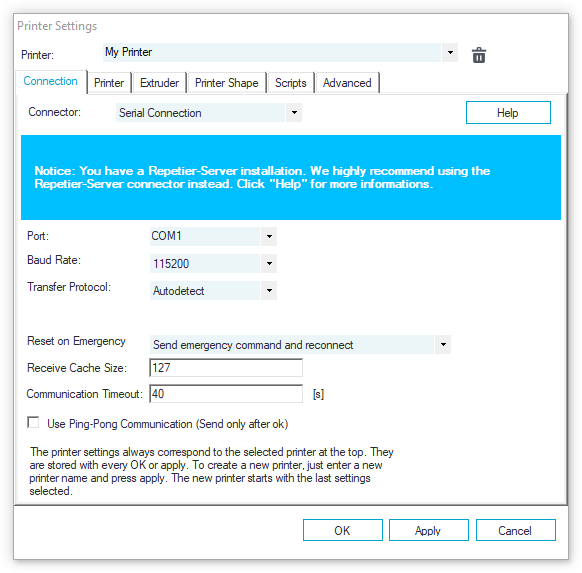
To communicate with your printer, you first have to select the correct port. If you plug in the usb cable while this dialog is open, the port dropdown list will update automatically, so that the added port will show up.
After that you have to set the correct baud rate. 95% of all printers use 115200 or 250000. It is very important to use the correct baud rate!
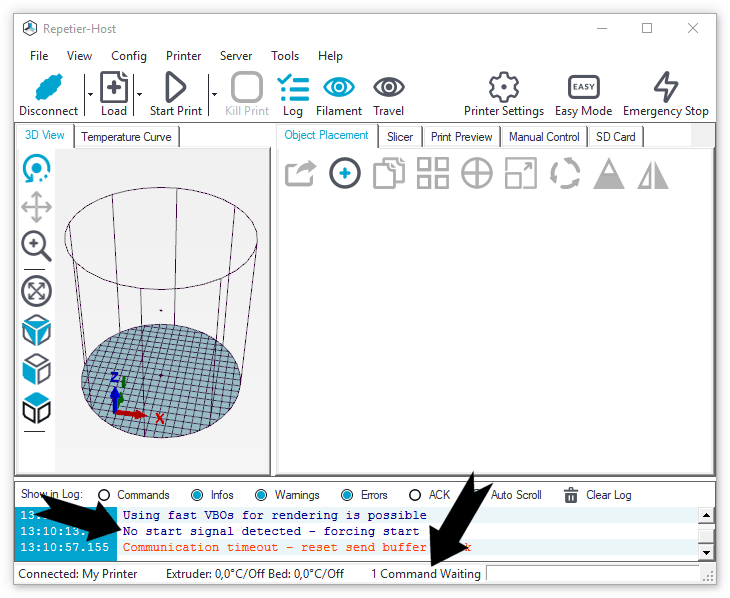
Notice that even if the baud rate is wrong, you can connect to the printer, but when connected you get the message 1 Commands Waiting as you can see on this image:
After that you can enter the other settings. The receive cache size is nearly always 127. If you get many communication errors while printing, you might need to go down to 63.
TCP/IP Connection
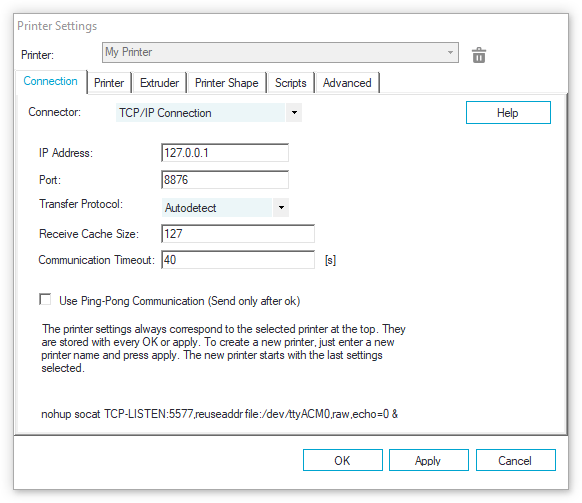
If you want to connect your printer via ethernet without Repetier-Server, what we recommend, you can choose TCP/IP Connection. This will send the same data as it would with serial connection. Except IP Address and Port, which must match your printer, the settigs are the same as for the serial connection.
Источник


