- Unity и «Помогаторы» для редактора
- Дебажим логами.
- Gizmos
- Handles.
- Attributes.
- Свой редактор уровней
- Управление отображением Гизмо и иконок
- Селектор иконок
- Отображение и скрытие иконок и Гизмо
- Работа с Gizmo Объектами.
- Gizmos
- Success!
- Submission failed
- Description
- Static Properties
- Static Methods
- Gizmos menu
- Gizmos and Icons
- Gizmos
- Icons
- Selection Outline and Selection Wire
- Selection Outline
- Selection Wire
- Selection colors
- Built-in components, scripts, and recently changed items
- Toggling icon visibility
- Changing script icons
- Toggling gizmo visibility
Unity и «Помогаторы» для редактора

В этой статье опишу несколько полезных возможностей и реализаций, которые мне помогли в разработке. Unity уже имеет множество методов чтобы не только «дебажить логами», но и расширять, дорисовывать необходимые данные в окне редактора. Если вы новичок в Unity или вам захотелось освежить знания – «Нужно брать!».
Дебажим логами.
Класс Debug позволяет выводить текст, ошибки, рисовать линии, ставить редактор на паузу и тд.
Рассмотрим пример.
Метод будет вызван когда противник будет в зоне видимости орудия. В нем, меш оружия повернется в его сторону, нарисует линию к нему. Как только это произойдет — редактор станет в паузу.
Gizmos
Gizmos используются для визуального дебага.
Рассмотрим пример.
Блоки, которые проходимы для врага, окрашиваются синими кубами, непроходимы – красными (заняты преградой) или серым (нет пути), финиш – голубой цвет. Если выделен элемент земли (мышкой в редакторе) – то зеленым подсвечиваются его соседи (в данном случае диагональные клетки соседями не считаются, система соседей используется для поиска пути).
Обратите внимание что Gizmos можно включать и отключать раздельно для каждого типа компонентов в окне Scene (вверху справа) — показано развернутым на первой картинке.
Handles.
Handles используют для отображения и управления объектами в окне сцены.
Вот пошаговый пример небольшого редактора для построения кривых: http://catlikecoding.com/unity/tutorials/curves-and-splines/
Если у вас не заработает OnSceneGUI в классе BezierSplineInspector то используйте реализацию через SceneView.onSceneGUIDelegate.
Благодаря этому расширению кролики летают по цикличным кривым. И все это красиво настраивается в редакторе.
Attributes.
Атрибуты помогут вам в совершенно разных ситуациях: украшать инспектор, организовывать меню, работать в runtime, обрабатывать компоненты. Их становится все больше, с каждой новой версией Unity. Атрибуты можно писать самостоятельно, вот несколько интересных примеров: https://github.com/Thundernerd
Приведу пример скрипта, который двигает вертексы меша, создавая простейшую имитацию волн. Тут представлены визуальные помощники, которые ограничивают значения некоторых переменных (Range), и показывают всплывающие подсказки (Tooltip). Так же можно настроить контекстное меню для свойства (ContextMenuItem).
Еще один часто применяемый мной прием связан с ContextMenu и ленью. Допустим, вы построили UI с 30 достижениями, они отображаются и скролятся как вы задумали. Вам необходимо заполнить List-ы в классе ссылками на них. Нужно 30 раз перетянуть названия, 30 раз описания и тд. Можно этот процесс автоматизировать.
Свой редактор уровней
Если ваша игра подразумевает структурированные, однотипные уровни в большом количестве (в моем примере это Tower Defence). То огромную кучу времени вам может сэкономить собственный редактор уровней.
Основной его задачей, считаю, показывать только необходимую информацию, множественные действия по нажатию на одну кнопку в инспекторе, подсказки, чтение / загрузку в дополнительные файлы.
Источник
Управление отображением Гизмо и иконок
Гизмо и иконки имеют несколько опций для уменьшения помех и улучшения четкости изображения сцены.
Селектор иконок
Вы можете легко установить ваши иконки для объектов и скриптов в сцене и инспекторе. Для изменения иконок для Объекта игры просто кликните на его иконке в Инспекторе. Иконки скриптов меняются аналогично. В селекторе иконок есть специальный сорт иконок, называемых Метка (Label Icon). Этот тип иконок отображается в сцене как текстовая метка, используя имя объекта. Иконки для встроенный компонентов не могут быть изменены.
Примечание: когда ассет иконки изменяется, ассет будет отмечен как модифицированный и т.о. будет подхвачен Системой Контроля версий.
Выбор иконки для объекта.
Выбор иконки для скрипта.
Отображение и скрытие иконок и Гизмо
Видимость Гизмо индивидуальных компонентов зависит от того развернут или свернут компонент в Инспекторе (свернутые компоненты не видимы). Однако Вы можете использовать выпадающее меню Гизмо для сворачивания и развертывания всех компонентов данного импа одновременно. Это полезно для уменьшения визуальных помех, когда в сцене большое число гизмо и иконок.
Чтобы увидеть состояние гизмо и иконок щелкните выпадающее меню Gizmos в баре окна. Переключатели используются для установки какие иконки и Гизмо видимы.
Заметим что скрипты которые показываются в этом меню должны иметь свою иконку или иметь реализованные функции OnDrawGizmos () или OnDrawGizmosSelected ().
Выпадающее меню Гизмо показывает состояние видимости гизмо и иконок.
Слайдер масштабирования иконок может быть использован для управления размером иконок в сцене. Если слайдер сдвинуть направо иконки всегда будут отображаться в обычном размере. Иначе иконки будут масштабироваться соответственно расстоянию до камеры сцены с ограничением максимального размера при маленьких расстояниях.
Источник
Работа с Gizmo Объектами.
Сегодня я расскажу что такое Gizmo объекты,для чего они нужны,как с ними работать и как они могут нам пригодится.
Начнем с того,что Gizmo объект-это меш,который создается в сцене,но не отображается в игре. Выглядит он так:

Геометрия меша создается с помощью встроенных методов в библиотеки UnityEngine. Цвет материала можно указать любой,на скриншоте видно что я объявил поле типа Color и выбрал зеленый цвет,а также увеличил значение в альфа канале(Это для того,что бы объект был виден). Теперь возникает вопрос:»А зачем этот объект нужен?»-,на самом деле нет какого-то основного предназначения для этого объекта,но лично я использую его для создания системы триггером,своим методом светофора. Есть три цвета: Зеленый,Желтый,Красный. Триггеры зеленого цвета активируют основные фичи игры,желтого цвета активируют побочные(второстепенные) фичи,красного цвета активируют различные мелочи(если хоррор,то скримеры или звуки).
Теперь приступим к созданию такого объекта. Вот примитивный пример:
Далее создаем обычный куб,удаляем MeshRenderer и MeshFilter,оставляем BoxCollider и кидаем на этот объект наш код. Потом настраиваем цвет и теперь у нас получилось тоже самое что на скриншоте 1.
Теперь я думаю нет особых затруднений сделать из этого триггер(кстати вы могли увидеть что альфа канал я не ставил на максимум,это сделано для того чтобы видеть сквозь них другие объекты). Первым делом ставим галочку в BoxCollider в поле Is Trigger. Далее просто вписываем в наш код эту часть:
Имя nameObject — это лишь поле типа string,чтобы мы могли вписать любое имя объекта(Очень удобно если нам нужно сделать несколько проверок на разные объекты с разным именем). Просто впишите public string nameObject; .Вот Самый примитивный пример использования Gizmos объекта как триггер(его очень удобно расставлять по локации). Кстати если вы работаете в 2D режиме,просто поставьте 0 в Z-координате в методе DrawCube и у триггера Z-ось в размере поставьте на 0.
В данном методе можно рисовать не только куб,но и сферу,фрустум,линию,меш и другое. И у каждого естественно свои параметры. Вот примитивный код линии:
Вот что получилось:

На этом все. Может напишу статью еще об одной очень крутой вещи как Handles.
Источник
Gizmos
class in UnityEngine
Success!
Thank you for helping us improve the quality of Unity Documentation. Although we cannot accept all submissions, we do read each suggested change from our users and will make updates where applicable.
Submission failed
For some reason your suggested change could not be submitted. Please try again in a few minutes. And thank you for taking the time to help us improve the quality of Unity Documentation.
Description
Gizmos are used to give visual debugging or setup aids in the Scene view.
All gizmo drawing has to be done in either OnDrawGizmos or OnDrawGizmosSelected functions of the script.
OnDrawGizmos is called every frame. All gizmos rendered within OnDrawGizmos are pickable. OnDrawGizmosSelected is called only if the object the script is attached to is selected.
Static Properties
| color | Sets the color for the gizmos that will be drawn next. |
| exposure | Set a texture that contains the exposure correction for LightProbe gizmos. The value is sampled from the red channel in the middle of the texture. |
| matrix | Sets the Matrix4x4 that the Unity Editor uses to draw Gizmos. |
| probeSize | Set a scale for Light Probe gizmos. This scale will be used to render the spherical harmonic preview spheres. |
Static Methods
| DrawCube | Draw a solid box with center and size. |
| DrawFrustum | Draw a camera frustum using the currently set Gizmos.matrix for it’s location and rotation. |
| DrawGUITexture | Draw a texture in the Scene. |
| DrawIcon | Draw an icon at a position in the Scene view. |
| DrawLine | Draws a line starting at from towards to. |
| DrawMesh | Draws a mesh. |
| DrawRay | Draws a ray starting at from to from + direction. |
| DrawSphere | Draws a solid sphere with center and radius. |
| DrawWireCube | Draw a wireframe box with center and size. |
| DrawWireMesh | Draws a wireframe mesh. |
| DrawWireSphere | Draws a wireframe sphere with center and radius. |
Is something described here not working as you expect it to? It might be a Known Issue. Please check with the Issue Tracker at issuetracker.unity3d.com.
Copyright ©2021 Unity Technologies. Publication Date: 2021-10-08.
Источник
Gizmos menu
The Scene view An interactive view into the world you are creating. You use the Scene View to select and position scenery, characters, cameras, lights, and all other types of Game Object. More info
See in Glossary and the Game view both have a Gizmos A graphic overlay associated with a GameObject in a Scene, and displayed in the Scene View. Built-in scene tools such as the move tool are Gizmos, and you can create custom Gizmos using textures or scripting. Some Gizmos are only drawn when the GameObject is selected, while other Gizmos are drawn by the Editor regardless of which GameObjects are selected. More info
See in Glossary menu. Click the Gizmos button in the toolbar A row of buttons and basic controls at the top of the Unity Editor that allows you to interact with the Editor in various ways (e.g. scaling, translation). More info
See in Glossary of the Scene A Scene contains the environments and menus of your game. Think of each unique Scene file as a unique level. In each Scene, you place your environments, obstacles, and decorations, essentially designing and building your game in pieces. More info
See in Glossary view or the Game view to access the Gizmos menu.
 The Gizmos button in the Scene view
 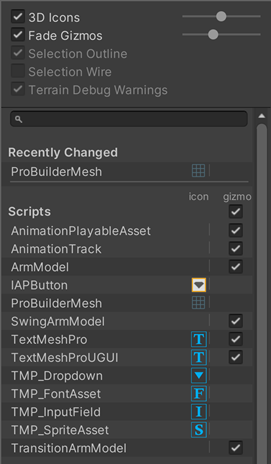 The Gizmos menu at the top of the Scene view and Game view window
| Property | Function |
|---|---|
| 3D Icons | The 3D Icons checkbox controls whether component icons (such as those for Lights and Cameras) are drawn by the Editor in 3D in the Scene view. When the 3D Icons checkbox is ticked, component icons are scaled by the Editor according to their distance from the Camera, and obscured by GameObjects in the Scene. Use the slider to control their apparent overall size. When the 3D Icons checkbox is not ticked, component icons are drawn at a fixed size, and are always drawn on top of any GameObjects in the Scene view. See Gizmos and Icons, below, for images and further information. |
| Selection Outline | Check Selection Outline to display selected GameObjects with a colored outline, and their children with a different colored outline. By default, Unity highlights the selected GameObject in orange, and child GameObjects in blue. NOTE: This option is only available in the Scene view Gizmos menu; you cannot enable it in the Game view Gizmos menu. See Selection Outline and Selection Wire, below, for images and further information. |
| Selection Wire | Check Selection Wire to show the selected GameObjects with their wireframe Mesh visible. To change the colour of the Selection Wire, go to Unity > Preferences (macOS) or Edit > Preferences__ (Windows), select Colors, and alter the Selected Wireframe setting. This option is only available in the Scene view Gizmos menu; you cannot enable it in the Game view Gizmos menu. See Selection Outline and Selection Wire, below, for images and further information. |
| Recently Changed | Controls the visibility of the icons and gizmos for components and scripts that you modified recently. This section appears the first time you change one or more items, and updates after subsequent changes. For more information, see Built-in components, scripts, and recently changed items, below. |
| Scripts | Controls the visibility of the icons and gizmos for scripts in the Scene. This section appears only when your Scene uses scripts that meet specific criteria. See Built-in components, scripts, and recently changed items, below, for further information. |
| Built-in Components | Controls the visibility of the icons and gizmos for all component types that have an icon or gizmo. See Built-in components, scripts, and recently changed items, below, for further information. |
Gizmos and Icons
Gizmos
Gizmos are graphics associated with GameObjects The fundamental object in Unity scenes, which can represent characters, props, scenery, cameras, waypoints, and more. A GameObject’s functionality is defined by the Components attached to it. More info
See in Glossary in the Scene. Some Gizmos are only drawn when the GameObject is selected, while other Gizmos are drawn by the Editor regardless of which GameObjects are selected. They are usually wireframes, drawn with code rather than bitmap graphics, and can be interactive. The Camera A component which creates an image of a particular viewpoint in your scene. The output is either drawn to the screen or captured as a texture. More info
See in Glossary Gizmo and Light direction Gizmo (shown below) are both examples of built-in Gizmos; you can also create your own Gizmos using script. See documentation on Understanding Frustum for more information about the Camera.
Some Gizmos are passive graphical overlays, shown for reference (such as the Light direction Gizmo, which shows the direction of the light). Other Gizmos are interactive, such as the AudioSource spherical range Gizmo, which you can click and drag to adjust the maximum range of the AudioSource.
The Move, Scale, Rotate and Transform tools are also interactive Gizmos. See documentation on Positioning GameObjects to learn more about these tools.
The Camera Gizmo and a Light Gizmo. These Gizmos are only visible when they are selected.
See the Script Reference page for the OnDrawGizmos function for further information about implementing custom Gizmos in your scripts A piece of code that allows you to create your own Components, trigger game events, modify Component properties over time and respond to user input in any way you like. More info
See in Glossary .
Icons
You can display icons in the Game view or Scene view. They are flat, billboard-style overlays which you can use to clearly indicate a GameObject’s position while you work on your game. The Camera icon and Light icon are examples of built-in icons; you can also assign your own to GameObjects or individual scripts (see documentation on Assigning Icons to lean how to do this).
 The built-in icons for a Camera and a Light Left: icons in 3D mode. Right: icons in 2D mode.
Selection Outline and Selection Wire
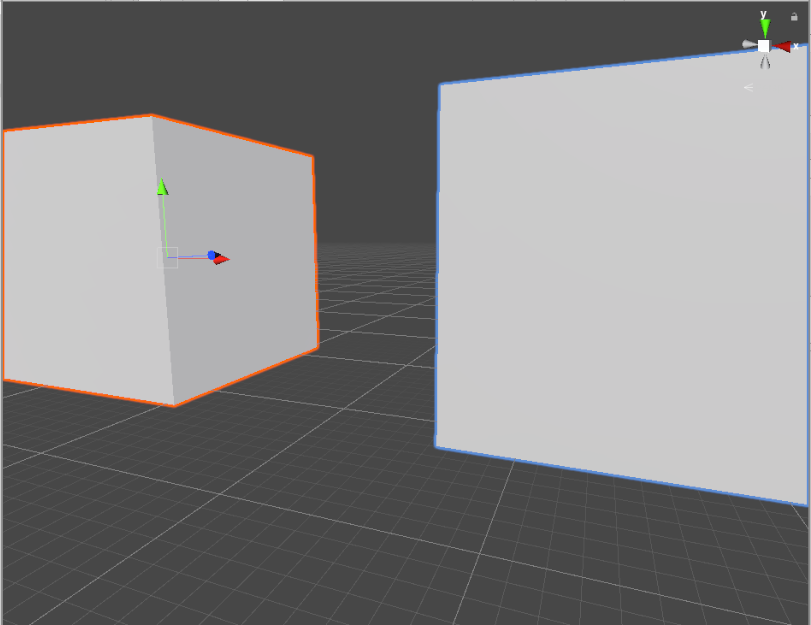
Selection Outline
When Selection Outline is enabled, an outline appears around selected GameObjects and their child GameObjects. By default, Unity outlines selected GameObjects in orange, and child GameObjects in blue. You can change these colors in the Unity preferences (see Selection Colors, below).
 Selecting a GameObject (the far left box) outlines it in orange, and outlines its child GameObjects (the middle and right boxes) in blue.
When you select a GameObject, Unity outlines all of its child GameObjects (and their child GameObjects, and so on), but does not outline parent GameObjects (or their parent GameObjects, and so on).
 Selecting the middle box highlights it in orange, and highlights its child GameObject (the far right box) in blue, but does not highlight its parent GameObject (the far left box).
If selected GameObjects extend beyond the edges of the Scene view, the selection outline runs along the edge of the window:
Selection Wire
When Selection Wire is enabled, then when you select a GameObject in the Scene view or Hierarchy window, the wireframe Mesh The main graphics primitive of Unity. Meshes make up a large part of your 3D worlds. Unity supports triangulated or Quadrangulated polygon meshes. Nurbs, Nurms, Subdiv surfaces must be converted to polygons. More info
See in Glossary for that GameObject is made visible in the Scene view:

Selection colors
You can set custom colors for selection wireframes.
- Go to Unity >Preferences (macOS) or Edit > Preferences__ (Windows) to open the Preferences editor.
- On the colors tab, change one or more of the following colors:
- (A) Selected Children Outline: outline color for selected GameObjects’ children.
- (B) Selected Outline: outline color for selected GameObjects.
- (C) Wireframe Selected: outline color for selected GameObjects’ wireframes.

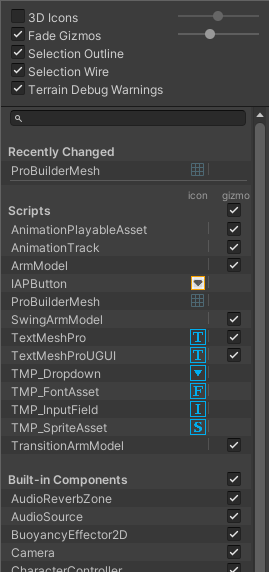
Built-in components, scripts, and recently changed items
Use the list in the Gizmos menu to control the visibility of icons and gizmos for various components. The list is divided into sections:
 The Gizmos menu, displaying items with custom icons and some recently modified items
A. The Recently Changed section controls the visibility of the icons and gizmos for items that you’ve modified recently. It appears the first time you change one or more items. Unity updates the list after subsequent changes.
B. The Scripts section controls the visibility of the icons and gizmos for scripts that:
Have an icon assigned to them (see documentation on Assigning icons).
Implement the OnDrawGizmos function.
This section appears when your Scene contains one or more scripts that meet the above criteria.
C. The Built-in Components section controls the visibility of the icons and gizmos for all component types that have an icon or gizmo.
Built-in component types that do not have an icon or gizmo shown in the Scene view (for example, Rigidbody) are not listed here.
Toggling icon visibility
The icon column shows or hides the icons for each component type. Full-color icons are displayed in the main Scene view window, faded icons are not.
The Light icon is faded, indicating that the Editor does not display light icons in the Scene view. The Camera icon is full-color, indicating that the Editor does display camera icons in the Scene view.
To toggle an icon’s visibility in the Scene view, click any icon in the icon column.
Note: If an item in the list has a gizmo but no icon, the icon column for that item is empty.
Changing script icons
Scripts with custom icons show a small drop-down menu arrow in the icon column. To change a custom icon, click the arrow to open the Select Icon menu.
Toggling gizmo visibility
To control whether the Editor draws gizmo graphics for a particular component type (for example, a Collider’s wireframe gizmo or a Camera’s view frustum gizmo) or script, use the checkboxes in the Gizmo column.
When a checkbox is checked, the Editor draws gizmos for that component type.
When a checkbox is cleared, the Editor does not draw gizmos for that component type.
Note: If an item in the list has an icon but no gizmo, the Gizmo column for that item is empty.
To toggle gizmo visibility for an entire section (all Built-in Components, all Scripts, and so on), use the checkboxes next to the section names.
 The Built-in Components checkbox toggles gizmo visibility for every type of component listed in that section
When the checkbox is toggled on, gizmo visibility is toggled on for one or more item types in the section.

Selection outline for child GameObjects added in 2018.3 NewIn20183
Gizmo menu option to toggle Gizmo visibility for all components in a section added in 2019.1 NewIn20191
Источник


