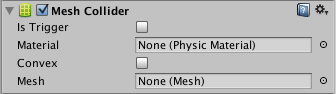
Меш-коллайдер (Mesh Collider)
Mesh Collider использует меш ассет для создания под него коллайдера на основе этого меша. Это гораздо удобнее, чем использовать примитивы для определения столкновений сложных мешей. Меш коллайдеры, которые помечены как Convex могут взаимодействовать (сталкиваться) с другими меш коллайдерами.
Свойства
| Свойство: | Функция: |
|---|---|
| Is Trigger | Если включён, то этот коллайдер будет игнорироваться физическим движком и использоваться для запуска событий. |
| Material | Ссылка на физический материал, который определяет, как данный коллайдер взаимодействует с другими. |
| Mesh | Ссылка на меш, используемый для столкновений. |
| Convex | При включении, текущий меш коллайдер будет взаимодействовать с другими меш коллайдерами. Выпуклые (Convex) меш коллайдеры ограничены 255 треугольниками. |
Детали
The Mesh Collider builds its collision representation from the Mesh attached to the GameObject, and reads the properties of the attached Transform to set its position and scale correctly. The benefit of this is that the shape of the collider can be exactly the same as the shape of the visible mesh for the object, resulting in more precise and authentic collisions. However, this precision comes with a higher processing overhead than collisions involving primitive colliders (sphere, box, capsule) and so it is best to use Mesh Colliders sparingly.
Меши, служащие для расчёта столкновений, используют отсечение невидимых поверхностей. Если объект столкнётся с таким мешем визуально, то он также столкнётся с ним и физически.
Есть кое-какие ограничения в использовании меш коллайдеров. Обычно два меш коллайдера не могут столкнуться друг с другом. Все меш коллайдеры могут сталкиваться с примитивными коллайдерами. Если ваш меш помечен как Convex , то он сможет сталкиваться с другими меш коллайдерами.
Note that versions of Unity before 5.0 had a Smooth Sphere Collisions property for the Mesh Collider in order to improve interactions between meshes and spheres. This property is now obsolete since the smooth interaction is standard behaviour for the physics engine and there is no particular advantage in switching it off.
Источник
Mesh Collider
The Mesh Collider takes a Mesh Asset and builds its Collider based on that Mesh. It is more accurate for collision detection An automatic process performed by Unity which determines whether a moving GameObject with a Rigidbody and collider component has come into contact with any other colliders. More info
See in Glossary than using primitives for complicated Meshes. Mesh Colliders An invisible shape that is used to handle physical collisions for an object. A collider doesn’t need to be exactly the same shape as the object’s mesh — a rough approximation is often more efficient and indistinguishable in gameplay. More info
See in Glossary that are marked as Convex can collide with other Mesh Colliders.

Properties
| Property | Function | |
|---|---|---|
| Convex | Enable the checkbox to make the Mesh Collider collide with other Mesh Colliders. Convex Mesh Colliders are limited to 255 triangles. | |
| Is Trigger | Enable this checkbox to make Unity use this Collider for triggering events, and the physics engine A system that simulates aspects of physical systems so that objects can accelerate correctly and be affected by collisions, gravity and other forces. More info See in Glossary ignore it. | |
| Cooking Options | Enable or disable the Mesh cooking options that affect how the physics engine processes Meshes. | |
| None | Disables all of the Cooking Options listed below. | |
| Everything | Enables all of the Cooking Options listed below. | |
| Cook for Faster Simulation | Makes the physics engine cook Meshes for faster simulation. When enabled, this runs some extra steps to guarantee the resulting Mesh is optimal for run-time performance. This affects the performance of the physics queries and contacts generation. When this setting is disabled, the physics engine uses a faster cooking time instead, and produces results as fast as possible. Consequently, the cooked Mesh Collider might not be optimal. | |
| Enable Mesh Cleaning | Makes the physics engine clean Meshes. When enabled, the cooking process tries to eliminate degenerate triangles of the Mesh, as well as other geometrical artifacts. This results in a Mesh that is better suited for use in collision A collision occurs when the physics engine detects that the colliders of two GameObjects make contact or overlap, when at least one has a Rigidbody component and is in motion. More info See in Glossary detection and tends to produce more accurate hit points. | |
| Weld Colocated Vertices | Makes the physics engine remove equal vertices in the Meshes. When enabled, the physics engine combines the vertices that have the same position. This is important for the collision feedback that happens at run time. | |
| Use Fast Midphase | Makes the physics engine use the fastest mid-phase acceleration structure and algorithm available for your output platform. When you enable this option, the physics engine uses a faster algorithm that doesn’t require any R-Trees for spatial access. If you encounter mid-phase issues at runtime on some platform, you can still disable this option to use the slower legacy mid-phase algorithm instead. | |
| Material An asset that defines how a surface should be rendered. More info See in Glossary | Reference to the Physics Material that determines how this Collider interacts with others. | |
| Mesh The main graphics primitive of Unity. Meshes make up a large part of your 3D worlds. Unity supports triangulated or Quadrangulated polygon meshes. Nurbs, Nurms, Subdiv surfaces must be converted to polygons. More info See in Glossary | Reference to the Mesh to use for collisions. | |
Details
The Mesh Collider builds its collision representation from the Mesh attached to the GameObject The fundamental object in Unity scenes, which can represent characters, props, scenery, cameras, waypoints, and more. A GameObject’s functionality is defined by the Components attached to it. More info
See in Glossary , and reads the properties of the attached Transform to set its position and scale correctly. The benefit of this is that you can make the shape of the Collider exactly the same as the shape of the visible Mesh for the GameObject, which creates more precise and authentic collisions. However, this precision comes with a higher processing overhead than collisions involving primitive colliders (such as Sphere, Box, and Capsule), so it is best to use Mesh Colliders sparingly.
Faces in collision meshes are one-sided. This means GameObjects can pass through them from one direction, but collide with them from the other.
Details about underlying algorithms and data structures used by mesh colliders can be found at PhysX documentation.
Mesh cooking
Mesh cooking changes a normal Mesh into a Mesh that you can use in the physics engine. Cooking builds the spatial search structures for the physics queries, such as Physics.Raycast, as well as supporting structures for the contacts generation. Unity cooks all Meshes before using them in collision detection. This can happen at import time (Import Settings > Model > Generate Colliders) or at run time.
When you generate Meshes at run time (for example, for procedural surfaces), it’s useful to set the Cooking Options to produce results faster, and disable the additional data cleaning steps of cleaning. The downside is that you need to generate no degenerate triangles and no co-located vertices, but the cooking works faster.
If you disable Enable Mesh Cleaning or Weld Colocated Vertices, you need to ensure you aren’t using data that those algorithms would otherwise filter. Make sure you don’t have any co-located vertices if you have disabled Weld Colocated Vertices, and when you enable Enable Mesh Cleaning, make sure there are no tiny triangles whose area is close to zero, no thin triangles, and no huge triangles whose area is close to infinity.
Note: When you set the Cooking Options to any other value than the default settings, it means the Mesh Collider must use a Mesh that has an isReadable value of true .
Limitations
There are some limitations when using the Mesh Collider:
GameObjects that have a Rigidbody A component that allows a GameObject to be affected by simulated gravity and other forces. More info
See in Glossary component only support Mesh Colliders that have Convex option enabled: the physics engine can only simulate convex mesh colliders.
For a Mesh Collider to work properly, the Mesh must be read/write enabled in any of these circumstances:
- The Mesh Collider’s Transform has negative scaling (for example, (–1, 1, 1)) and the Mesh is convex.
- The Mesh Collider’s transform is skewed or sheared (for example, when a rotated transform has a scaled parent transform).
- The Mesh Collider’s Cooking Options flags are set to any value other than the default.
You should not modify mesh geometry that is used for colliders because the physics engine has to rebuild an internal mesh collision acceleration structure every time you change the mesh. This causes a substantial performance overhead. For meshes that need to collide and change at runtime, it is often better to approximate the mesh shape with primitive colliders like capsules, spheres and boxes.
Optimization tip: If a Mesh Collider only uses a Mesh, you can disable Normals The direction perpendicular to the surface of a mesh, represented by a Vector. Unity uses normals to determine object orientation and apply shading. More info
See in Glossary in Import Settings, because the physics system doesn’t need them.
Updated Mesh Collider limitations in 2018.3
2018–10–12 Page amended
Mesh Cooking Options added in 2017.3 NewIn20173
Updated functionality in 2018.1
Updated limitations relating to read/write enabled setting in 2017.3
Inflate Convex Mesh deprecated in 2018.3 because the new convex hull computation algorithm (Quickhull) is more tolerant towards imperfections in the input mesh.
Источник
Особенности работы с Mesh в Unity
Компьютерная графика, как известно, является основой игровой индустрии. В процессе создания графического контента мы неизбежно сталкиваемся с трудностями, связанными с разницей его представления в среде создания и в приложении. К этим трудностям прибавляются риски простой человеческой невнимательности. Учитывая масштабы разработки игр, такие проблемы возникают либо часто, либо в больших количествах.
Борьба с подобными трудностями навела нас на мысли об автоматизации и написании статей на эту тему. Большая часть материала коснется работы с Unity 3D, поскольку это основное средство разработки в Plarium Krasnodar. Здесь и далее в качестве графического контента будут рассматриваться 3D-модели и текстуры.
В этой статье мы поговорим об особенностях доступа к данным представления 3D-объектов в Unity. Материал будет полезен в первую очередь новичкам, а также тем разработчикам, которые нечасто взаимодействуют с внутренним представлением таких моделей.

О 3D-моделях в Unity — для самых маленьких

При стандартном подходе в Unity для рендеринга модели используются компоненты MeshFilter и MeshRenderer. MeshFilter ссылается на Mesh — ассет, который представляет модель. Для большинства шейдеров информация о геометрии является обязательной минимальной составляющей для отрисовки модели на экране. Данные же о текстурной развертке и костях анимации могут отсутствовать, если они не задействованы. Каким образом этот класс реализован внутри и как все там хранится, является тайной за энную сумму денег семью печатями.
Снаружи меш как объект предоставляет доступ к следующим наборам данных:
- vertices — набор позиций вершин геометрии в трехмерном пространстве с собственным началом координат;
- normals, tangents — наборы векторов-нормалей и касательных к вершинам, которые обычно используются для расчета освещения;
- uv, uv2, uv3, uv4, uv5, uv6, uv7, uv8 — наборы координат для текстурной развертки;
- colors, colors32 — наборы значений цвета вершин, хрестоматийным примером использования которых является смешивание текстур по маске;
- bindposes — наборы матриц для позиционирования вершин относительно костей;
- boneWeights — коэффициенты влияния костей на вершины;
- triangles — набор индексов вершин, обрабатываемых по 3 за раз; каждая такая тройка представляет полигон (в данном случае треугольник) модели.
Доступ к информации о вершинах и полигонах реализован через соответствующие свойства (properties), каждое из которых возвращает массив структур. Человеку, который не читает документацию редко работает с мешами в Unity, может быть неочевидно, что всякий раз при обращении к данным вершины в памяти создается копия соответствующего набора в виде массива с длиной, равной количеству вершин. Этот нюанс рассмотрен в небольшом блоке документации. Также об этом предупреждают комментарии к свойствам класса Mesh, о которых говорилось выше. Причиной такого поведения является архитектурная особенность Unity в контексте среды исполнения Mono. Схематично это можно изобразить так:
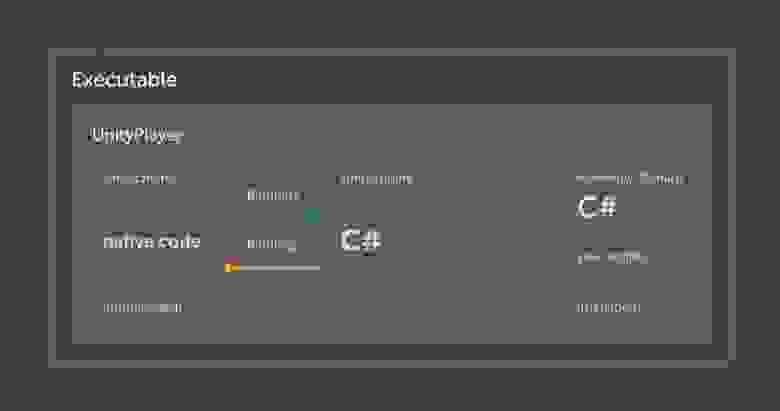
Ядро движка (UnityEngine (native)) изолировано от скриптов разработчика, и обращение к его функционалу реализовано через библиотеку UnityEngine (C#). Фактически она является адаптером, поскольку большинство методов служат прослойкой для получения данных от ядра. При этом ядро и вся остальная часть, в том числе ваши скрипты, крутятся под разными процессами и скриптовая часть знает только список команд. Таким образом, прямой доступ к используемой ядром памяти из скрипта отсутствует.
О доступе к внутренним данным, или Насколько все может быть плохо
Для демонстрации того, насколько все может быть плохо, проанализируем объем очищаемой памяти Garbage Collector’ом на примере из документации. Для простоты профилирования завернем аналогичный код в Update метод.
Мы прогнали данный скрипт со стандартным примитивом — сферой (515 вершин). При помощи инструмента Profiler, во вкладке Memory можно посмотреть, сколько памяти было помечено для очистки сборщиком мусора в каждом из кадров. На нашей рабочей машине это значение составило
Это довольно много даже для нагруженного приложения, а мы здесь запустили сцену с одним объектом, на который навешен простейший скрипт.
Важно упомянуть об особенности компилятора .Net и об оптимизации кода. Пройдясь по цепочке вызовов, можно обнаружить, что обращение к Mesh.vertices влечет за собой вызов extern метода движка. Это не позволяет компилятору оптимизировать код внутри нашего Update() метода, несмотря на то, что DoSomething() пустой и переменные x, y, z по этой причине являются неиспользуемыми.
Теперь закешируем массив позиций на старте.
В среднем 6 Кб. Другое дело!
Такая особенность стала одной из причин, по которой нам пришлось реализовать собственную структуру для хранения и обработки данных меша.
Как это делаем мы
За время работы над крупными проектами возникла идея сделать инструмент для анализа и редактирования импортируемого графического контента. О самих методах анализа и трансформации поговорим в следующих статьях. Сейчас же рассмотрим структуру данных, которую мы решили написать для удобства реализации алгоритмов с учетом особенностей доступа к информации о меше.
Изначально эта структура выглядела так:

Здесь класс CustomMesh представляет, собственно, меш. Отдельно в виде Utility мы реализовали конвертацию из UntiyEngine.Mesh и обратно. Меш определяется своим массивом треугольников. Каждый треугольник содержит ровно три ребра, которые в свою очередь определены двумя вершинами. Мы решили добавить в вершины только ту информацию, которая нам необходима для анализа, а именно: позицию, нормаль, два канала текстурной развертки (uv0 для основной текстуры, uv2 для освещения) и цвет.
Спустя некоторое время возникла необходимость обращения вверх по иерархии. Например, чтобы узнать у треугольника, какому мешу он принадлежит. Помимо этого, обращение вниз из CustomMesh в Vertex выглядело вычурно, а необоснованный и значительный объем дублированных значений действовал на нервы. По этим причинам структуру пришлось переработать.

В CustomMeshPool реализованы методы для удобного управления и доступа ко всем обрабатываемым CustomMesh. За счет поля MeshId в каждой из сущностей имеется доступ к информации всего меша. Такая структура данных удовлетворяет требованиям к первоначальным задачам. Ее несложно расширить, добавив соответствующий набор данных в CustomMesh и необходимые методы — в Vertex.
Стоит отметить, что такой подход не оптимален по производительности. В то же время большинство реализованных нами алгоритмов ориентированы на анализ контента в редакторе Unity, из-за чего не приходится часто задумываться об объемах используемой памяти. По этой причине мы кешируем буквально все что можно. Реализованный алгоритм мы сначала тестируем, а затем рефакторим его методы и в некоторых случаях упрощаем структуры данных для оптимизации времени выполнения.
На этом пока все. В следующей статье мы расскажем о том, как редактировать уже внесенные в проект 3D-модели, и воспользуемся рассмотренной структурой данных.
Источник


